
Workbook loyalty rewards Guide
Unlock a polished loyalty program experience tailored for your Shopify store. Use this guide to configure settings, manage customers, set up rewards, and launch quickly with confidence.
Introduction
Welcome to the Workbook loyalty rewards documentation. This guide helps you configure your loyalty program, manage customer rewards, track analytics, and understand every feature available in the app—designed to help you build customer loyalty and drive repeat purchases.
The Workbook loyalty rewards app powers customer retention through points-based rewards, referral programs, VIP tiers, and comprehensive analytics to help you understand your customers’ behavior and optimize your loyalty strategy.
Main Landing Page
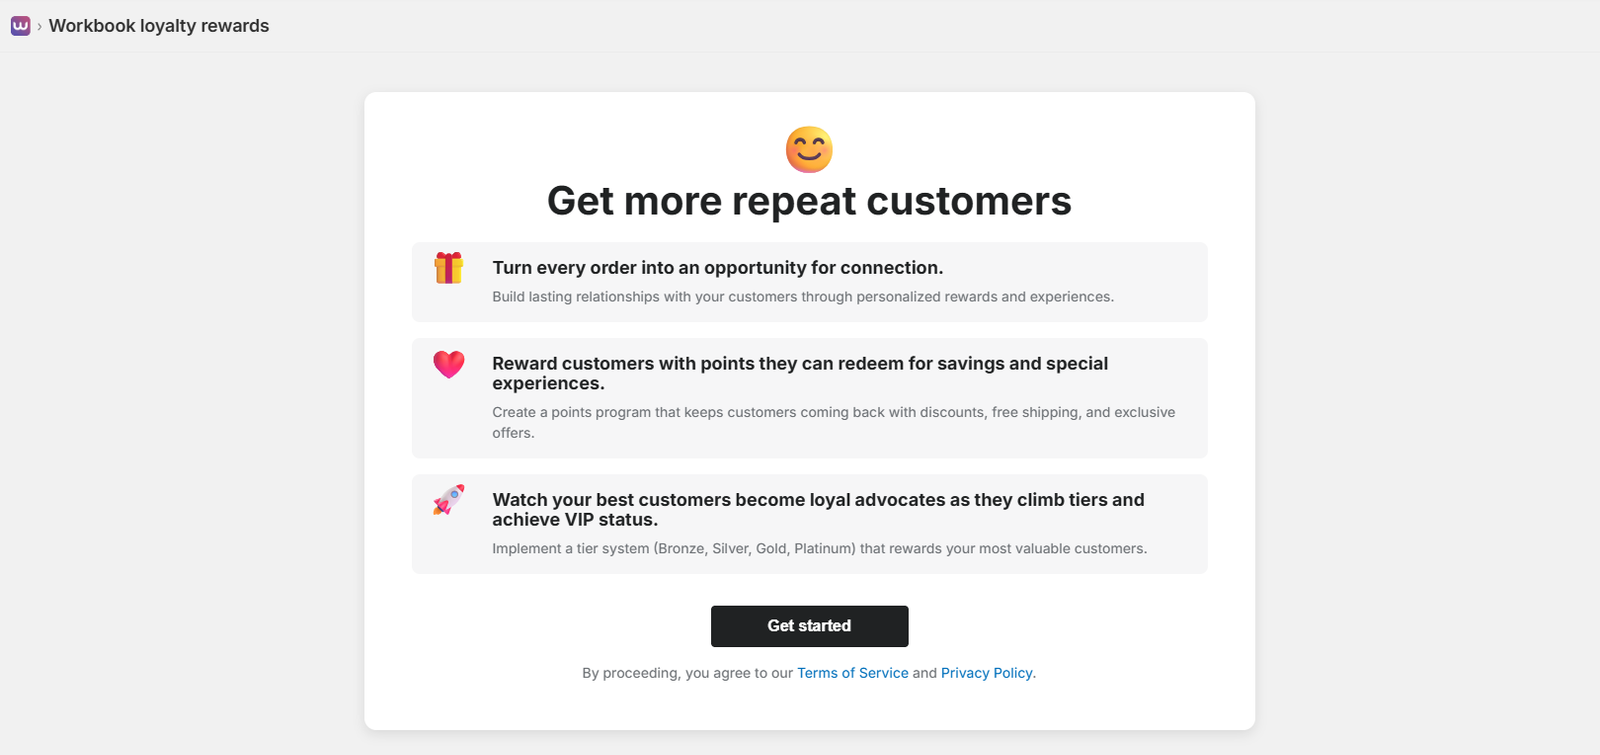
When you first access Workbook loyalty rewards, you’ll see the main landing page with the heading “Get more repeat customers”. This page introduces the three core benefits of the loyalty program:
- Turn every order into an opportunity for connection: Build lasting relationships with your customers through personalized rewards and experiences.
- Reward customers with points they can redeem for savings and special experiences: Create a points program that keeps customers coming back with discounts, free shipping, and exclusive offers.
- Watch your best customers become loyal advocates as they climb tiers and achieve VIP status: Implement a tier system (Bronze, Silver, Gold, Platinum) that rewards your most valuable customers.
The page includes a “Get started” button to begin the setup process, along with links to Terms of Service and Privacy Policy at the bottom.
Key Benefits
- Turn every order into an opportunity for connection: Build lasting relationships with your customers through personalized rewards and experiences.
- Reward customers with points: Create a points program that keeps customers coming back with discounts, free shipping, and exclusive offers.
- Watch customers become loyal advocates: Implement a tier system (Bronze, Silver, Gold, Platinum) that rewards your most valuable customers.
App Overview
The Workbook loyalty rewards app enables you to create a comprehensive loyalty system for your Shopify store with an emphasis on customer engagement, reward redemption, and data-driven insights.
Key Features
- Points Program: Customers earn points for purchases, signups, and referrals
- Reward Redemption: Create discounts, free shipping, and product rewards
- VIP Tiers: Bronze, Silver, Gold, and Platinum tiers with customizable thresholds
- Referral Program: Reward customers for bringing in new shoppers
- Analytics Dashboard: Track loyalty metrics, customer behavior, and program performance
- On-site Integration: Floating launcher, loyalty hub, and checkout integration
- Email Customization: Branded email templates for points earned, rewards redeemed, and more
Dashboard
The Dashboard provides an overview of your loyalty program’s performance with key metrics and quick access to common actions.
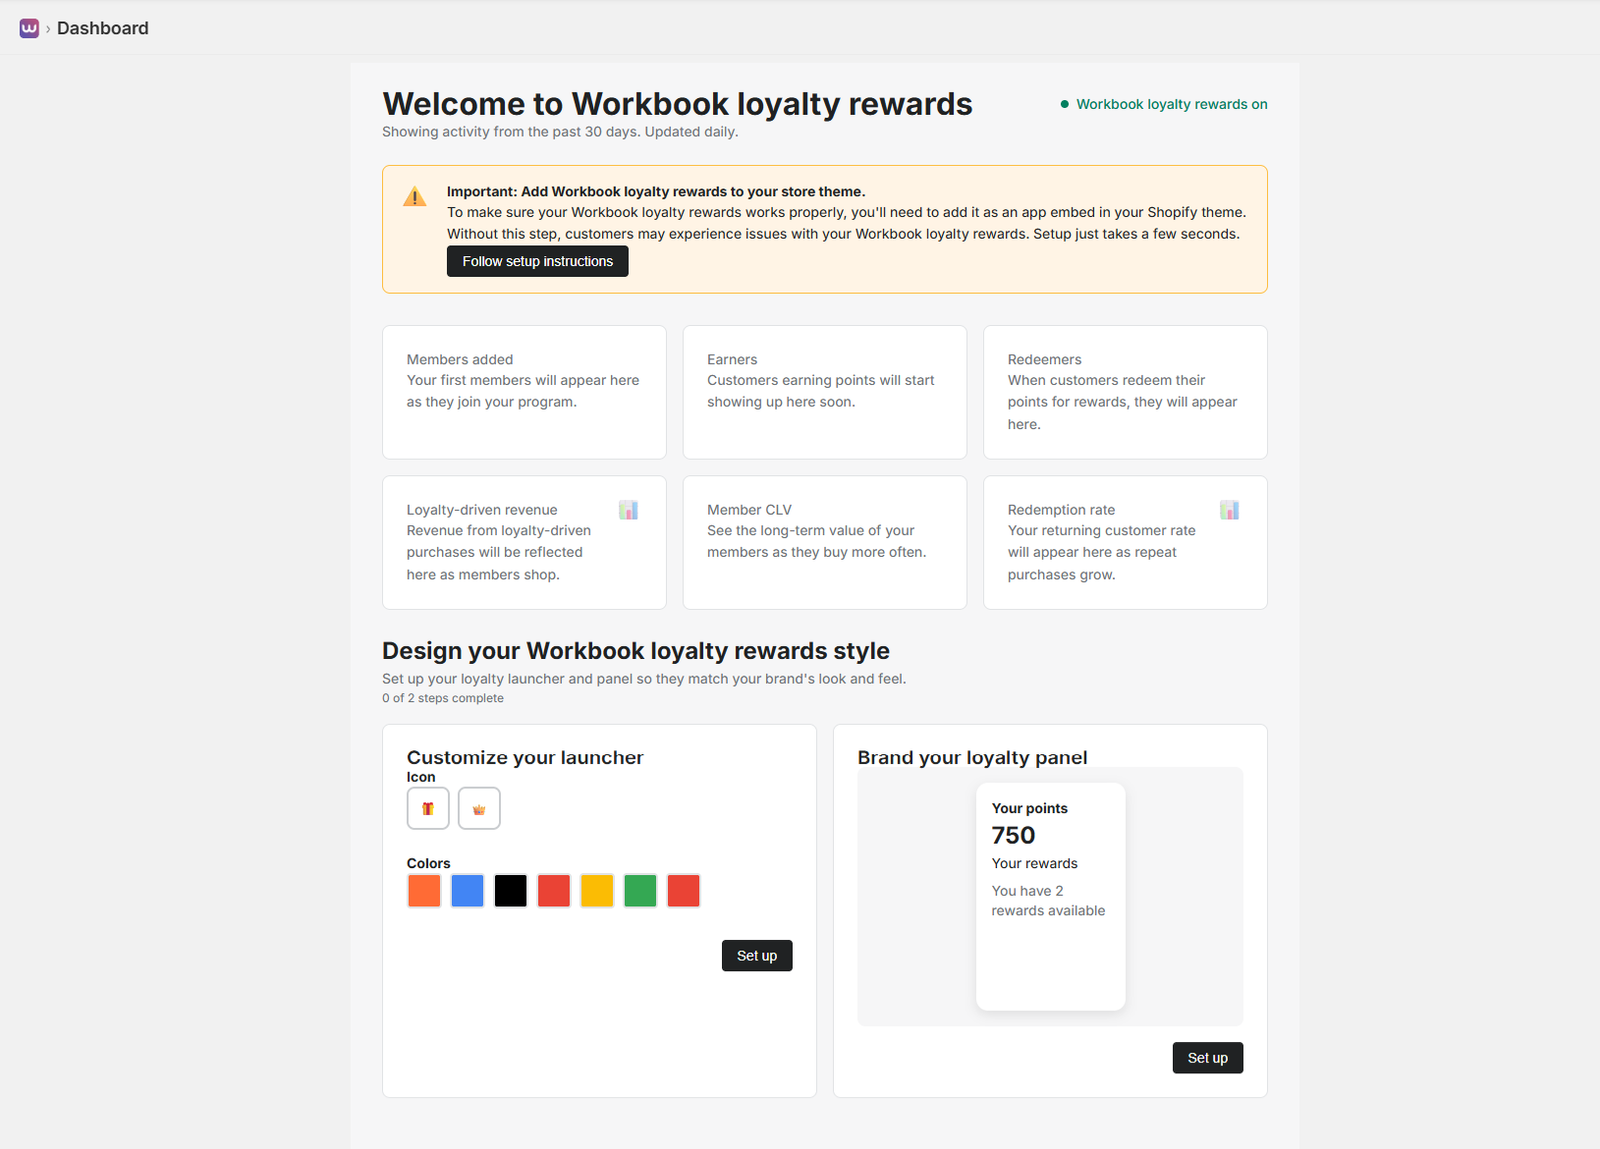
Key Metrics
- Members Added: Total number of customers enrolled in your loyalty program
- Earners: Customers who have earned points
- Redeemers: Customers who have redeemed rewards
- Loyalty Revenue: Revenue generated from loyalty-driven purchases
- Member CLV: Customer Lifetime Value for loyalty members
- Redemption Rate: Percentage of points redeemed vs. earned
Quick Actions
From the Dashboard, you can quickly access:
- View and manage loyalty customers
- Create new rewards
- Configure program settings
- View analytics reports
Setup Reminders
The Dashboard will show important setup reminders, such as:
- Adding the loyalty program to your store theme
- Customizing your launcher and panel design
- Creating your first reward
Dashboard Welcome Section
When you first access the Dashboard, you’ll see:
- Welcome Message: “Welcome to Workbook loyalty rewards” with activity summary showing data from the past 30 days
- Program Status: A green indicator showing “Workbook loyalty rewards on” when the program is active, or “off” when deactivated
- Important Alert: A yellow alert box reminding you to add Workbook loyalty rewards to your store theme for proper functionality
Design Customization Section
The Dashboard includes a “Design your Workbook loyalty rewards style” section that helps you customize:
- Customize Your Launcher: Choose an icon (gift box, crown, or custom) and select colors to match your brand
- Brand Your Loyalty Panel: Preview how your loyalty panel will appear to customers with their points balance and available rewards
This section shows “0 of 2 steps complete” to track your setup progress. You can customize the launcher icon, colors, and panel appearance to match your store’s branding.
Program Settings – Points
Configure your loyalty program’s core settings including points earning rates, tier thresholds, and program activation.

Earn Points
Create ways your customers can earn points when they join, share, and engage with your brand. The most common way is “Place an order” where customers earn points based on their purchase amount (e.g., 10 points for every $1 spent).
Points Per Dollar Configuration
In the Points section, you’ll see an “Earn Points” area with a description and an “Add ways to earn” button. The “Ways to earn” configuration panel allows you to set:
- Points per dollar: A text input field where you can enter the number (e.g., “10” points per dollar)
- Example calculation: The system automatically shows an example: “If a customer spends $100, they will earn 1000 points” (based on your configured rate)
Use the “Save” button to apply your changes or “Cancel” to discard them. You can adjust this rate based on your profit margins and reward strategy.
You can add multiple ways to earn points, such as:
- Signing up for the program
- Making a purchase
- Writing a review
- Following on social media
- Birthday bonuses
Redeem Points
Create rewards your customers can redeem with the points they’ve earned. In the Points section, you’ll see a “Redeem Points” area with a description and an “Add ways to redeem” button.
When no rewards are configured yet, the system displays “No rewards configured yet” in the redeem section. Rewards can include:
- Discount coupons (percentage or fixed amount)
- Free shipping
- Free products
- Gift cards
Click “Add ways to redeem” to create your first reward and configure redemption options.
Points Branding
Name your points currency to match your brand. In the Points Branding section, you’ll see a “Points currency” configuration area with an “Edit” button.
You can customize:
- Plural form: e.g., “Points”, “Coins”, “Stars” (displayed as “Plural: [your term]”)
- Singular form: e.g., “Point”, “Coin”, “Star” (displayed as “Singular: [your term]”)
The page provides tips for naming your points currency to match your brand. This helps make your loyalty program feel more integrated with your brand identity.
Points Expiry
Manage when customers’ points expire. In the Points Expiry section, you’ll see a “Get points expiry” feature description explaining: “Drive customers to make a purchase by expiring their rewards after a specific amount of time has elapsed.”
Expiring points is an effective way to re-engage customers who haven’t shopped with you in a while. This feature is available on Growth and Plus plans.
If you’re on a Free or Starter plan, you’ll see an “Upgrade to Growth” button to access this feature. You can set points to expire after a specific time period (e.g., 12 months) to encourage customers to use their points regularly.
Points Status
In the Points Status section, you can see whether your program is currently active. The page displays “Your program is currently active” when the program is running.
You can activate or deactivate your points program at any time using the “Deactivate” button. When active, customers can earn and redeem points. When deactivated, the program is paused but customer data is preserved.
The Points section also shows an “Active” badge next to the main “Points” heading, indicating the current status of your loyalty program.
General Settings
- Points per Dollar: Set how many points customers earn per dollar spent
- Points per Order: Bonus points awarded with each order
- Signup Points: Points awarded when customers join the program
- Program Name: Customize the name of your loyalty program
- Brand Colors: Set brand color and icon/text colors for on-site elements
VIP Tier Thresholds
Configure the points or spending thresholds for each VIP tier:
- Bronze: Default tier (0 points)
- Silver: Customizable threshold (default: 2,000 points)
- Gold: Customizable threshold (default: 5,000 points)
- Platinum: Customizable threshold (default: 10,000 points)
Customers
Manage your loyalty program members, view their points balance, transaction history, and manually adjust points when needed.
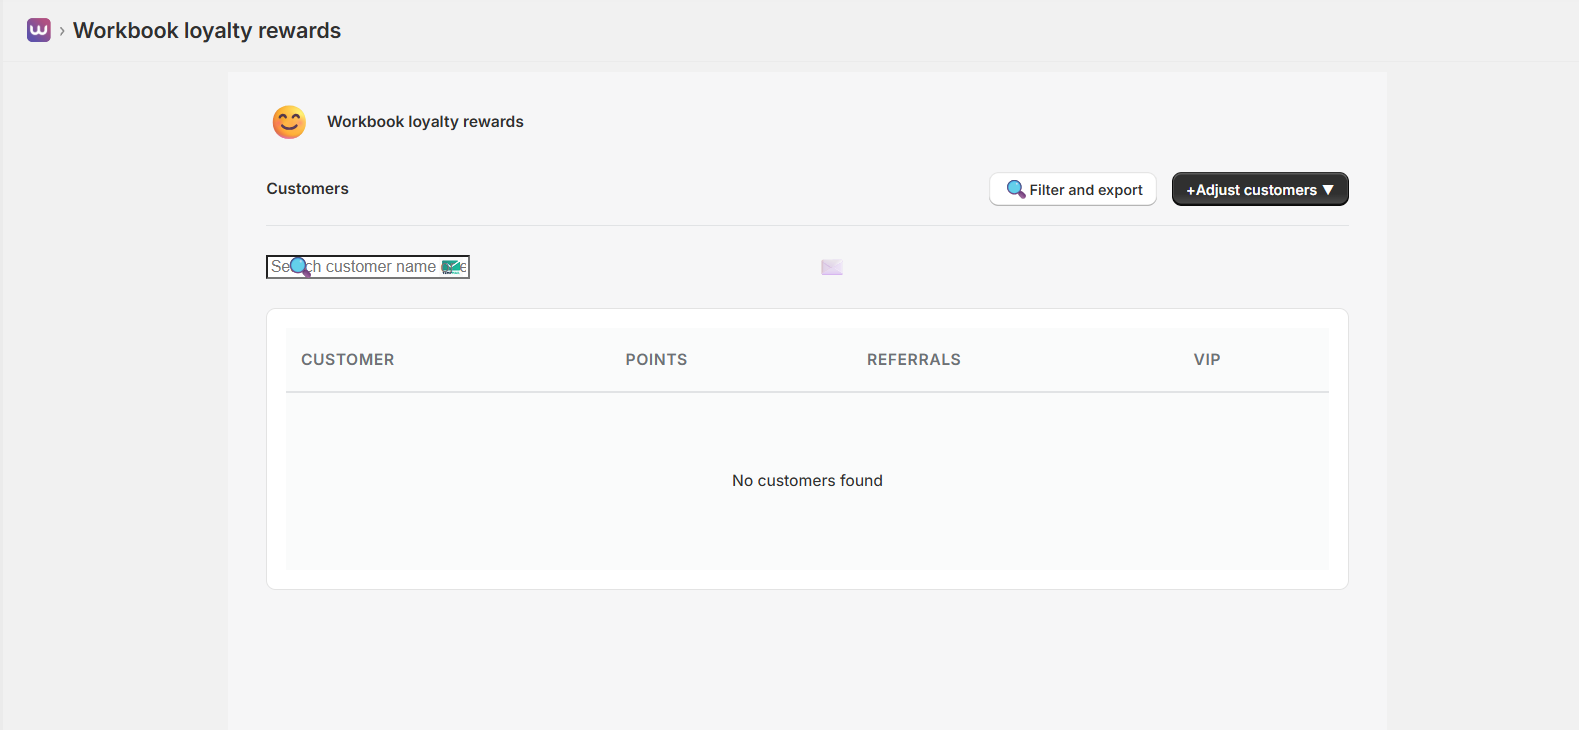
Customer Management
The Customers page provides a comprehensive view of all your loyalty program members. You can see customer information, points balance, referral count, and VIP tier status in a single table.
- View All Customers: See all enrolled members with their points, tier, and order history
- Search & Filter: Find customers by name or email using the search bar
- Filter and Export: Use advanced filters and export customer data for analysis
- Points Management: Manually add or deduct points with custom descriptions
- Reward Redemption: Allow customers to redeem rewards directly from the admin
- Transaction History: View complete history of points earned, redeemed, and expired
Adjust Customers
Use the “Adjust customers” dropdown menu to:
- Adjust Points Totals: Bulk adjust points for multiple customers at once
- Adjust VIP Tiers: Manually upgrade or downgrade customer VIP tiers
- Import Birthdays: Import customer birthdays to enable birthday reward campaigns
Customer Table Columns
The customer table displays:
- Customer: Customer name and email
- Points: Current points balance
- Referrals: Number of successful referrals
- VIP: Current VIP tier (Bronze, Silver, Gold, Platinum)
Sync Customers
Use the “Sync Customers” button to import all existing Shopify customers into your loyalty program. This ensures all customers are enrolled and can start earning points.
Rewards
Create and manage rewards that customers can redeem using their loyalty points.
Reward Types
- Discount Rewards: Percentage or fixed amount discounts (e.g., 10% off or $5 off)
- Free Shipping: Reward that provides free shipping on orders
- Free Product: Reward that provides a free product when redeemed
- Gift Card: Reward that provides a gift card credit
Creating Rewards
To create a reward:
- Navigate to Rewards from the main menu
- Click Create Reward
- Select the reward type
- Set the points cost and reward value
- Add a title, description, and image
- Toggle the reward active status
- Click Create to save
Analytics & Insights
Track your loyalty program’s performance with comprehensive analytics and reporting. Gain powerful insights into customer engagement and program performance—available on paid plans.
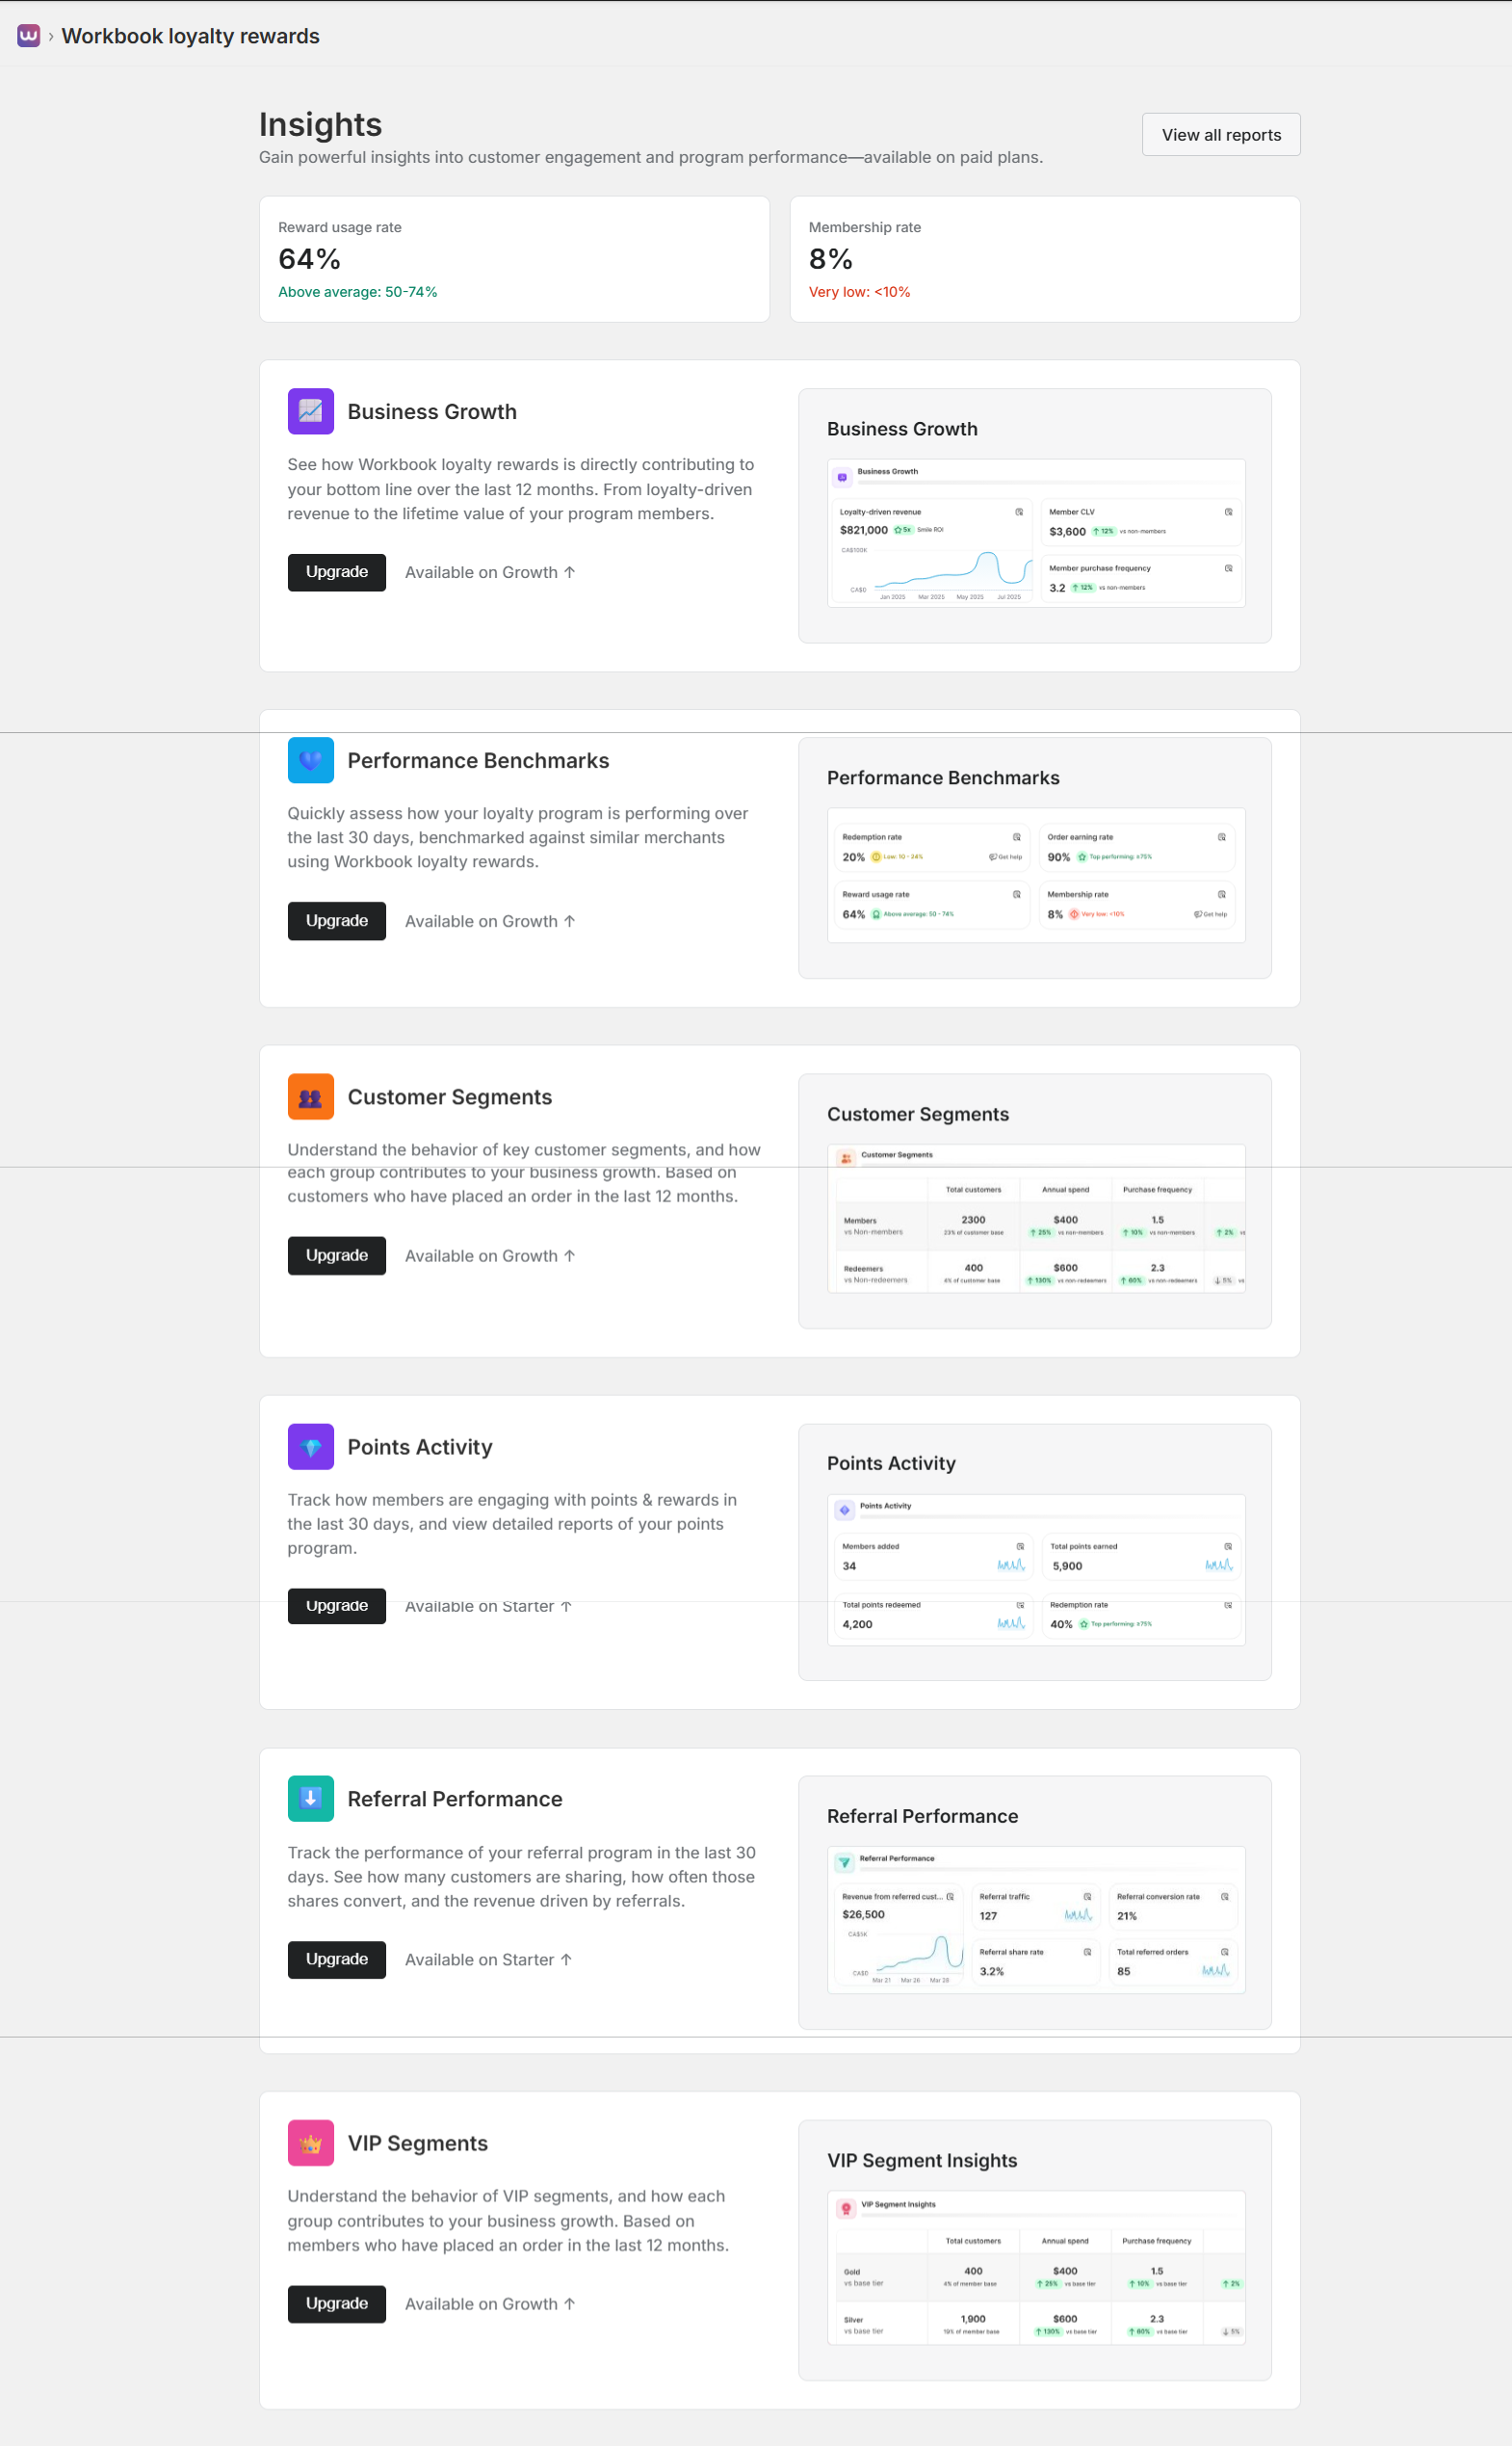
Summary Metrics
Quick overview of key performance indicators:
- Reward Usage Rate: Percentage of customers who redeem rewards (e.g., 64% – Above average: 50-74%)
- Membership Rate: Percentage of customers enrolled in the program (e.g., 8% – Very low: <10%)
Business Growth
See how Workbook loyalty rewards is directly contributing to your bottom line over the last 12 months. From loyalty-driven revenue to the lifetime value of your program members.
Key metrics include:
- Loyalty-driven Revenue: Total revenue from loyalty program members (e.g., $821,000)
- Member CLV (Customer Lifetime Value): Average lifetime value of program members (e.g., $3,600, +15% vs non-members)
- Member Purchase Frequency: How often members make purchases (e.g., 3.2 purchases, +12% vs non-members)
Available on: Growth plan and above
Performance Benchmarks
Quickly assess how your loyalty program is performing over the last 30 days, benchmarked against similar merchants using Workbook loyalty rewards.
Benchmark metrics include:
- Redemption Rate: Percentage of points redeemed (e.g., 20% – Low: 10-24%)
- Order Earning Rate: Percentage of orders that earn points (e.g., 90% – Top performing: >75%)
- Reward Usage Rate: Percentage of members using rewards (e.g., 64% – Above average: 50-74%)
- Membership Rate: Percentage of customers enrolled (e.g., 8% – Very low: <10%)
Available on: Growth plan and above
Customer Segments
Understand the behavior of key customer segments, and how each group contributes to your business growth. Based on customers who have placed an order in the last 12 months.
Compare segments:
- Members vs Non-members: See how loyalty members compare to non-members in annual spend and purchase frequency
- Redeemers vs Non-redeemers: Understand the value of customers who actively redeem rewards
Available on: Growth plan and above
Points Activity
Track how members are engaging with points & rewards in the last 30 days, and view detailed reports of your points program.
Metrics include:
- Members Added: New customers enrolled in the program
- Total Points Earned: All points earned by customers
- Total Points Redeemed: All points used for rewards
- Redemption Rate: Percentage of points redeemed (e.g., 40% – Top performing: >30%)
Available on: Starter plan and above
Referral Performance
Track the performance of your referral program in the last 30 days. See how many customers are sharing, how often those shares convert, and the revenue driven by referrals.
Metrics include:
- Revenue from Referred Customers: Total revenue from customers who were referred (e.g., $26,500)
- Referral Traffic: Number of visitors from referral links (e.g., 127)
- Referral Conversion Rate: Percentage of referrals that result in purchases (e.g., 21%)
- Referral Share Rate: Percentage of customers sharing referrals (e.g., 3.2%)
- Total Referred Orders: Number of orders from referred customers (e.g., 85)
Available on: Starter plan and above
VIP Segments
Understand the behavior of VIP segments, and how each group contributes to your business growth. Based on members who have placed an order in the last 12 months.
Compare VIP tiers:
- Gold vs Base Tier: See how Gold tier members compare to base tier
- Silver vs Base Tier: Compare Silver tier performance
Metrics include total customers, annual spend, and purchase frequency for each tier.
Available on: Growth plan and above
Reports
Access comprehensive reports to dive deeper into your loyalty program data:

Basic Reports (Available on all plans)
Data exports that update daily:
- List of customers
- List of customers who can redeem
- List of discounts created by Workbook loyalty rewards
- List of orders placed by referred customers
- List of points redemptions
- List of points transactions
- List of referrals
- List of Workbook loyalty rewards influenced orders
- List of top earning customers all-time
Advanced Reports (Available on Starter, Growth, and Plus plans)
Upgrade your plan to access these advanced reports and better understand what’s driving loyalty in your store.
Data Exports (Growth plan):
- List of customers by VIP tier
- List of customers with points expiring
- List of orders by VIP tier
- List of VIP tier changes
- List of excluded products (Starter plan)
Key Metrics Reports (Starter & Growth plans):
- Order earning rate over time (Growth)
- Reward usage rate over time (Growth)
- Workbook loyalty rewards benchmarks (Growth)
- Redemption rate over time (Starter)
- Sales influenced by Workbook loyalty rewards over time (Starter)
Points Reports (Starter plan):
- First time vs repeat earners over time
- First time vs repeat redeemers over time
- Outstanding points over time
- Points activity over time
- Top ways to earn
- Top ways to redeem
- Total members over time
Referrals Reports (Starter plan):
- Referral conversion rate over time
- Referral traffic over time
- Sales from referred customers over time
- Top referrers
VIP Reports (Growth plan):
- VIP tier behaviour over time
- VIP tier changes over time
- VIP tier members over time
Finance Reports (Plus plan):
- Financial value of discounts issued over time
- Financial value of outstanding points
Note: All reports update daily. You can filter reports by category (Data exports, Finance, Key metrics, Points, Referrals, VIP) and export data for further analysis.
Settings
Configure all aspects of your loyalty program from account settings to email customization. Access Settings from the main navigation to manage program configuration, billing, emails, language, platform integrations, and more.
General Settings
Configure your program settings – Set points earning rules and tier thresholds.
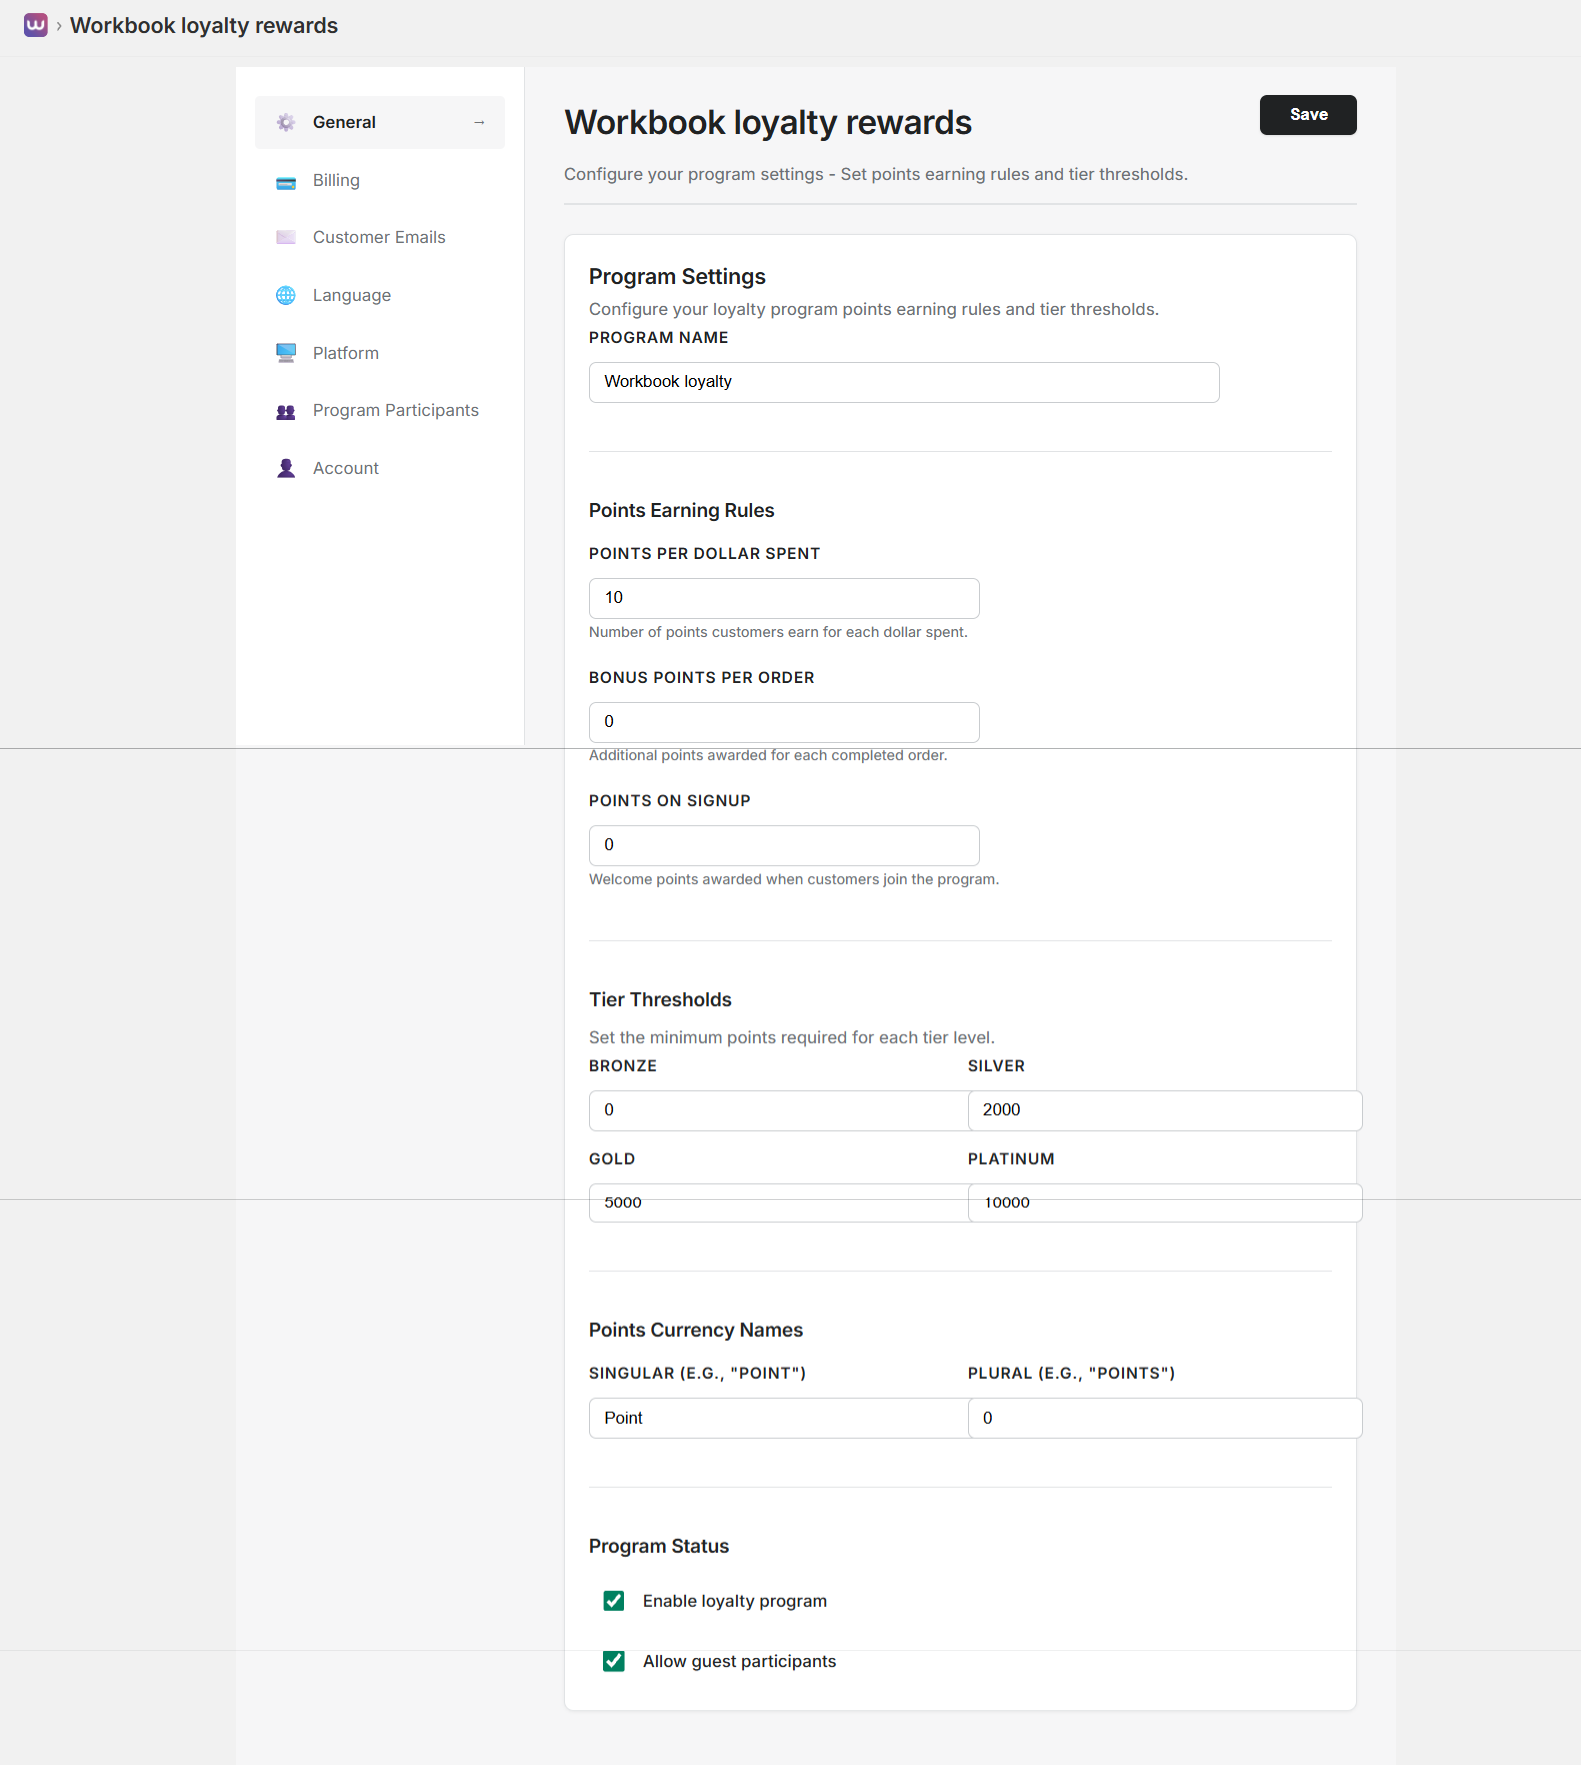
Program Settings
Configure your loyalty program points earning rules and tier thresholds:
- Program Name: Set your loyalty program name (e.g., “Workbook loyalty rewards”). This name appears throughout your loyalty program interface.
Points Earning Rules
Define how customers earn points:
- Points Per Dollar Spent: Number of points customers earn for each dollar spent (e.g., 10 points per $1). This is the primary earning method.
- Bonus Points Per Order: Additional points awarded for each completed order (e.g., 0 points). Use this to reward order completion.
- Points on Signup: Welcome points awarded when customers join the program (e.g., 0 points). Encourage signups with welcome bonuses.
Tier Thresholds
Set the minimum points required for each tier level:
- Bronze: Base tier (0 points) – All customers start here
- Silver: First upgrade tier (e.g., 2,000 points)
- Gold: Second upgrade tier (e.g., 5,000 points)
- Platinum: Highest tier (e.g., 10,000 points)
Customers automatically upgrade to higher tiers when they reach the required points threshold.
Points Currency Names
Customize how points are referred to in your program:
- Singular Form: Name for a single point (e.g., “Point”)
- Plural Form: Name for multiple points (e.g., “Points”)
This allows you to brand your points currency (e.g., “Coins”, “Stars”, “Credits”) to match your brand identity.
Program Status
Control program activation and participation:
- Enable Workbook loyalty rewards: Toggle to activate or deactivate the entire Workbook loyalty rewards
- Allow Guest Participants: Toggle to allow customers without accounts to participate in the program
Use these toggles to control when your loyalty program is active and who can participate.
Billing Settings
Manage your billing and subscription details.
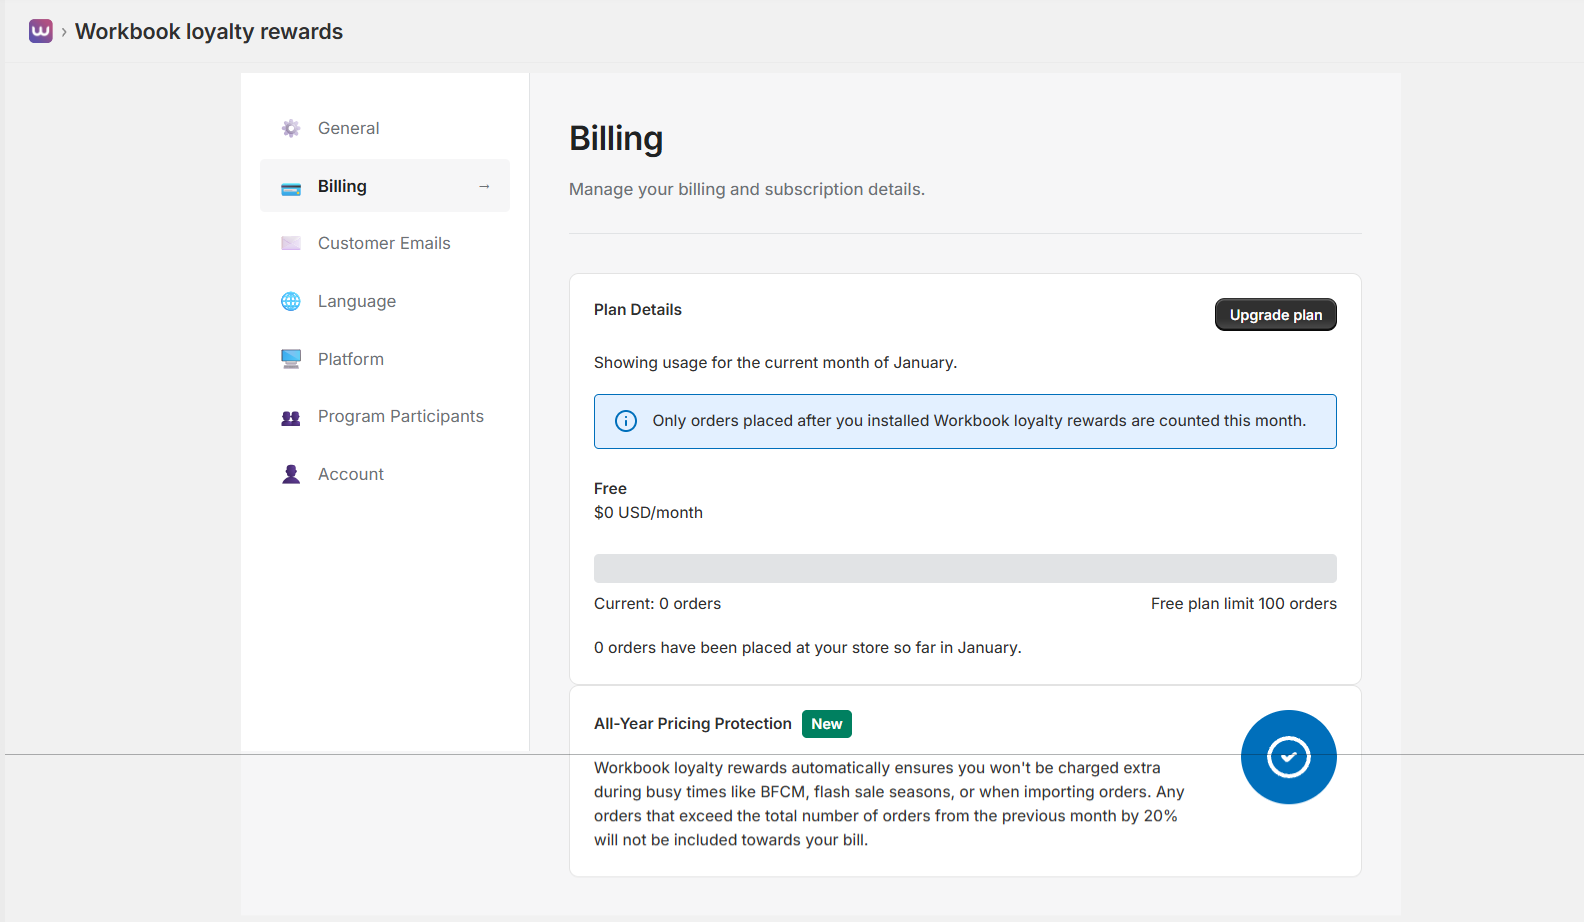
Plan Details
View your current subscription and usage:
- Current Month Usage: See usage for the current month (e.g., December)
- Current Plan: Your active subscription plan (Free, Starter, Growth, or Plus) with monthly cost
- Order Usage: Current orders this month vs. your plan’s order limit
- Order Count: Total orders placed at your store in the current month
Note: Only orders placed after you installed Workbook loyalty rewards are counted this month.
Use the “Upgrade plan” button to move to a higher tier if you’re approaching your order limit.
All-Year Pricing Protection
New Feature: Automatic pricing protection for busy periods.
Workbook loyalty rewards automatically ensures you won’t be charged extra during busy times like BFCM, flash sale seasons, or when importing orders. Any orders that exceed the total number of orders from the previous month by 20% will not be included towards your bill.
This protection helps you avoid unexpected charges during peak sales periods or bulk order imports.
Customer Emails
Manage the email reminders you send your customers.
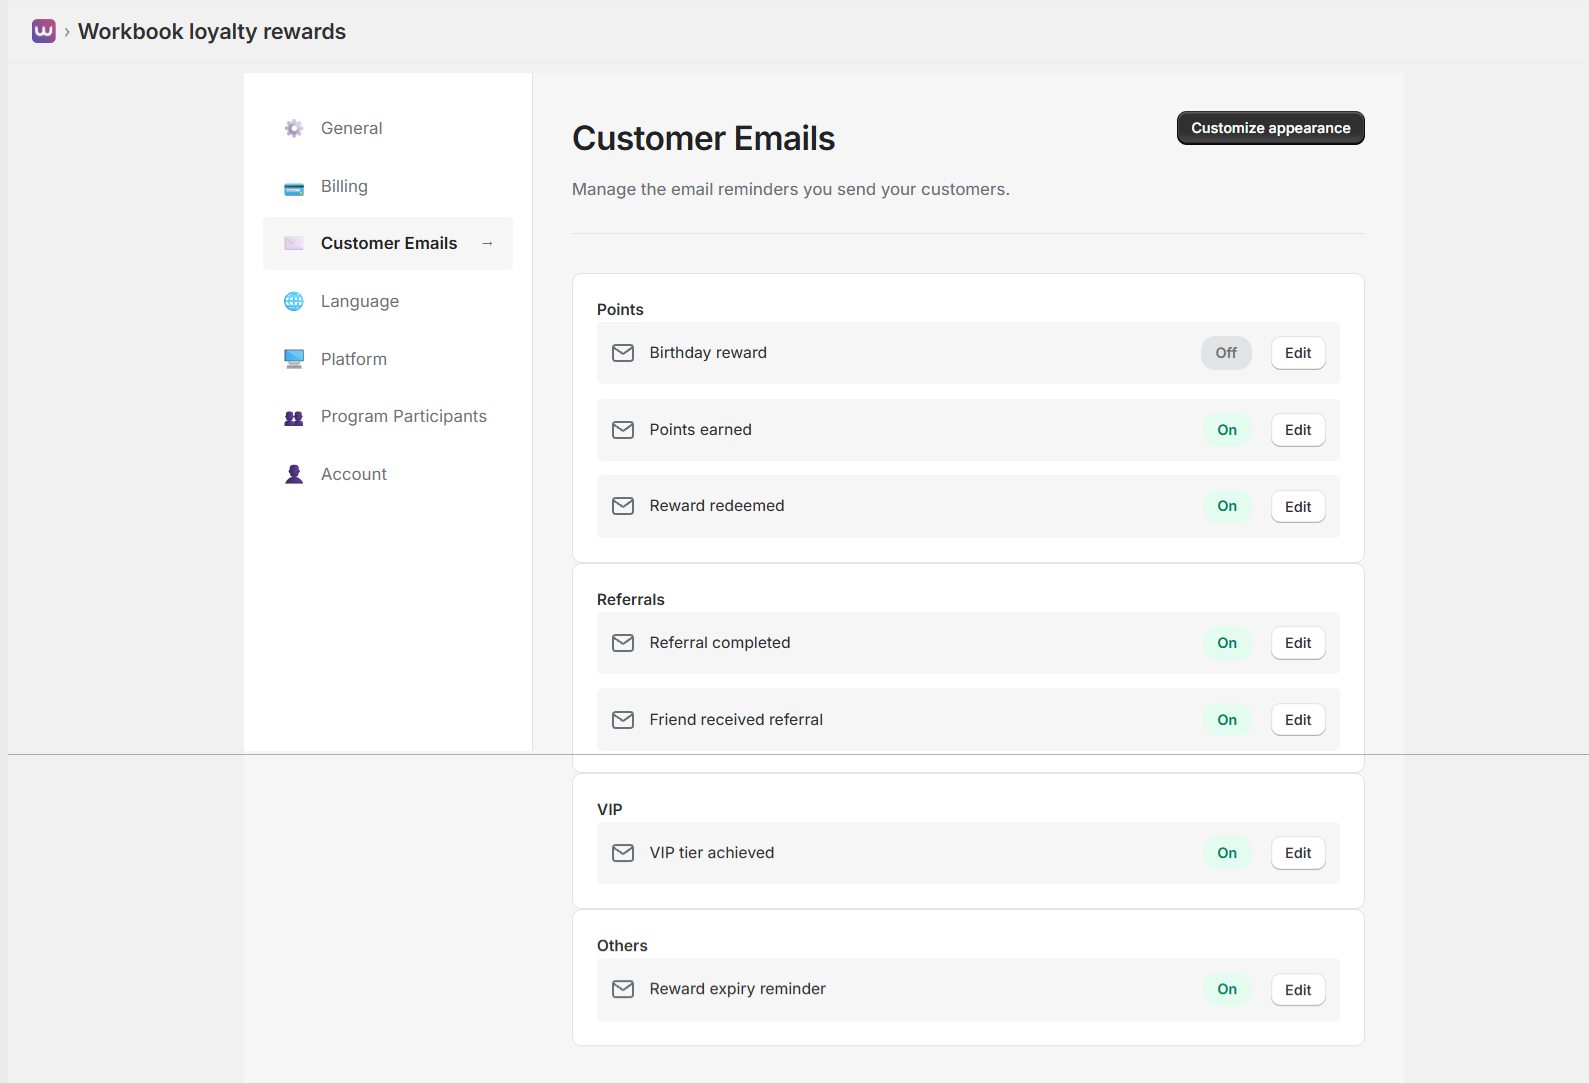
Configure automated email notifications for various loyalty program events. Each email type can be enabled or disabled individually:
Points Section
- Birthday Reward: Send birthday reward notifications (can be toggled On/Off)
- Points Earned: Notify customers when they earn points (can be toggled On/Off)
- Reward Redeemed: Confirm when customers redeem rewards (can be toggled On/Off)
Referrals Section
- Referral Completed: Notify when a referral is successfully completed (can be toggled On/Off)
- Friend Received Referral: Notify the referred friend about the referral (can be toggled On/Off)
VIP Section
- VIP Tier Achieved: Celebrate when customers reach a new VIP tier (can be toggled On/Off)
Others Section
- Reward Expiry Reminder: Remind customers about expiring points or rewards (can be toggled On/Off)
Each email type has an “Edit” button to customize the email content, subject line, and timing. Use the “Customize appearance” button to set global email styling.
Customize Email Appearance
Customize the visual appearance of all customer emails:
Configure email branding and styling:
- Button Settings:
- Button Color: Choose primary button color (e.g., Primary blue)
- Text Color: Set button text color (e.g., White)
- Default Colors: Link to change default display colors
- Logo:
- Upload your brand logo for email headers
- Required: Minimum 400x144 pixels
- Logo appears at the top of all customer emails
Email Preview
Preview emails in both Desktop and Mobile views to ensure they look great on all devices:
- Desktop Preview: See how emails appear on desktop email clients
- Mobile Preview: See how emails appear on mobile devices
Email preview shows:
- Logo placement (400px by 144px)
- Customer points balance and recent rewards
- Next reward information and progress
- "Explore all rewards" call-to-action button
- More ways to earn section
- Email footer with program attribution and preferences link
All email content uses dynamic placeholders like "(customer points balance with currency name)" and "(reward name)" that are automatically replaced with actual customer data when emails are sent.
Language Settings
Configure program language and multi-language support.
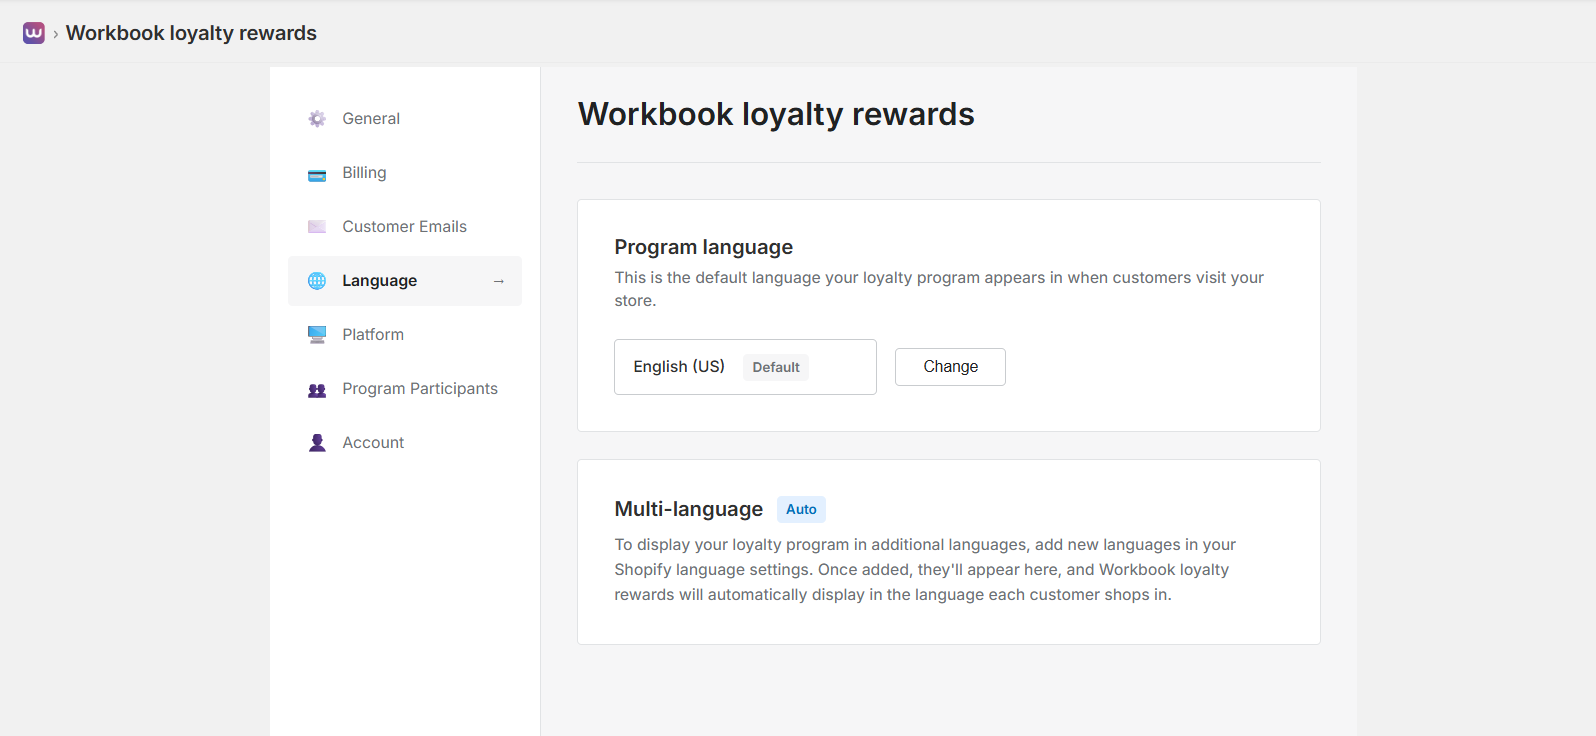
Program Language
Set the default language for your loyalty program:
- Default Language: This is the default language your loyalty program appears in when customers visit your store
- Current Setting: Shows your current default language (e.g., "English (US)")
- Change Language: Use the "Change" button to select a different default language
Multi-Language Support
Auto Mode: Automatic multi-language detection and display.
To display your loyalty program in additional languages, add new languages in your Shopify language settings. Once added, they'll appear here, and Workbook loyalty rewards will automatically display in the language each customer shops in.
- Shopify Integration: Multi-language support is integrated with Shopify's language settings
- Automatic Detection: The program automatically detects and displays content in the customer's preferred language
- Seamless Experience: Customers see the loyalty program in their shopping language automatically
Platform Settings
Manage your ecommerce platform settings, integrations, and exclusions.
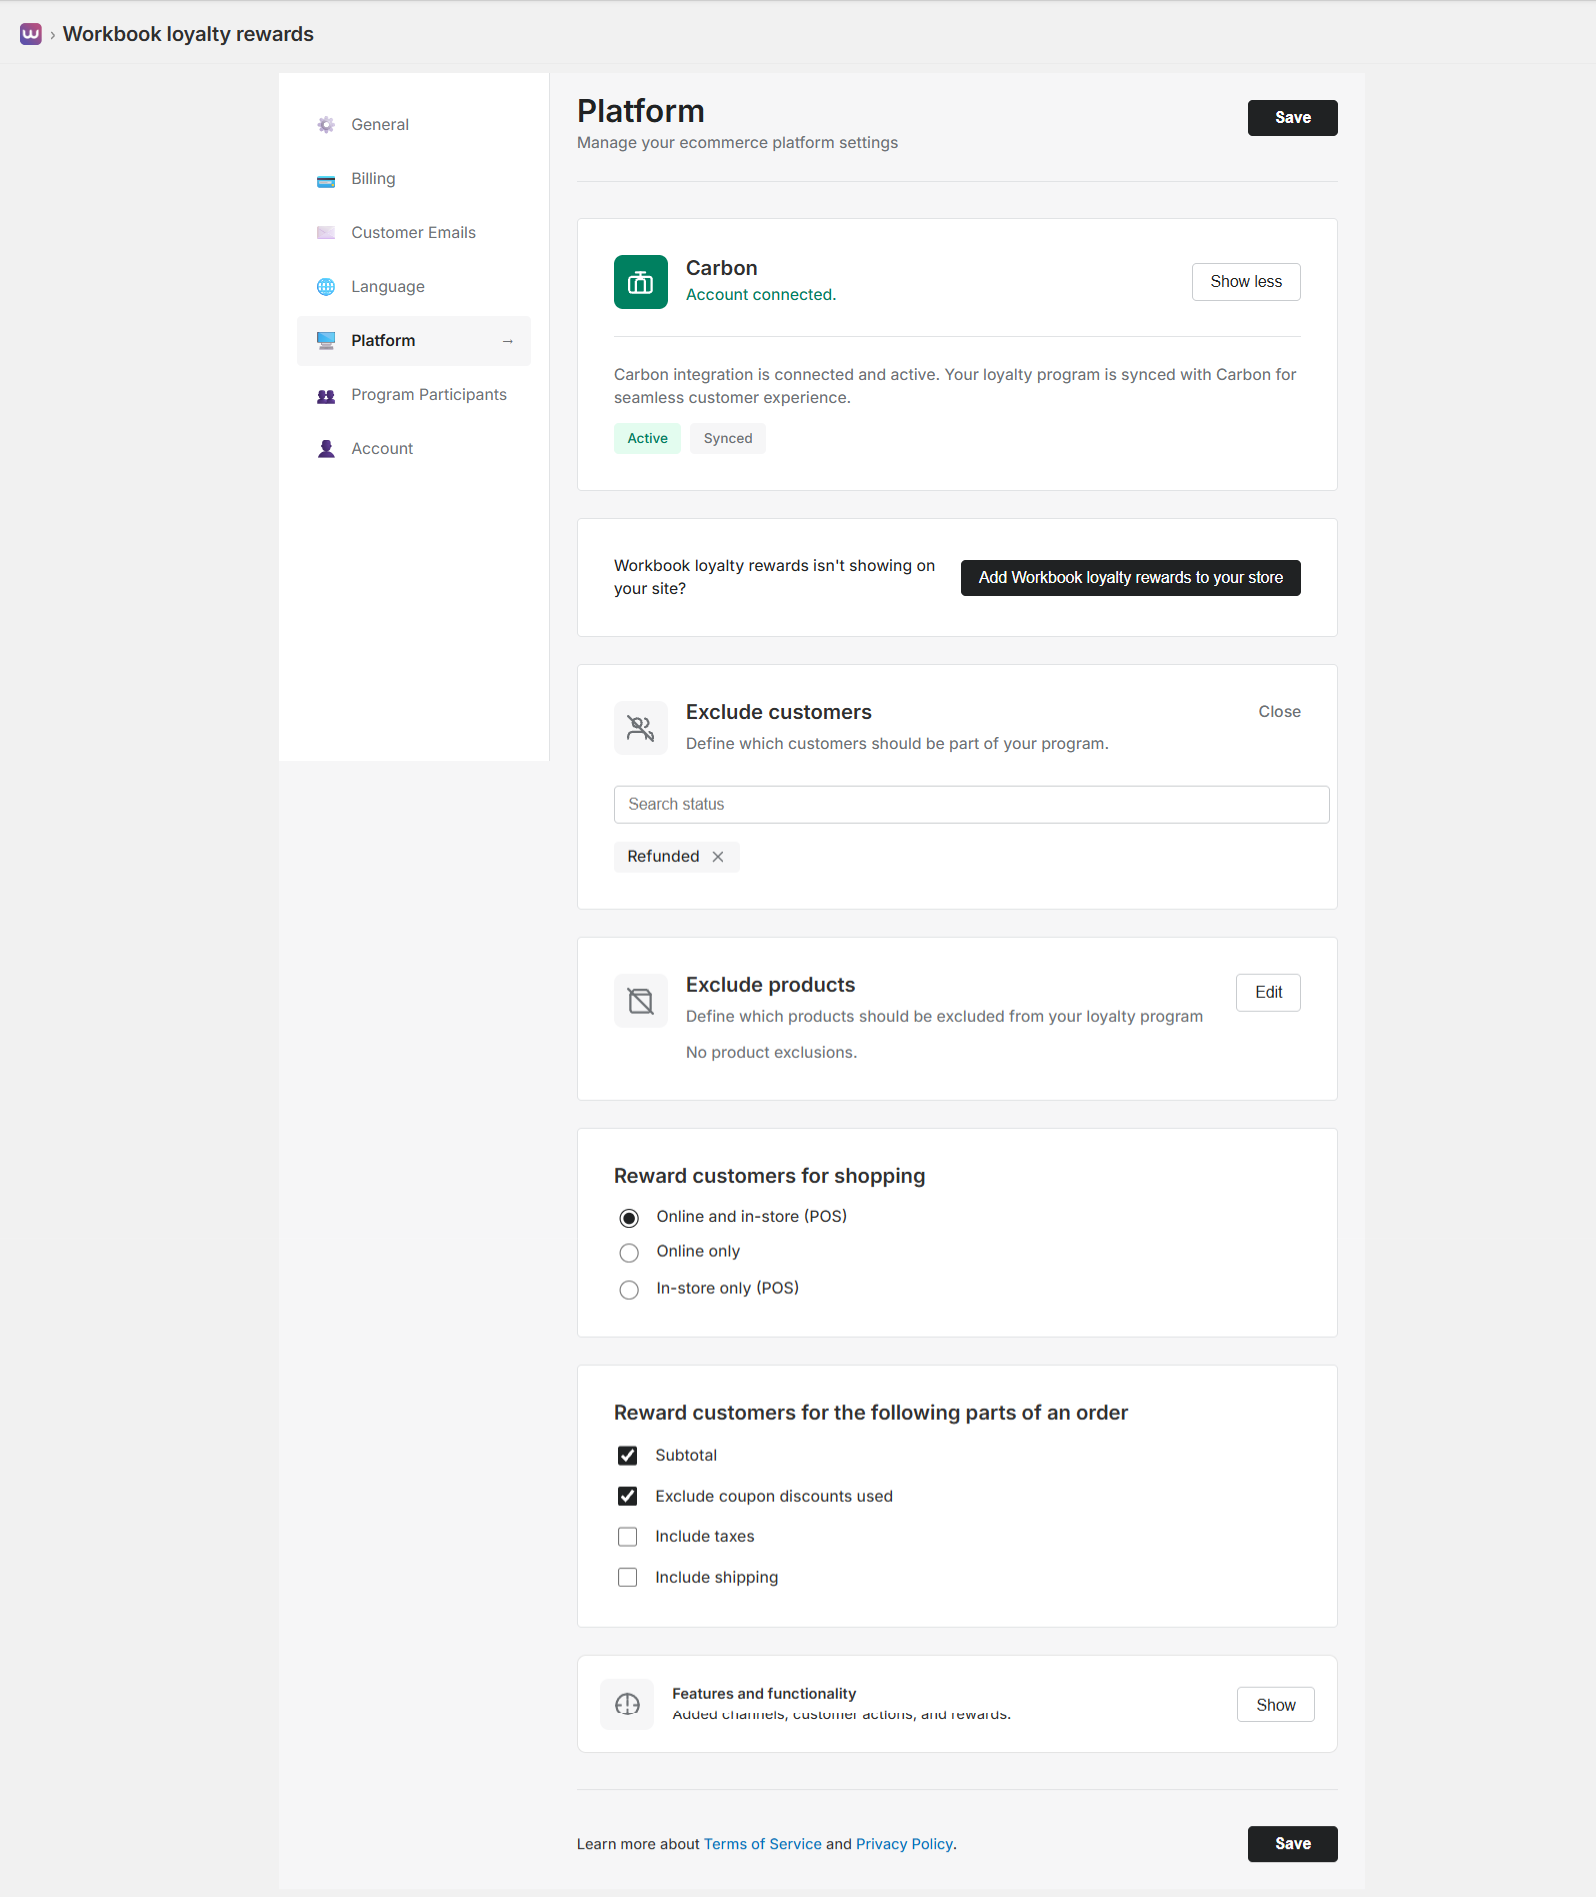
Carbon Integration
Connect and manage your Carbon integration:
- Status: View integration connection status (e.g., "Account connected")
- Sync Status: See if your loyalty program is synced with Carbon (Active, Synced)
- Description: Carbon integration is connected and active. Your loyalty program is synced with Carbon for seamless customer experience.
Workbook loyalty rewards Visibility
If Workbook loyalty rewards isn't showing on your site:
- Add to Store: Click "Add Workbook loyalty rewards to your store" button to integrate the app with your Shopify theme
- Theme Integration: This adds the loyalty program as an app embed in your Shopify theme settings
Exclude Customers
Define which customers should be part of your program:
- Search Status: Search for customer statuses to exclude (e.g., "Refunded")
- Active Filters: See currently excluded customer statuses with option to remove them
- Use Cases: Exclude customers with specific order statuses from earning points
Exclude Products
Define which products should be excluded from your loyalty program:
- Search Products: Search and select products to exclude from earning points
- Use Cases: Exclude sale items, clearance products, or specific categories from point earning
Reward Customers For Shopping
Choose where customers can earn points:
- Online and In-Store (POS): Customers earn points for both online and in-store purchases
- Online Only: Points only earned for online purchases
- In-Store Only (POS): Points only earned for in-store point-of-sale purchases
Reward Customers For Order Parts
Define which parts of an order count toward points:
- Subtotal: Base order subtotal (typically checked)
- Exclude Coupon Discounts Used: Don't count coupon discounts toward points (typically checked)
- Include Taxes: Include tax amount in points calculation (optional)
- Include Shipping: Include shipping costs in points calculation (optional)
Features and Functionality
View added channels, customer actions, and rewards. Click "Show" to see detailed information about enabled features.
Add to Store Theme
In order for your customers to access and redeem their points, you need to add Workbook loyalty rewards as an app embed on your Shopify theme settings.
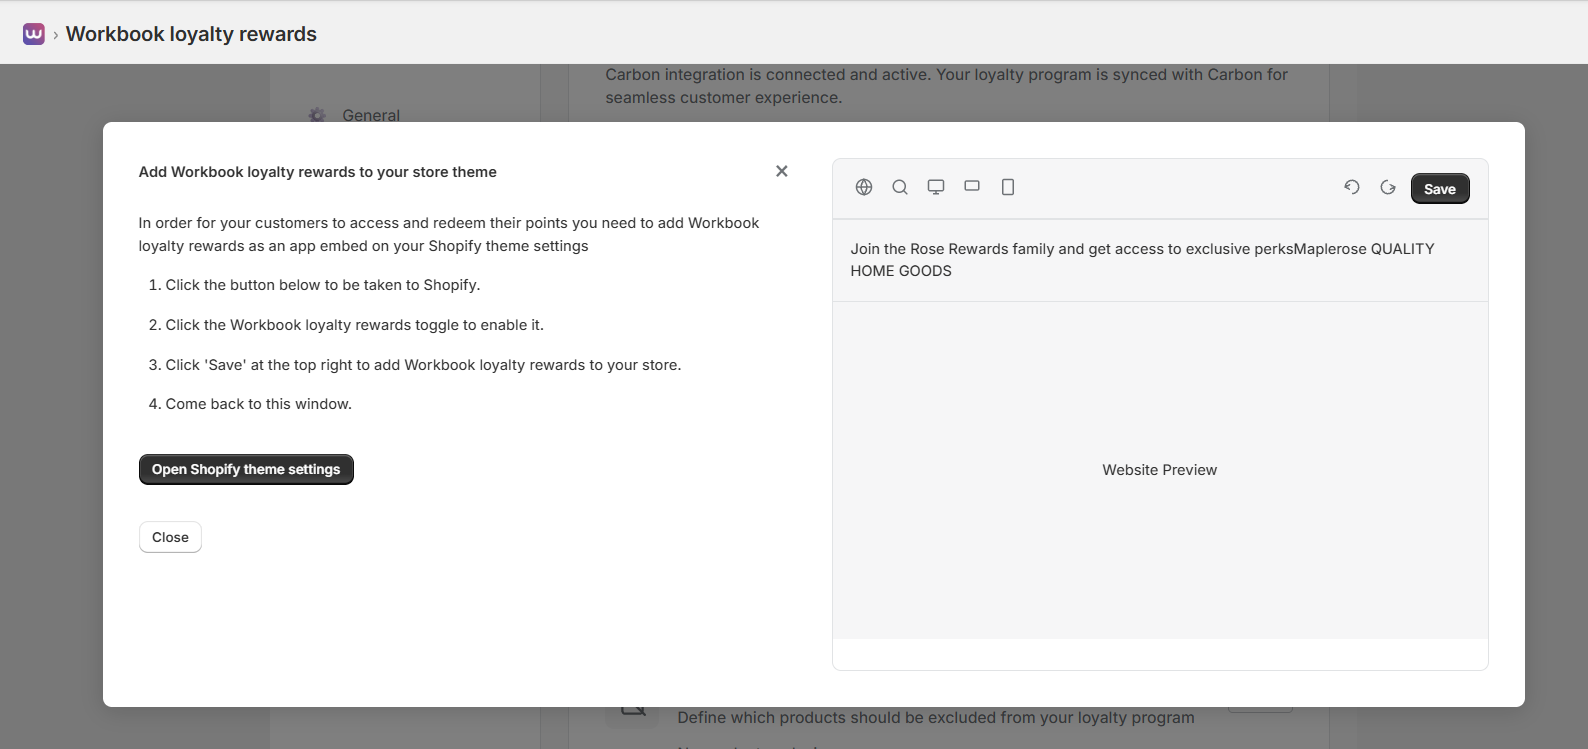
Step-by-step Instructions:
- Click the "Open Shopify theme settings" button to be taken to Shopify
- Click the Workbook loyalty rewards toggle to enable it
- Click "Save" at the top right to add Workbook loyalty rewards to your store
- Come back to this window
The preview panel shows how the loyalty program will appear on your website. You can toggle between Desktop and Mobile views to see how it looks on different devices.
Program Participants
Manage who can participate in your loyalty program.
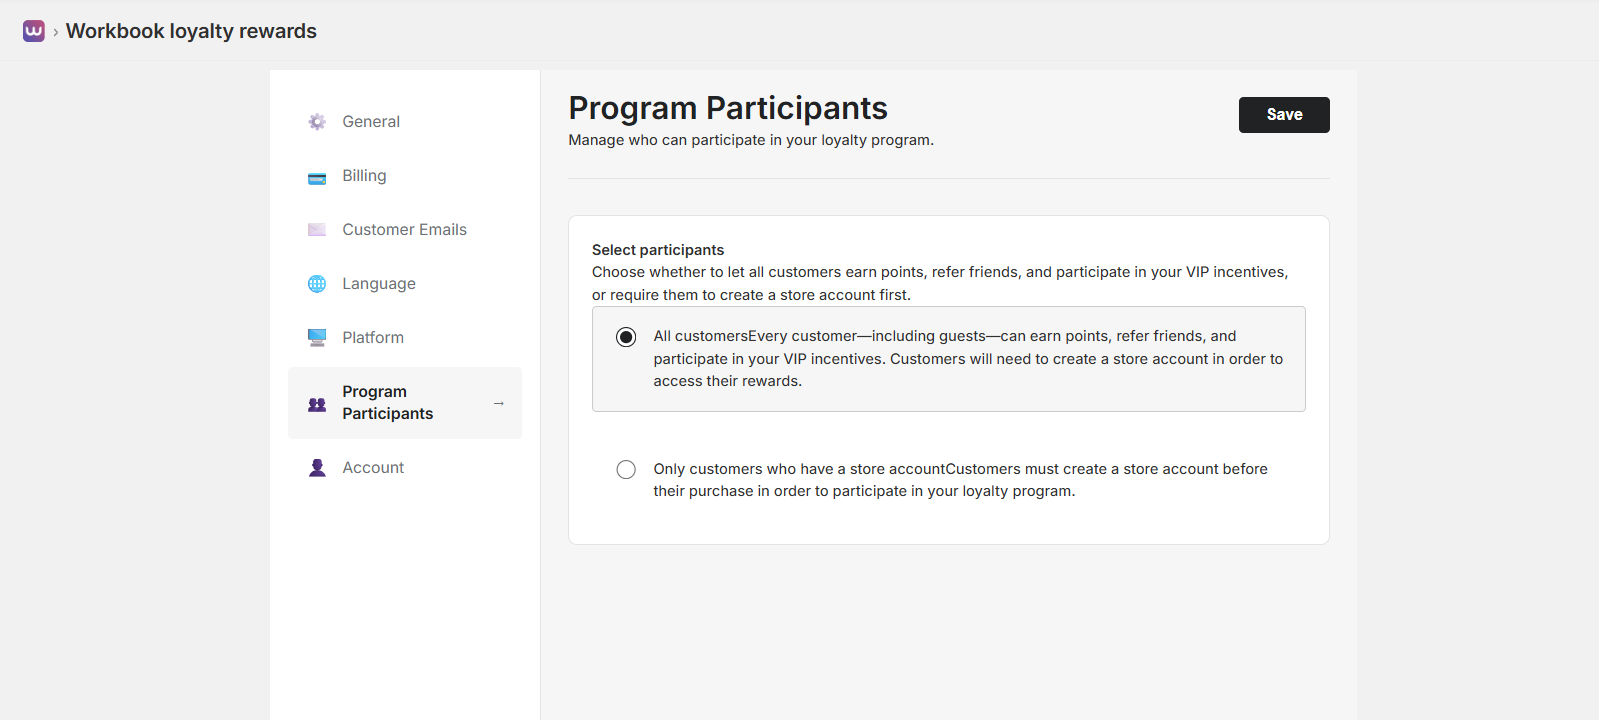
Select Participants
Choose whether to let all customers earn points, refer friends, and participate in your VIP incentives, or require them to create a store account first.
Two Participation Options:
- All Customers (Recommended):
- Every customer—including guests—can earn points, refer friends, and participate in your VIP incentives
- Customers will need to create a store account in order to access their rewards
- This option maximizes participation by allowing guests to start earning immediately
- Guests can earn points during checkout, but must create an account to view and redeem rewards
- Only Customers Who Have a Store Account:
- Customers must create a store account before their purchase in order to participate in the loyalty program
- This ensures all participants have accounts from the start
- Useful if you want to require account creation for all loyalty program members
Recommendation: "All Customers" is typically recommended as it allows guests to start earning points immediately, increasing program engagement. They can create an account later to access their rewards.
Account Settings
Manage your account login information.
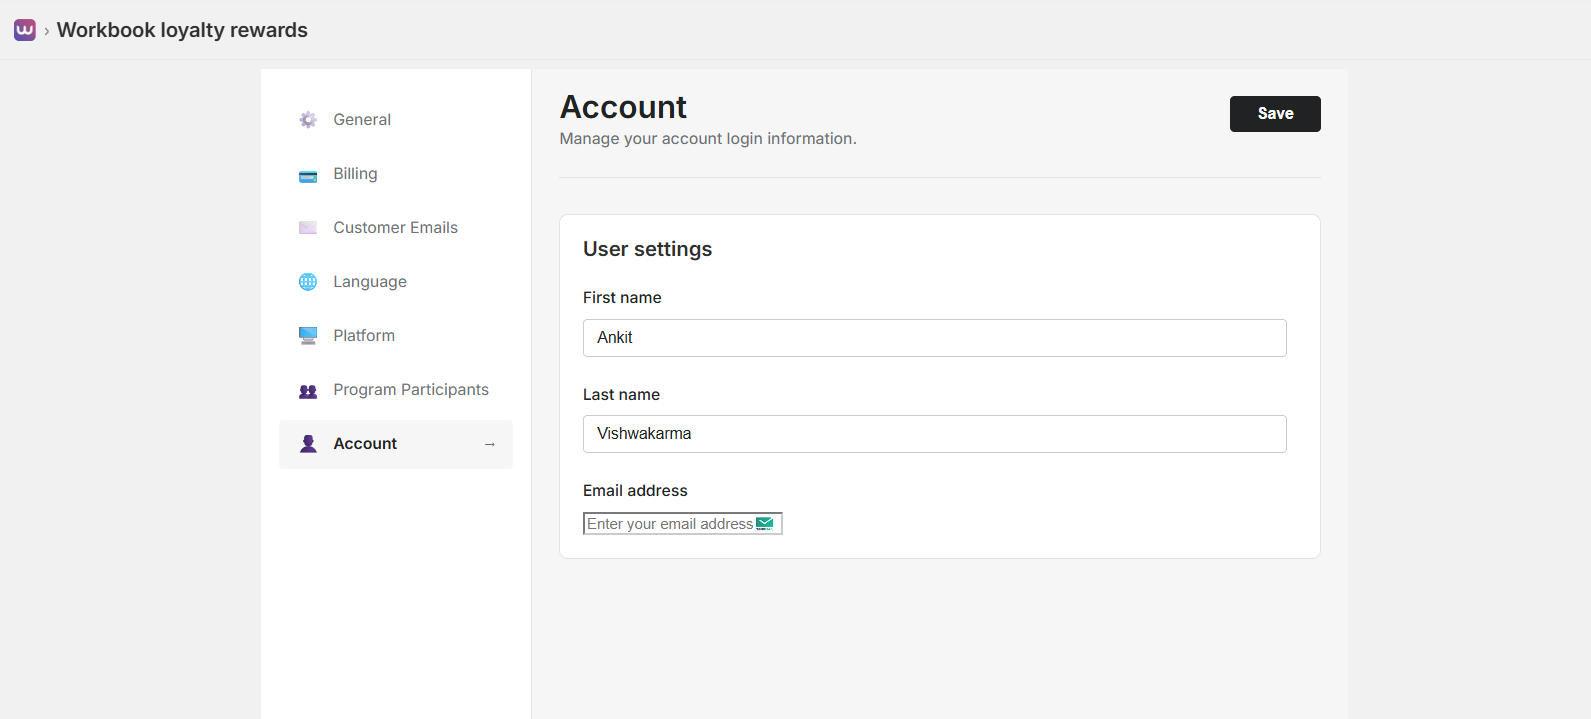
User Settings
Update your personal account information:
- First Name: Enter your first name
- Last Name: Enter your last name
- Email Address: Enter your email address (used for account login and notifications)
Use the "Save" button to update your account information. Changes to your email address may require verification.
Settings Navigation
Access all settings sections from the left sidebar:
- General: Program name, points currency, brand colors, tier thresholds, points earning rules
- Billing: View subscription details, usage, and pricing protection
- Customer Emails: Customize email templates for points earned, rewards redeemed, referrals, VIP tiers, etc.
- Language: Configure program language and multi-language support
- Platform: Manage platform integrations, product/customer exclusions, and theme integration
- Program Participants: Control who can participate (all customers vs. account holders only)
- Account: Update your account information (name, email)
Each section provides specific configuration options to customize your loyalty program experience.
Pricing & Billing
Choose a plan that fits your store’s order volume and access advanced features. All plans include core loyalty program features with different order limits and advanced capabilities.
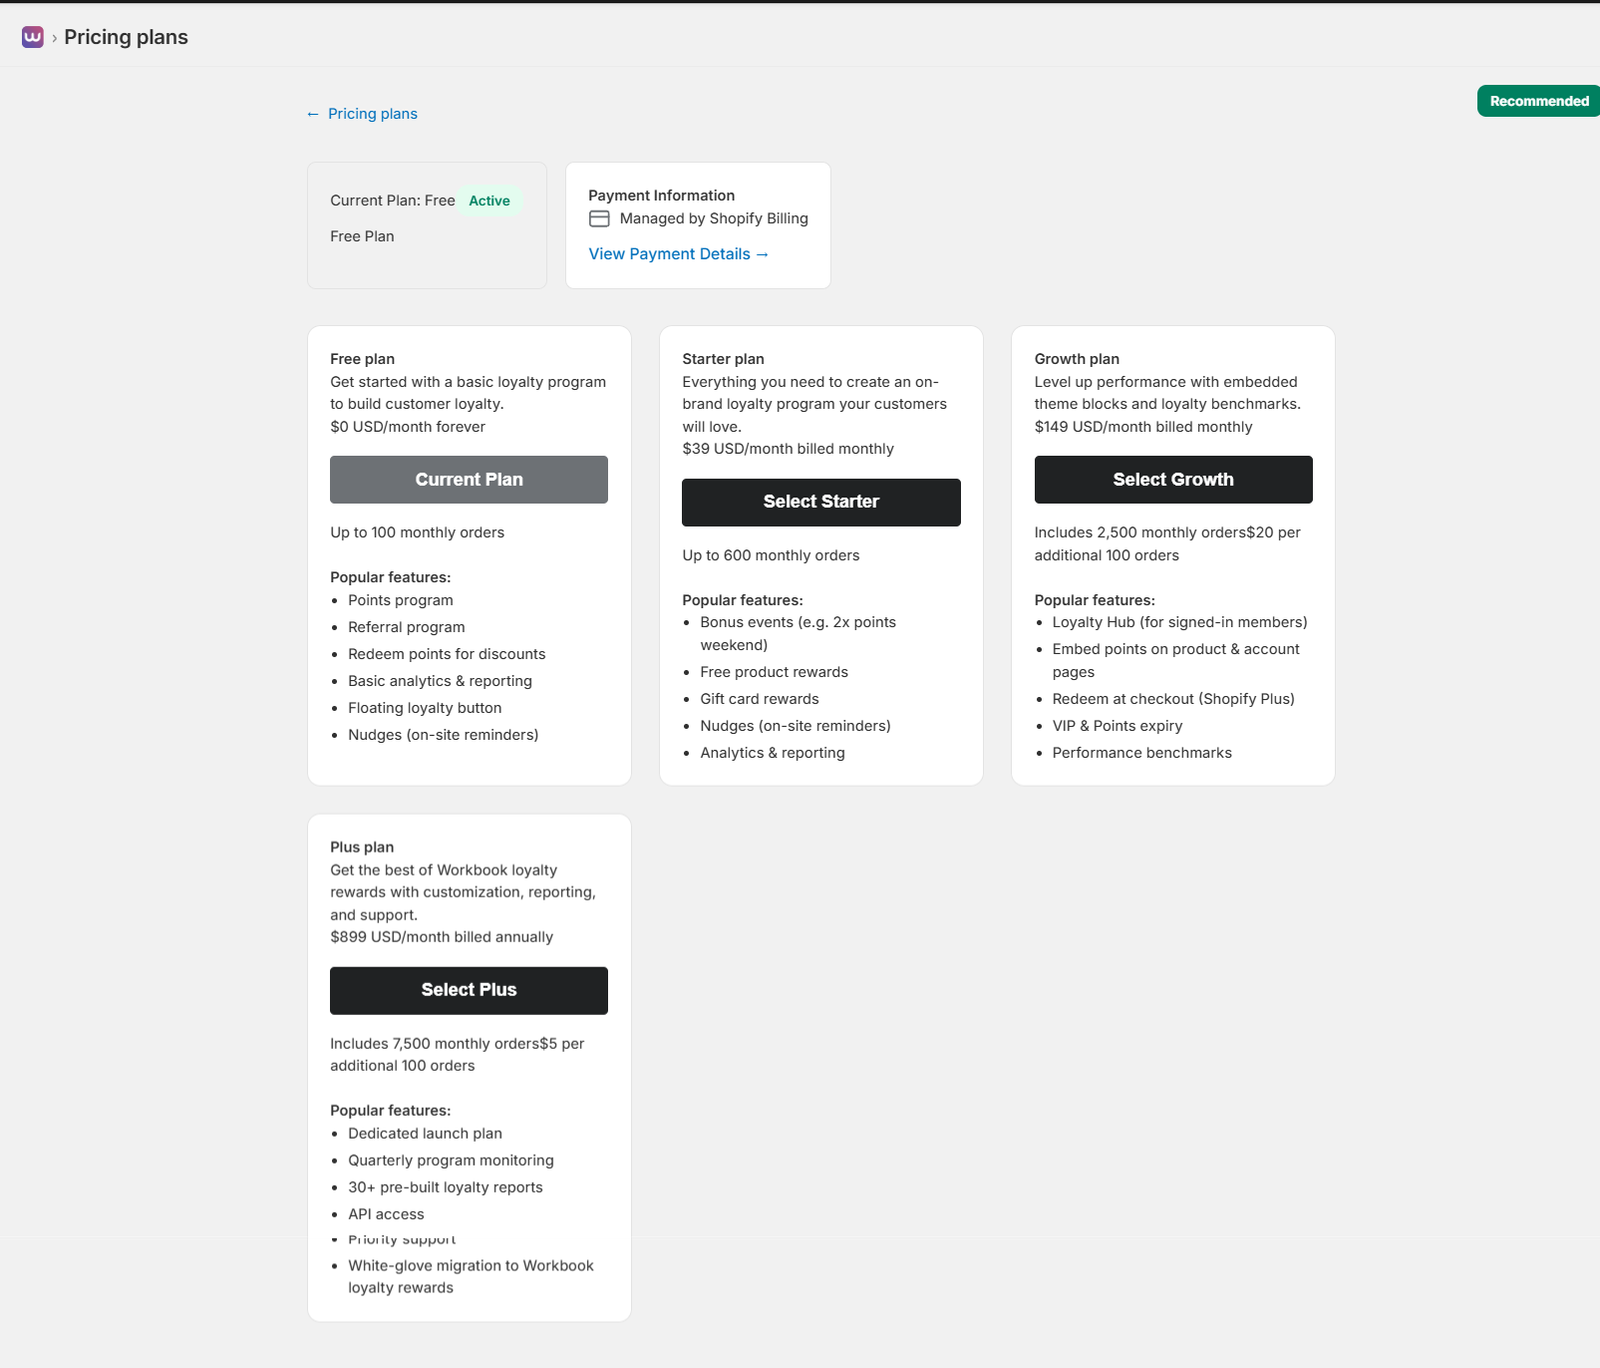
The pricing page displays all available plans with their features, order limits, and pricing. You can see your current plan status, payment information, and easily switch between plans based on your needs.
Current Plan & Payment Information
At the top of the pricing page, you can see:
- Current Plan Status: View your active plan with status indicator (Active, Pending, or Inactive)
- Payment Information: See that payments are managed by Shopify Billing
- View Payment Details: Click the link to navigate to the dedicated Payment page for detailed billing information
Available Plans
Four subscription tiers are available to match your business needs:
Free Plan
$0 USD/month forever
Get started with a basic loyalty program to build customer loyalty.
Order Limit: Up to 100 monthly orders
Features:
- Points program
- Referral program
- Redeem points for discounts
- Basic analytics & reporting
- Floating loyalty button
- Nudges (on-site reminders)
Perfect for small stores just getting started with loyalty programs.
Starter Plan
$39 USD/month billed monthly
Everything you need to create an on-brand loyalty program your customers will love.
Order Limit: Up to 600 monthly orders
Features: All Free plan features plus:
- Bonus events (e.g. 2x points weekend)
- Free product rewards
- Gift card rewards
- Nudges (on-site reminders)
- Analytics & reporting
Growth Plan
$149 USD/month billed monthly
Level up performance with embedded theme blocks and loyalty benchmarks.
Order Limit: Includes 2,500 monthly orders ($20 per additional 100 orders)
Features: All Starter plan features plus:
- Loyalty Hub (for signed-in members)
- Embed points on product & account pages
- Redeem at checkout (Shopify Plus)
- VIP & Points expiry
- Performance benchmarks
Plus Plan
$899 USD/month billed annually
Get the best of Workbook loyalty rewards with customization, reporting, and support.
Order Limit: Includes 7,500 monthly orders ($5 per additional 100 orders)
Features: All Growth plan features plus:
- Dedicated launch plan
- Quarterly program monitoring
- 30+ pre-built loyalty reports
- API access
- Priority support
- White-glove migration to Workbook loyalty rewards
Plan Comparison
Click the “Show plan comparison” button below the plan cards to see a detailed side-by-side comparison of all features across plans. This helps you understand which plan best fits your needs.
Plan Selection & Validation
The app includes intelligent plan validation to ensure you select an appropriate plan for your order volume:
- Order Limit Validation: The app validates plan selection based on your current month’s order count. You cannot select a plan that would exceed your order limit.
- Warning Messages: If you have more orders than a plan allows, you’ll see a warning message: “⚠️ You have X orders this month, which exceeds the [Plan Name] limit of Y orders. Please select a higher plan.”
- Disabled Plans: Plans that don’t meet your order requirements will be disabled with the button text “Order Limit Exceeded”
- Downgrade Notifications: When downgrading, you’ll see an info message: “ℹ️ You are downgrading from [Current Plan]. Changes will take effect at the start of your next billing period.”
- Current Plan Indicator: Your active plan shows “Current Plan” button in gray, indicating it’s already selected
This validation ensures you always have a plan that can handle your order volume and prevents service interruptions.
Frequently Asked Questions
The pricing page includes an FAQ section with answers to common questions:
- How does the free plan work? – Explains the free plan features and limitations
- Can I upgrade or downgrade my plan at any time? – Information about plan changes
- What happens if I exceed the order limits of my plan? – Details about order limit handling
- How does Workbook loyalty rewards’s pricing compare to competitors? – Competitive pricing information
Payment Page
Access comprehensive payment and billing management from the dedicated Payment page:
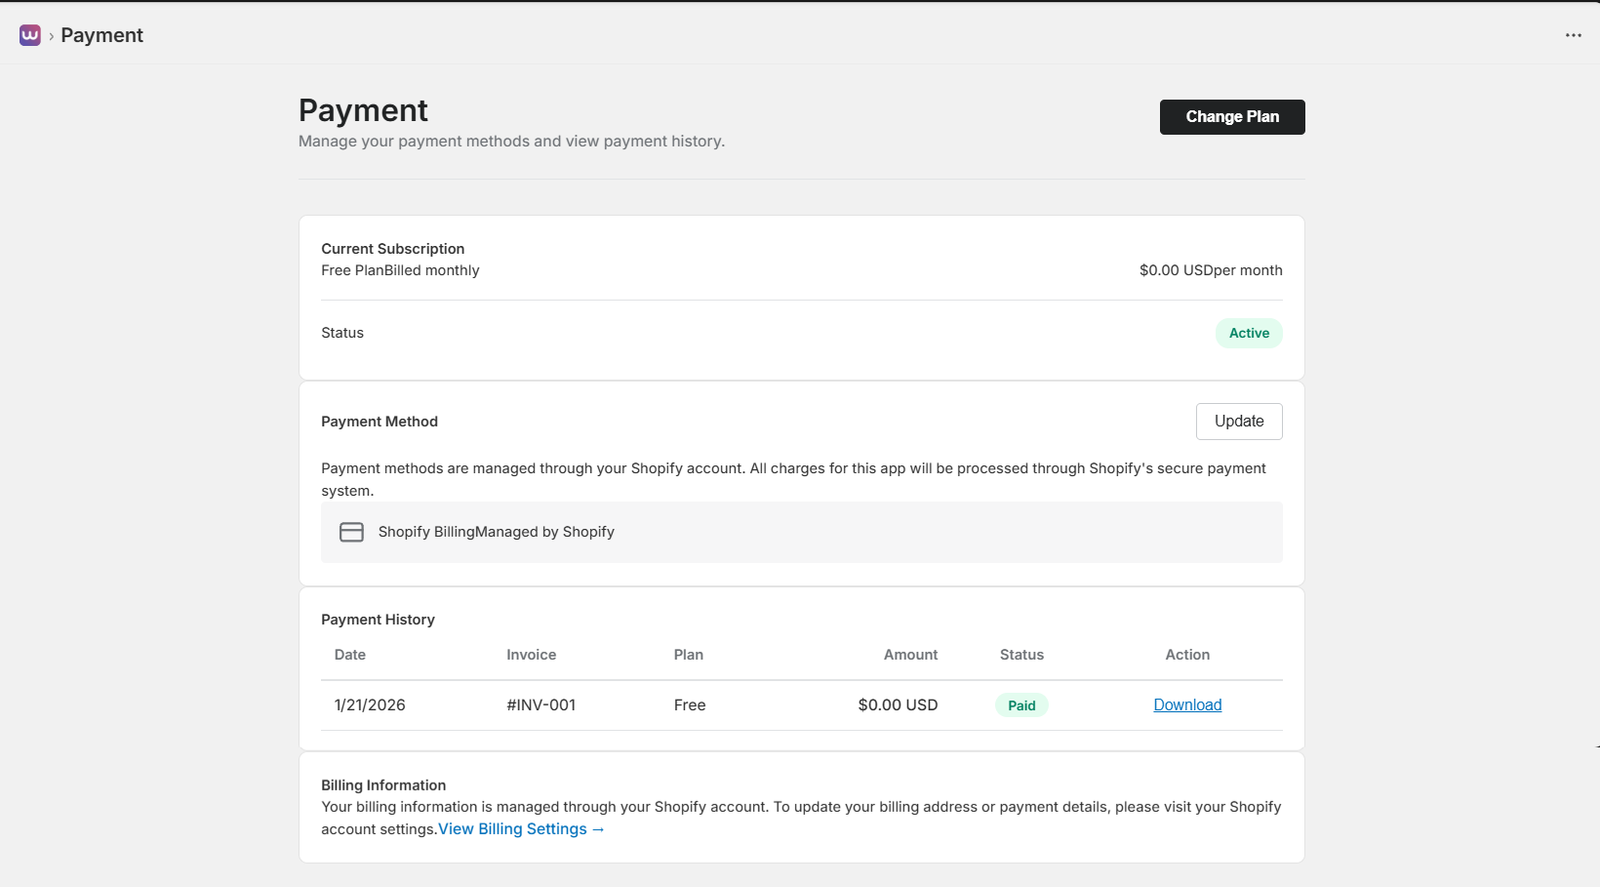
Current Subscription
View your active subscription details:
- Plan Name: Your current plan (Free, Starter, Growth, or Plus)
- Billing Cycle: Monthly or annual billing
- Cost: Monthly or annual cost in USD
- Status: Active, Pending, or Inactive status indicator
Use the “Change Plan” button to navigate back to the pricing page and modify your subscription.
Payment Method
Payment methods are managed through your Shopify account. All charges for this app will be processed through Shopify’s secure payment system.
- Shopify Billing: All payments are handled by Shopify’s billing system
- Update Payment Method: Click “Update” to manage payment methods through your Shopify account settings
- Secure Processing: All transactions are processed securely through Shopify
Payment History
View a complete history of all payments and invoices:
- Date: Payment date
- Invoice: Invoice number (e.g., #INV-001)
- Plan: Plan associated with the payment
- Amount: Payment amount in USD
- Status: Payment status (Paid, Pending, Failed)
- Action: Download invoice as PDF
This helps you track all billing activity and maintain records for accounting purposes.
Billing Information
Your billing information is managed through your Shopify account. To update your billing address or payment details, please visit your Shopify account settings.
- View Billing Settings: Click “View Billing Settings →” to navigate to your Shopify account’s billing section
- Centralized Management: All billing information is managed in one place through Shopify
Plan Management
You can manage your subscription in several ways:
- Upgrade: Move to a higher plan from the Pricing page
- Downgrade: Move to a lower plan (changes take effect at the start of your next billing period)
- View Details: Access the Payment page to see subscription details and payment history
- Cancel: Cancel your subscription through Shopify’s billing settings
Note: All payments are processed securely through Shopify’s billing system. View your payment history, update payment methods, and manage your subscription from the Payment page accessible via the main navigation or the “View Payment Details” link on the Pricing page.
On-site Content
Configure how your loyalty program appears on your storefront with customizable on-site elements. Our on-site content features are designed to make your loyalty program visible, engaging, and easy for your shoppers to use.
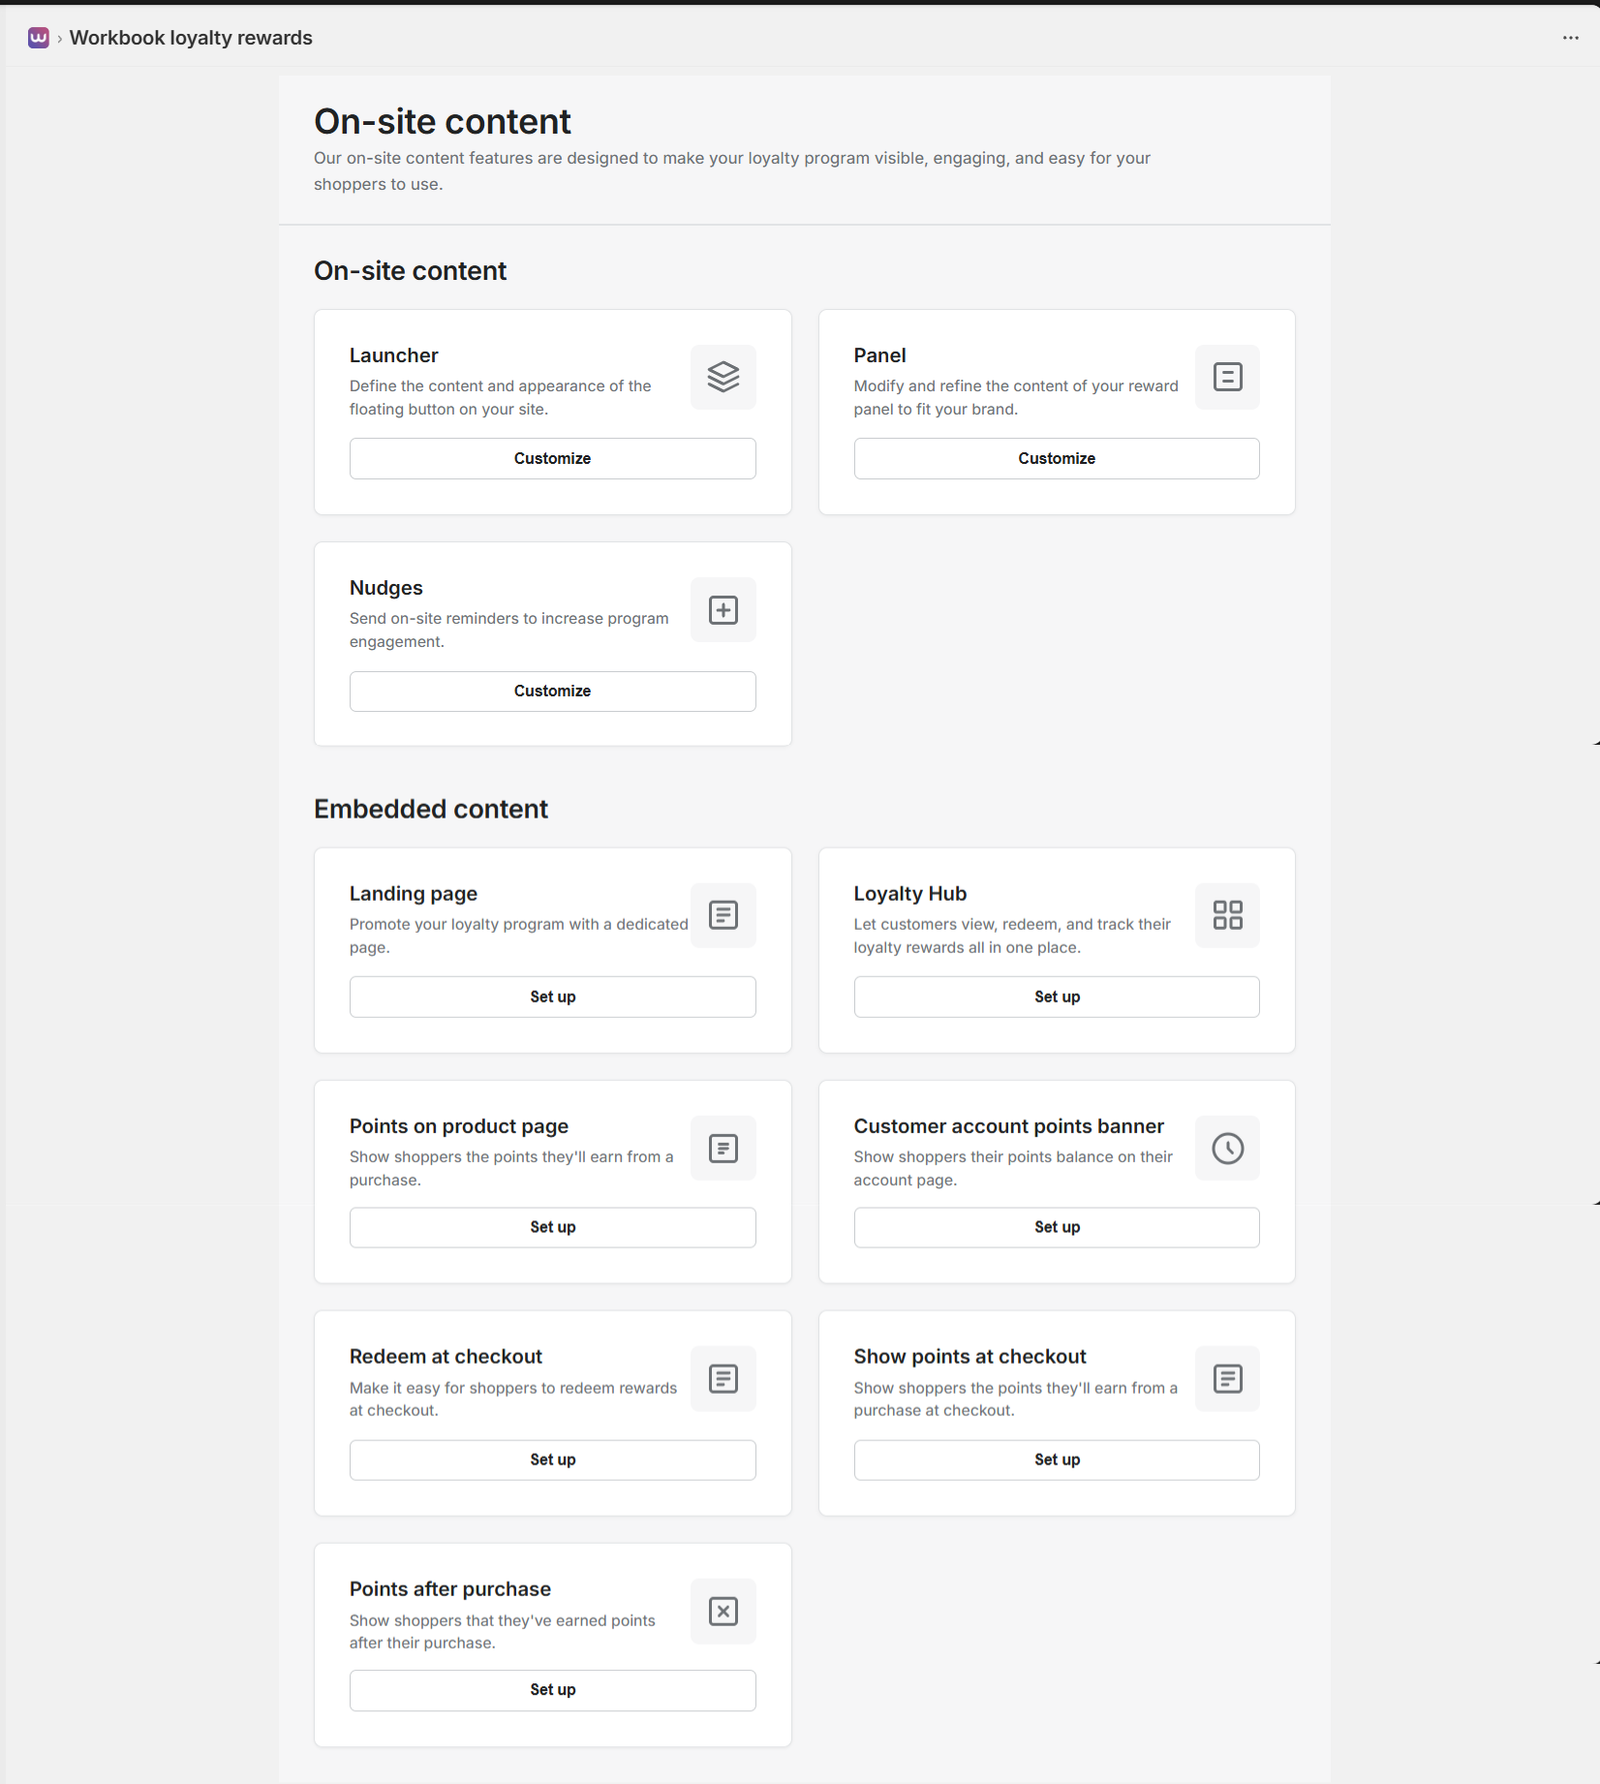
On-site Elements Overview
The On-site Content section is divided into two main categories:
- On-site Content (Floating Elements): Interactive elements that float or appear on your website
- Embedded Content: Features integrated directly into specific pages of your store
Launcher
The Launcher is a floating button that appears on your storefront, allowing customers to easily access their loyalty program dashboard, view points, and redeem rewards.
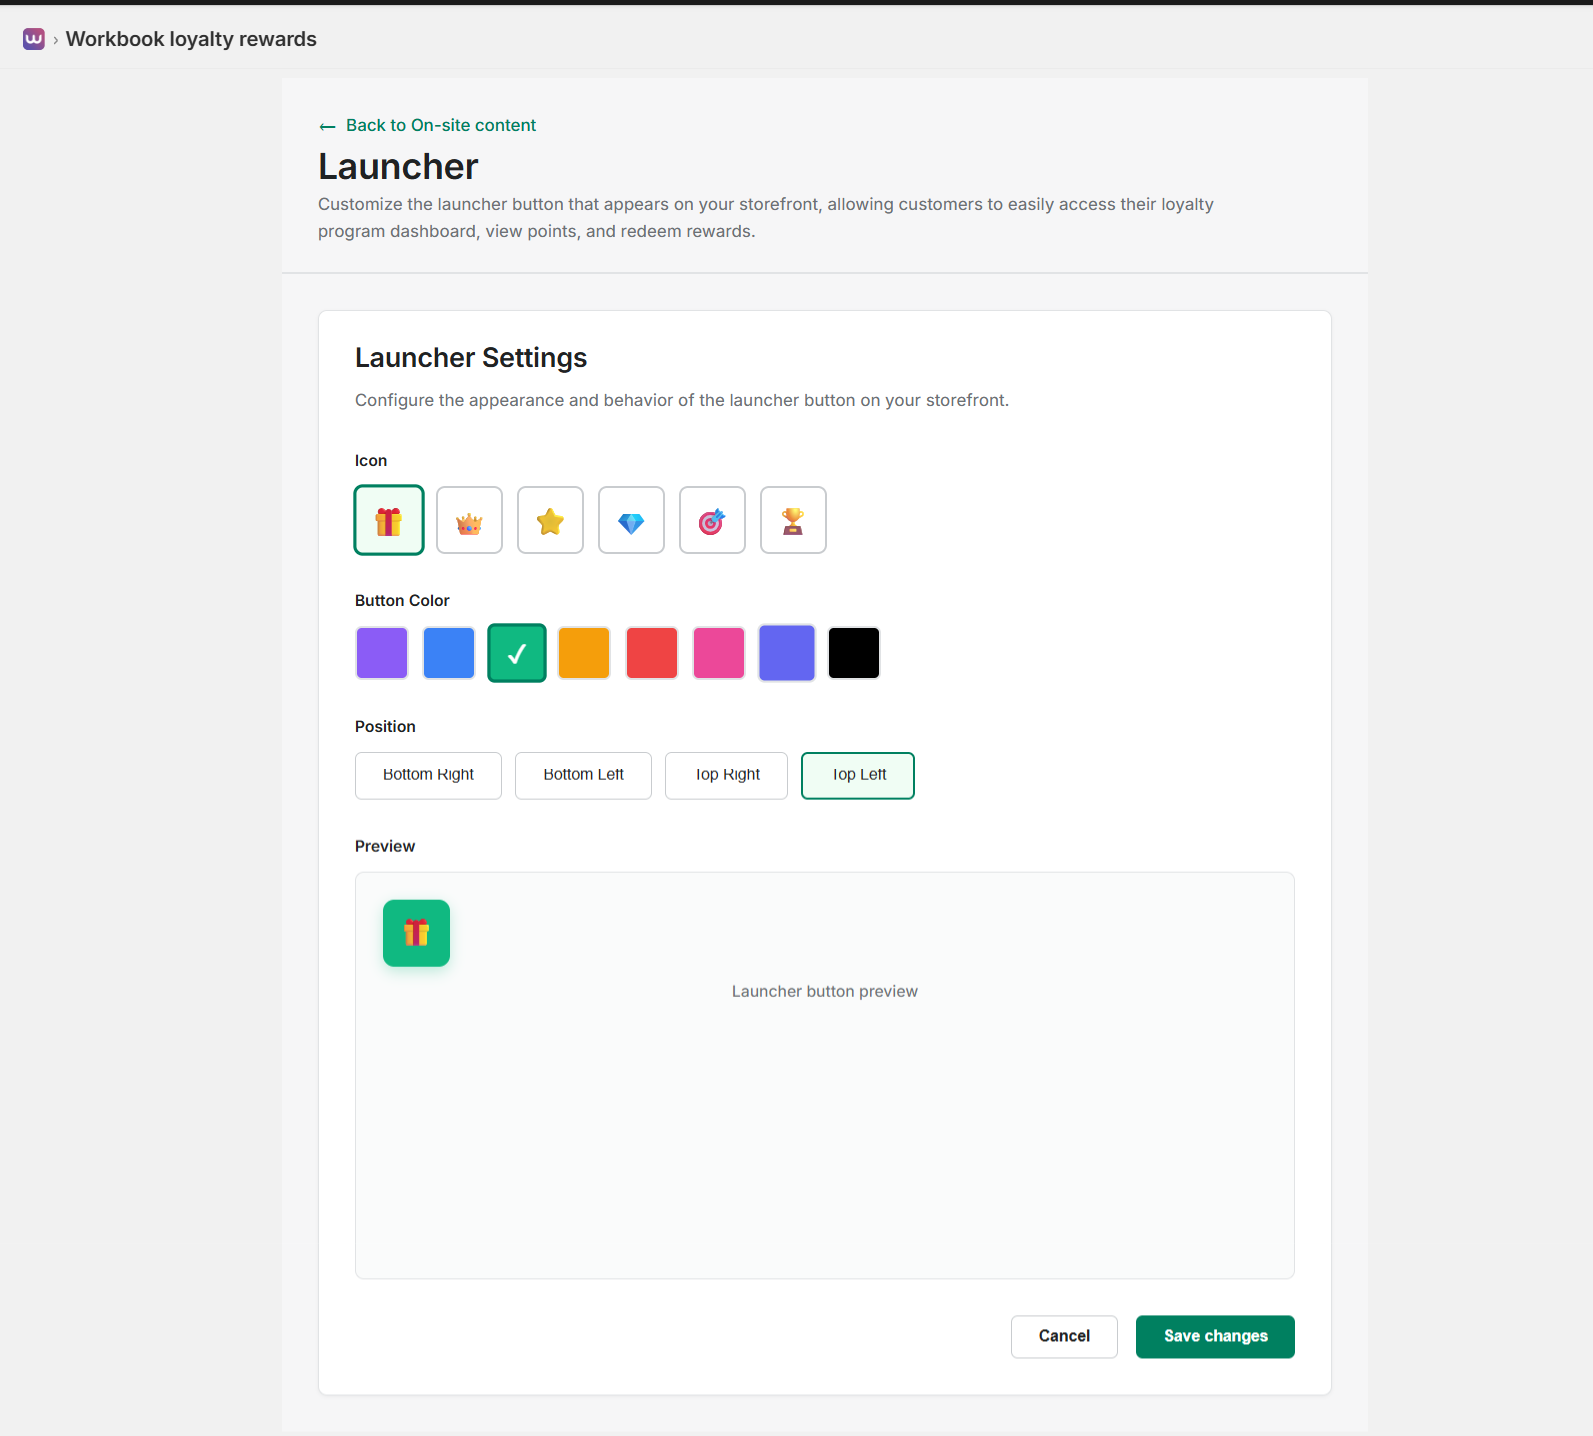
Customize the launcher button that appears on your storefront:
- Icon Selection: Choose from six icon options including gift box, crown, star, diamond, target, or trophy
- Button Color: Select from preset colors (purple, blue, green, orange, red, pink, indigo, black) or use your brand color
- Position: Set where the launcher appears:
- Bottom Right
- Bottom Left
- Top Right
- Top Left
- Live Preview: See exactly how the launcher will appear on your storefront before saving
The launcher provides the primary way customers access your loyalty program on your store.
Panel
When customers click the Launcher, a panel opens with your loyalty program details. Modify and refine the content of your reward panel to fit your brand.
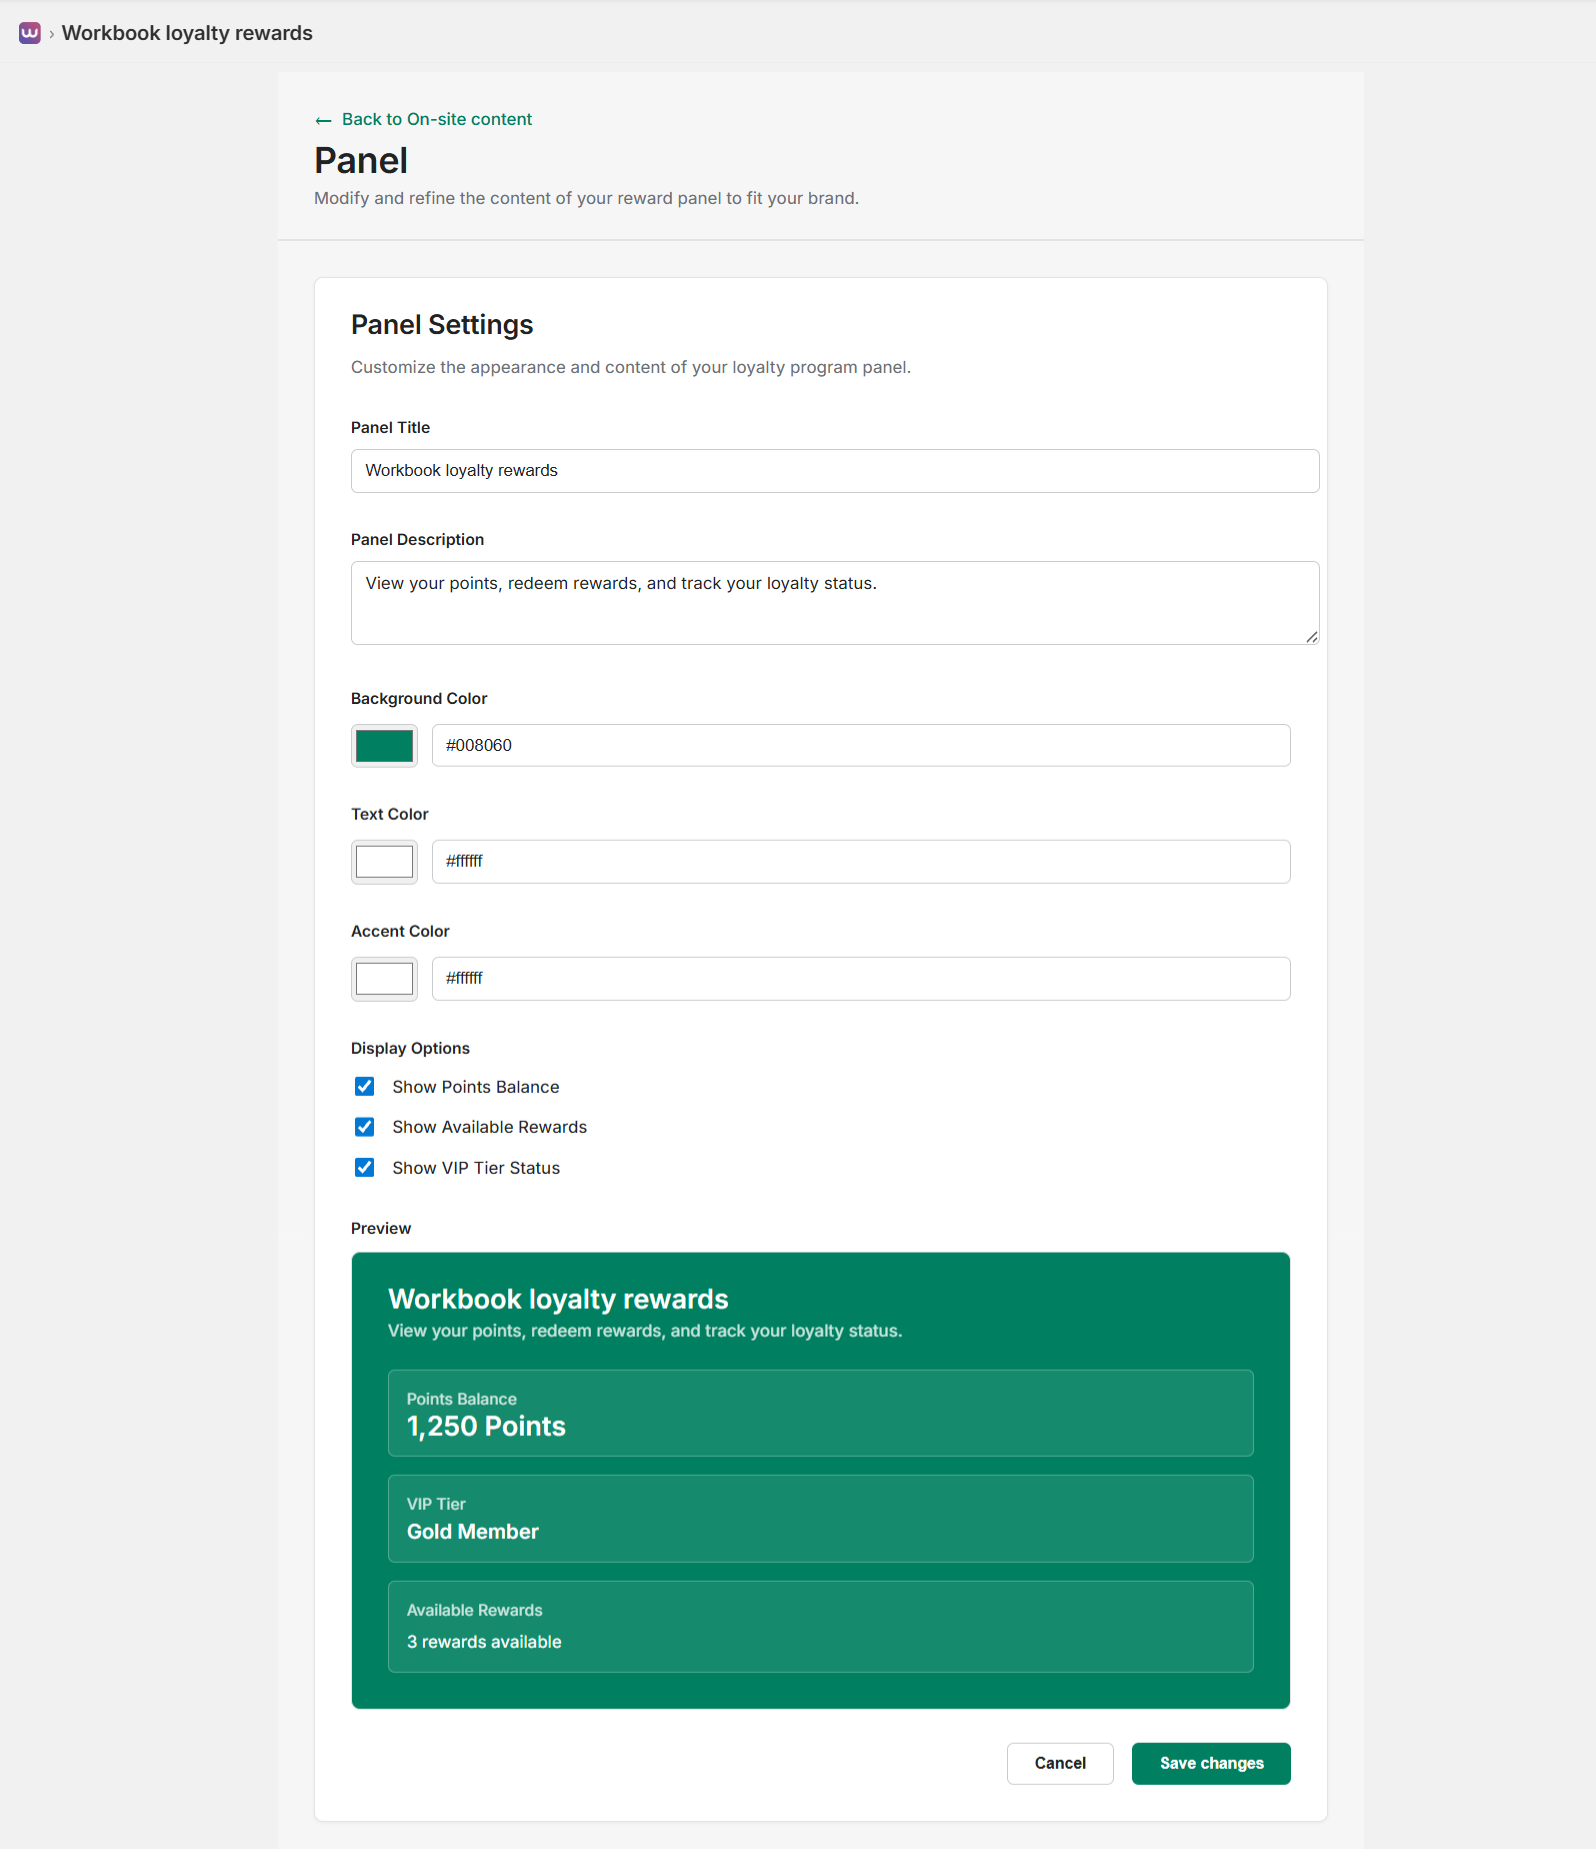
Customize the loyalty panel:
- Panel Title: Set the title displayed in the panel (e.g., “Workbook loyalty rewards”)
- Panel Description: Add a description explaining what customers can do (e.g., “View your points, redeem rewards, and track your loyalty status.”)
- Background Color: Match your brand colors (e.g., #008060 for green)
- Text Color: Ensure readability with white (#ffffff) or black text
- Accent Color: Set accent color for highlights and icons
- Display Options: Choose what to show in the panel:
- Show Points Balance
- Show Available Rewards
- Show VIP Tier Status
The preview section shows exactly how the panel will appear to your customers with the configured settings.
Nudges
Send on-site reminders to increase program engagement. Nudges are notifications that appear on your storefront to remind customers about their loyalty program.
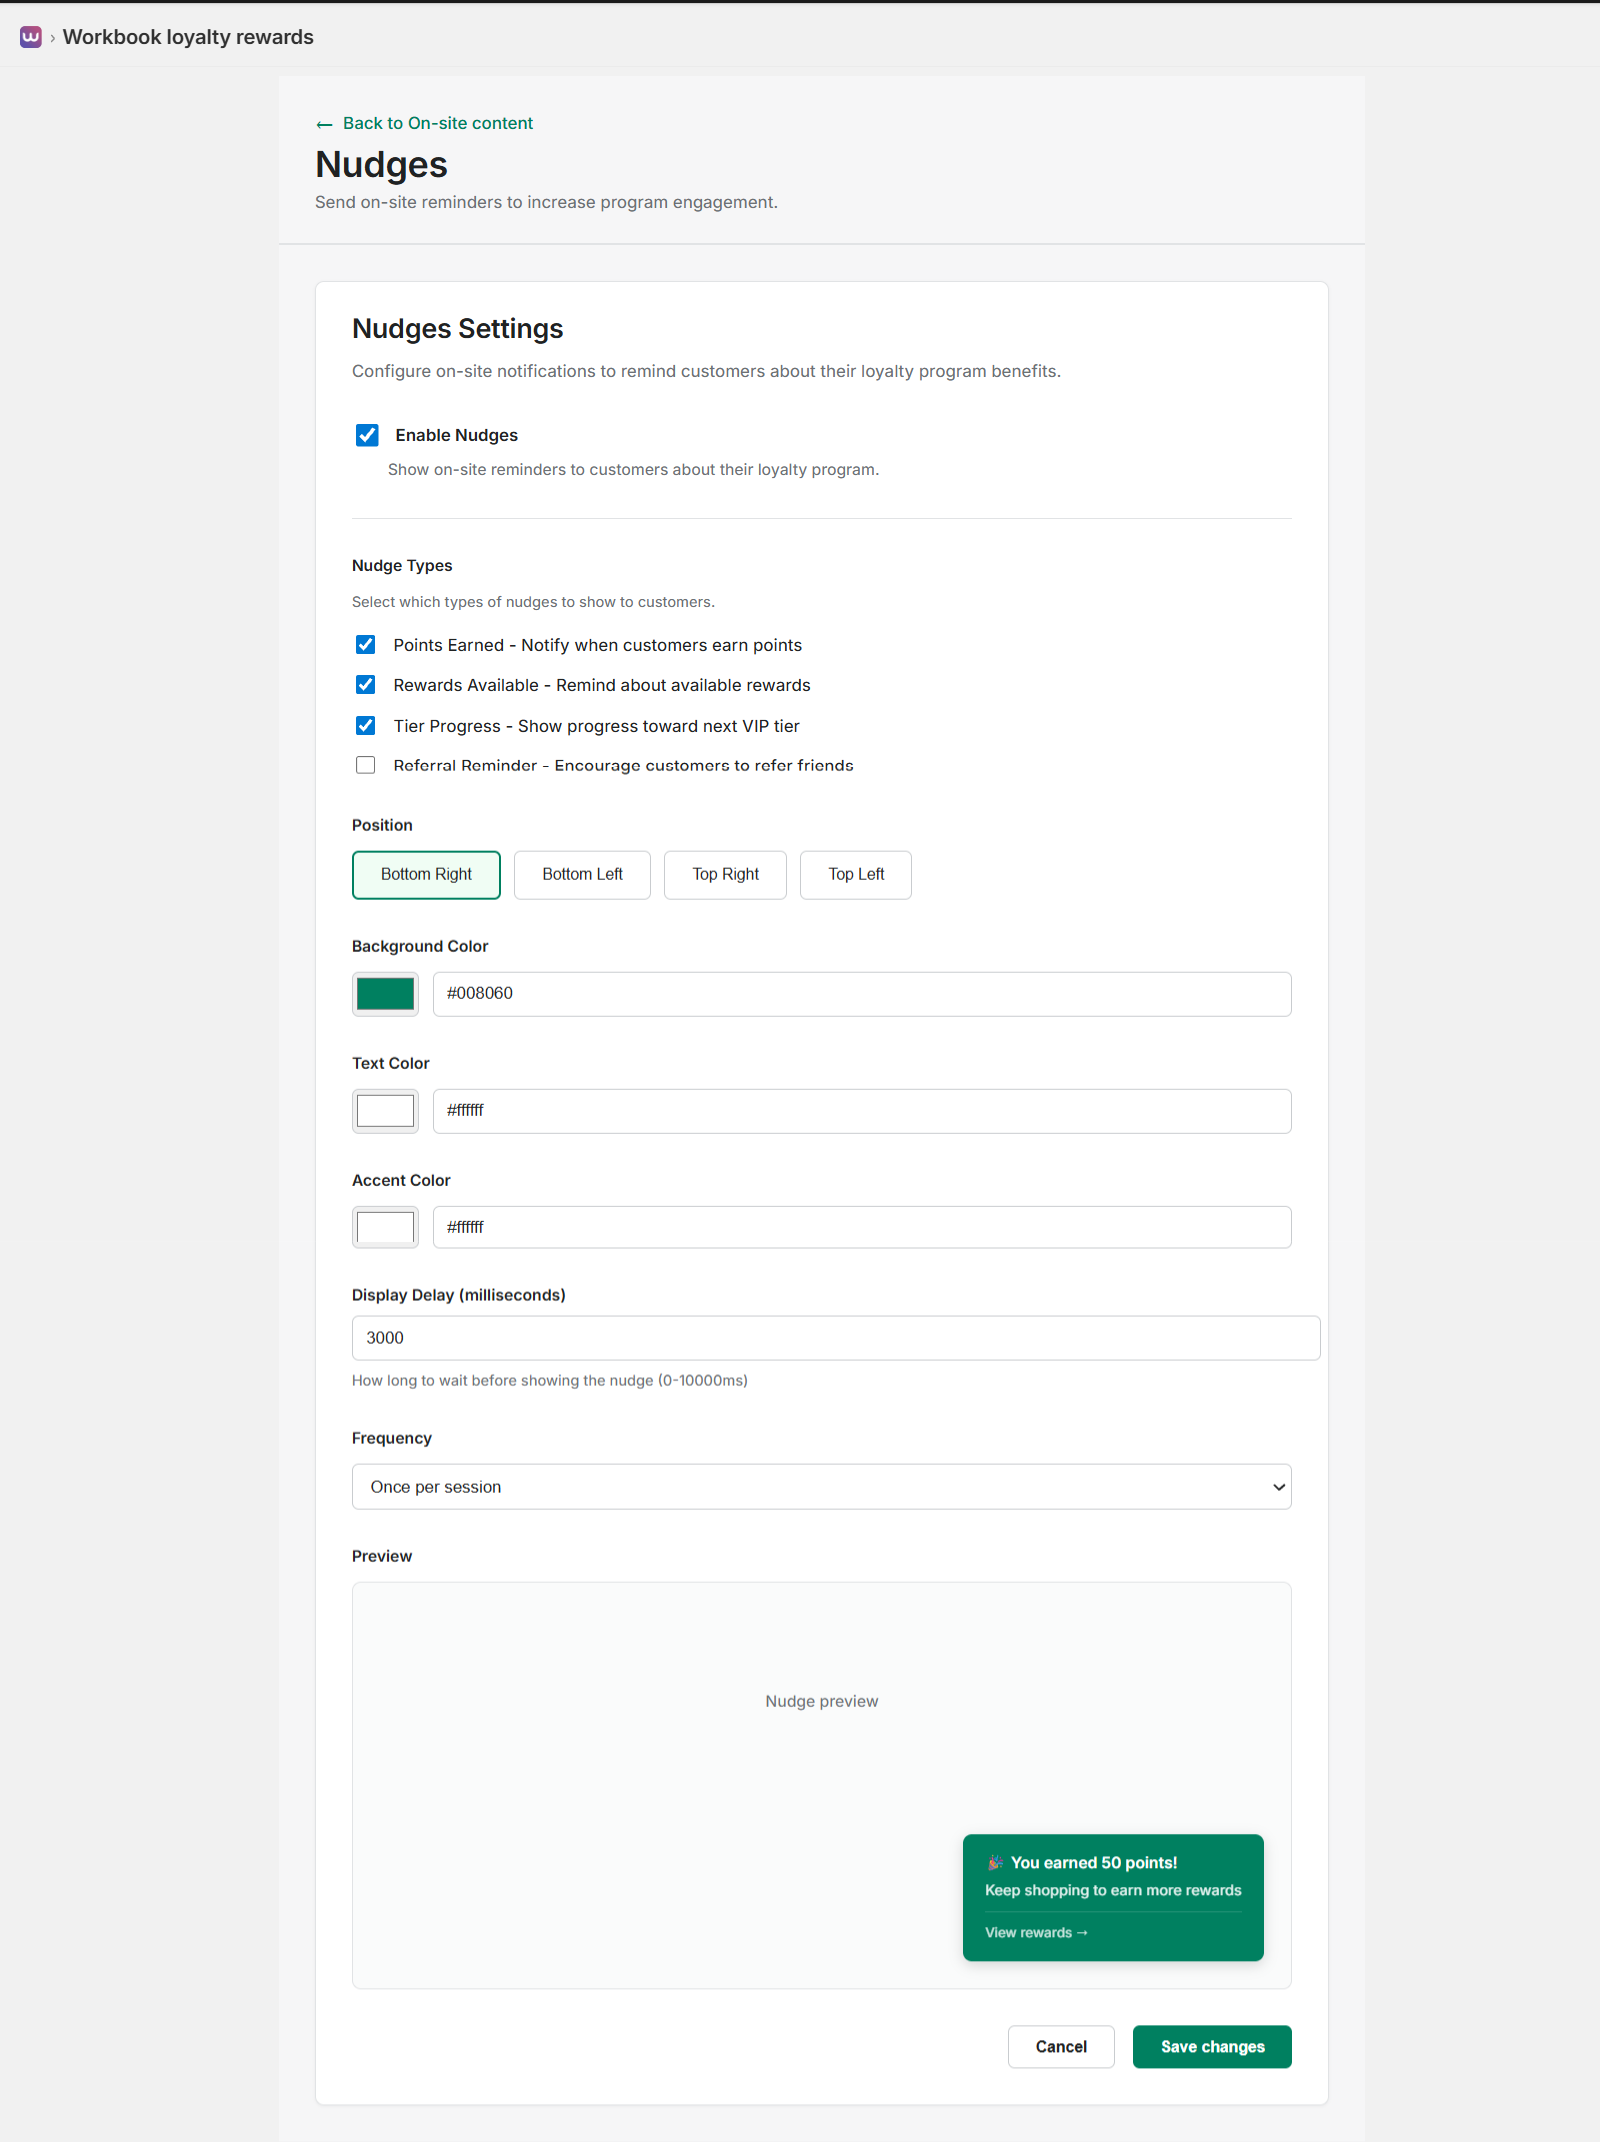
Configure nudges to engage customers:
- Enable Nudges: Toggle to show on-site reminders to customers about their loyalty program
- Nudge Types: Select which types of nudges to display:
- Points Earned: Notify when customers earn points
- Rewards Available: Remind about available rewards
- Tier Progress: Show progress toward next VIP tier
- Referral Reminder: Encourage customers to refer friends
- Position: Choose where nudges appear (Bottom Right, Bottom Left, Top Right, Top Left)
- Styling: Customize background color, text color, and accent color
- Display Delay: Set how long to wait before showing the nudge (0-10000ms, default: 3000ms)
- Frequency: Control how often nudges appear (e.g., “Once per session”)
The preview shows an example nudge: “✨ You earned 50 points! Keep shopping to earn more rewards” with a “View rewards →” link.
Landing Page
Promote your loyalty program with a dedicated page. Create a standalone landing page to attract and engage customers with your loyalty program.
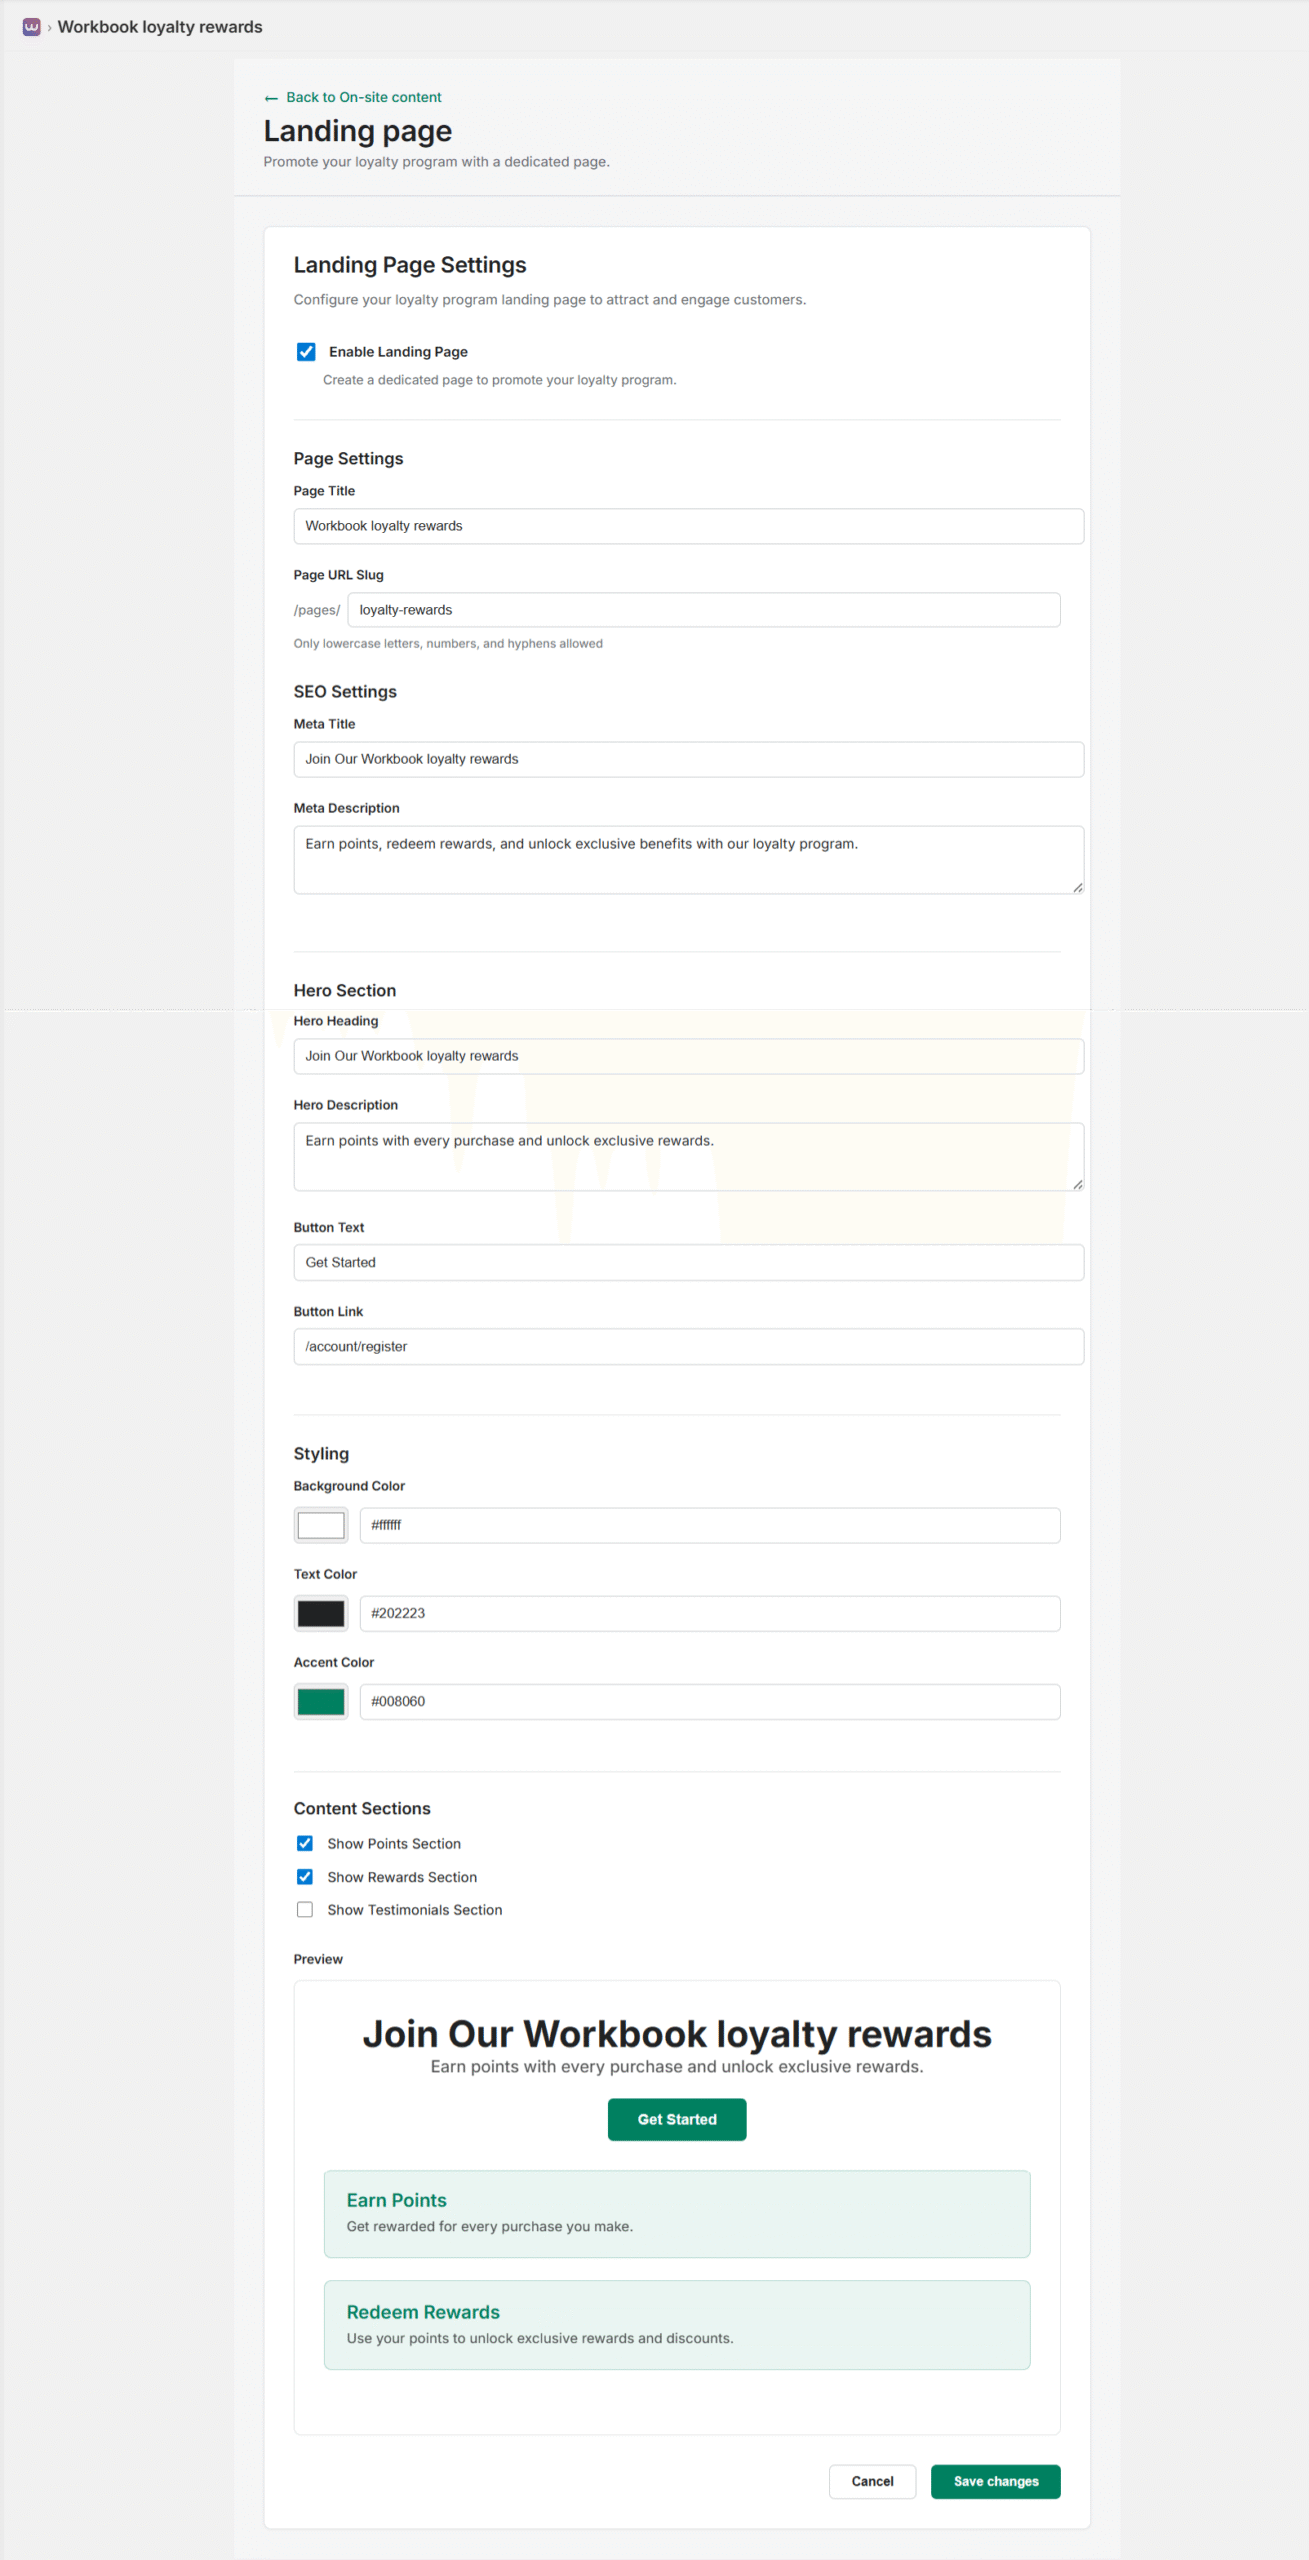
Configure your loyalty program landing page:
- Enable Landing Page: Toggle to create a dedicated page to promote your loyalty program
- Page Settings:
- Page Title: Set the page title (e.g., “Workbook loyalty rewards”)
- Page URL Slug: Define the URL path (e.g., “/pages/loyalty-rewards”) – only lowercase letters, numbers, and hyphens allowed
- SEO Settings:
- Meta Title: Set SEO title (e.g., “Join Our Workbook loyalty rewards”)
- Meta Description: Add SEO description for search engines
- Hero Section:
- Hero Heading: Main headline (e.g., “Join Our Workbook loyalty rewards”)
- Hero Description: Subheading text (e.g., “Earn points with every purchase and unlock exclusive rewards.”)
- Button Text: Call-to-action button label (e.g., “Get Started”)
- Button Link: Link destination (e.g., “/account/register”)
- Styling: Customize background color, text color, and accent color
- Content Sections: Choose which sections to display:
- Show Points Section
- Show Rewards Section
- Show Testimonials Section
The preview shows how the landing page will appear with your configured settings, including the hero section and content cards.
Loyalty Hub
Let customers view, redeem, and track their loyalty rewards all in one place. Create a dedicated hub page for customers to manage their loyalty program.
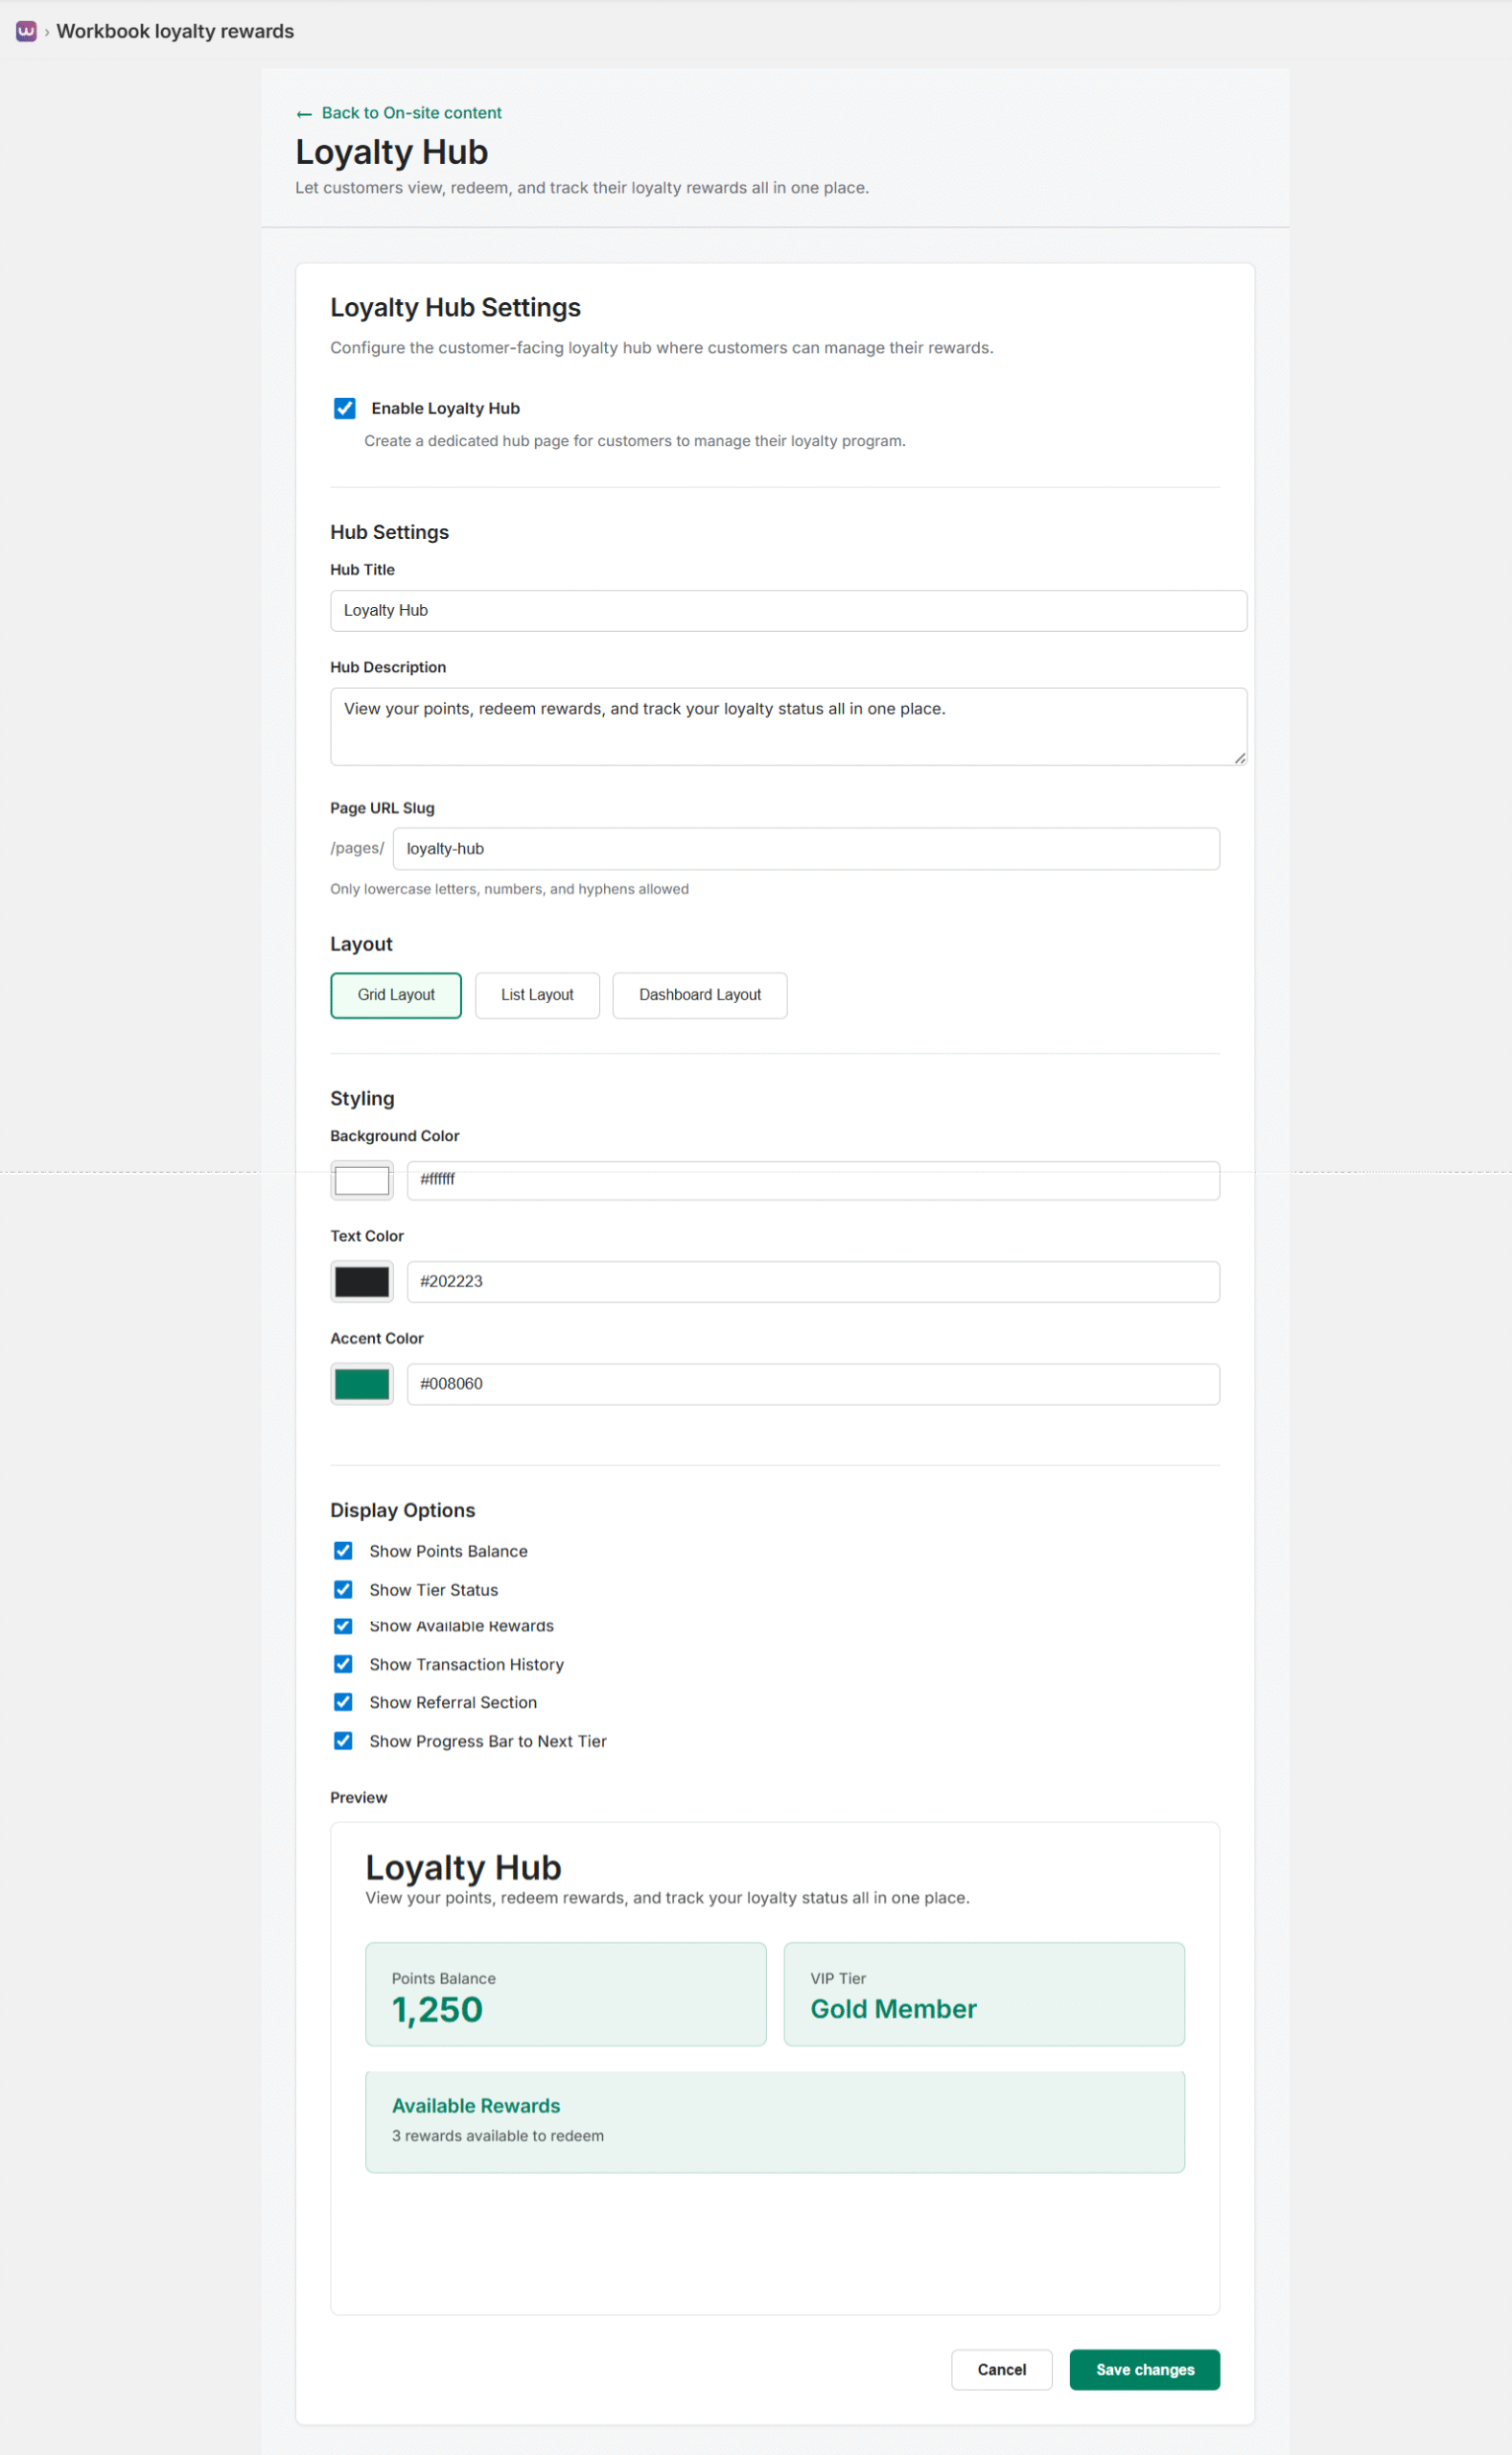
Configure the customer-facing loyalty hub:
- Enable Loyalty Hub: Toggle to create a dedicated hub page for customers to manage their loyalty program
- Hub Settings:
- Hub Title: Set the hub title (e.g., “Loyalty Hub”)
- Hub Description: Add description (e.g., “View your points, redeem rewards, and track your loyalty status all in one place.”)
- Page URL Slug: Define the URL path (e.g., “/pages/loyalty-hub”)
- Layout: Choose the hub layout:
- Grid Layout: Display information in a grid format
- List Layout: Display information in a list format
- Dashboard Layout: Display information in a dashboard-style layout
- Styling: Customize background color, text color, and accent color
- Display Options: Choose what information to show:
- Show Points Balance
- Show Tier Status
- Show Available Rewards
- Show Transaction History
- Show Referral Section
- Show Progress Bar to Next Tier
The preview demonstrates how the Loyalty Hub will appear with your selected layout and display options.
Points on Product Page
Show shoppers the points they’ll earn from a purchase. Display loyalty points information directly on product pages to encourage purchases.
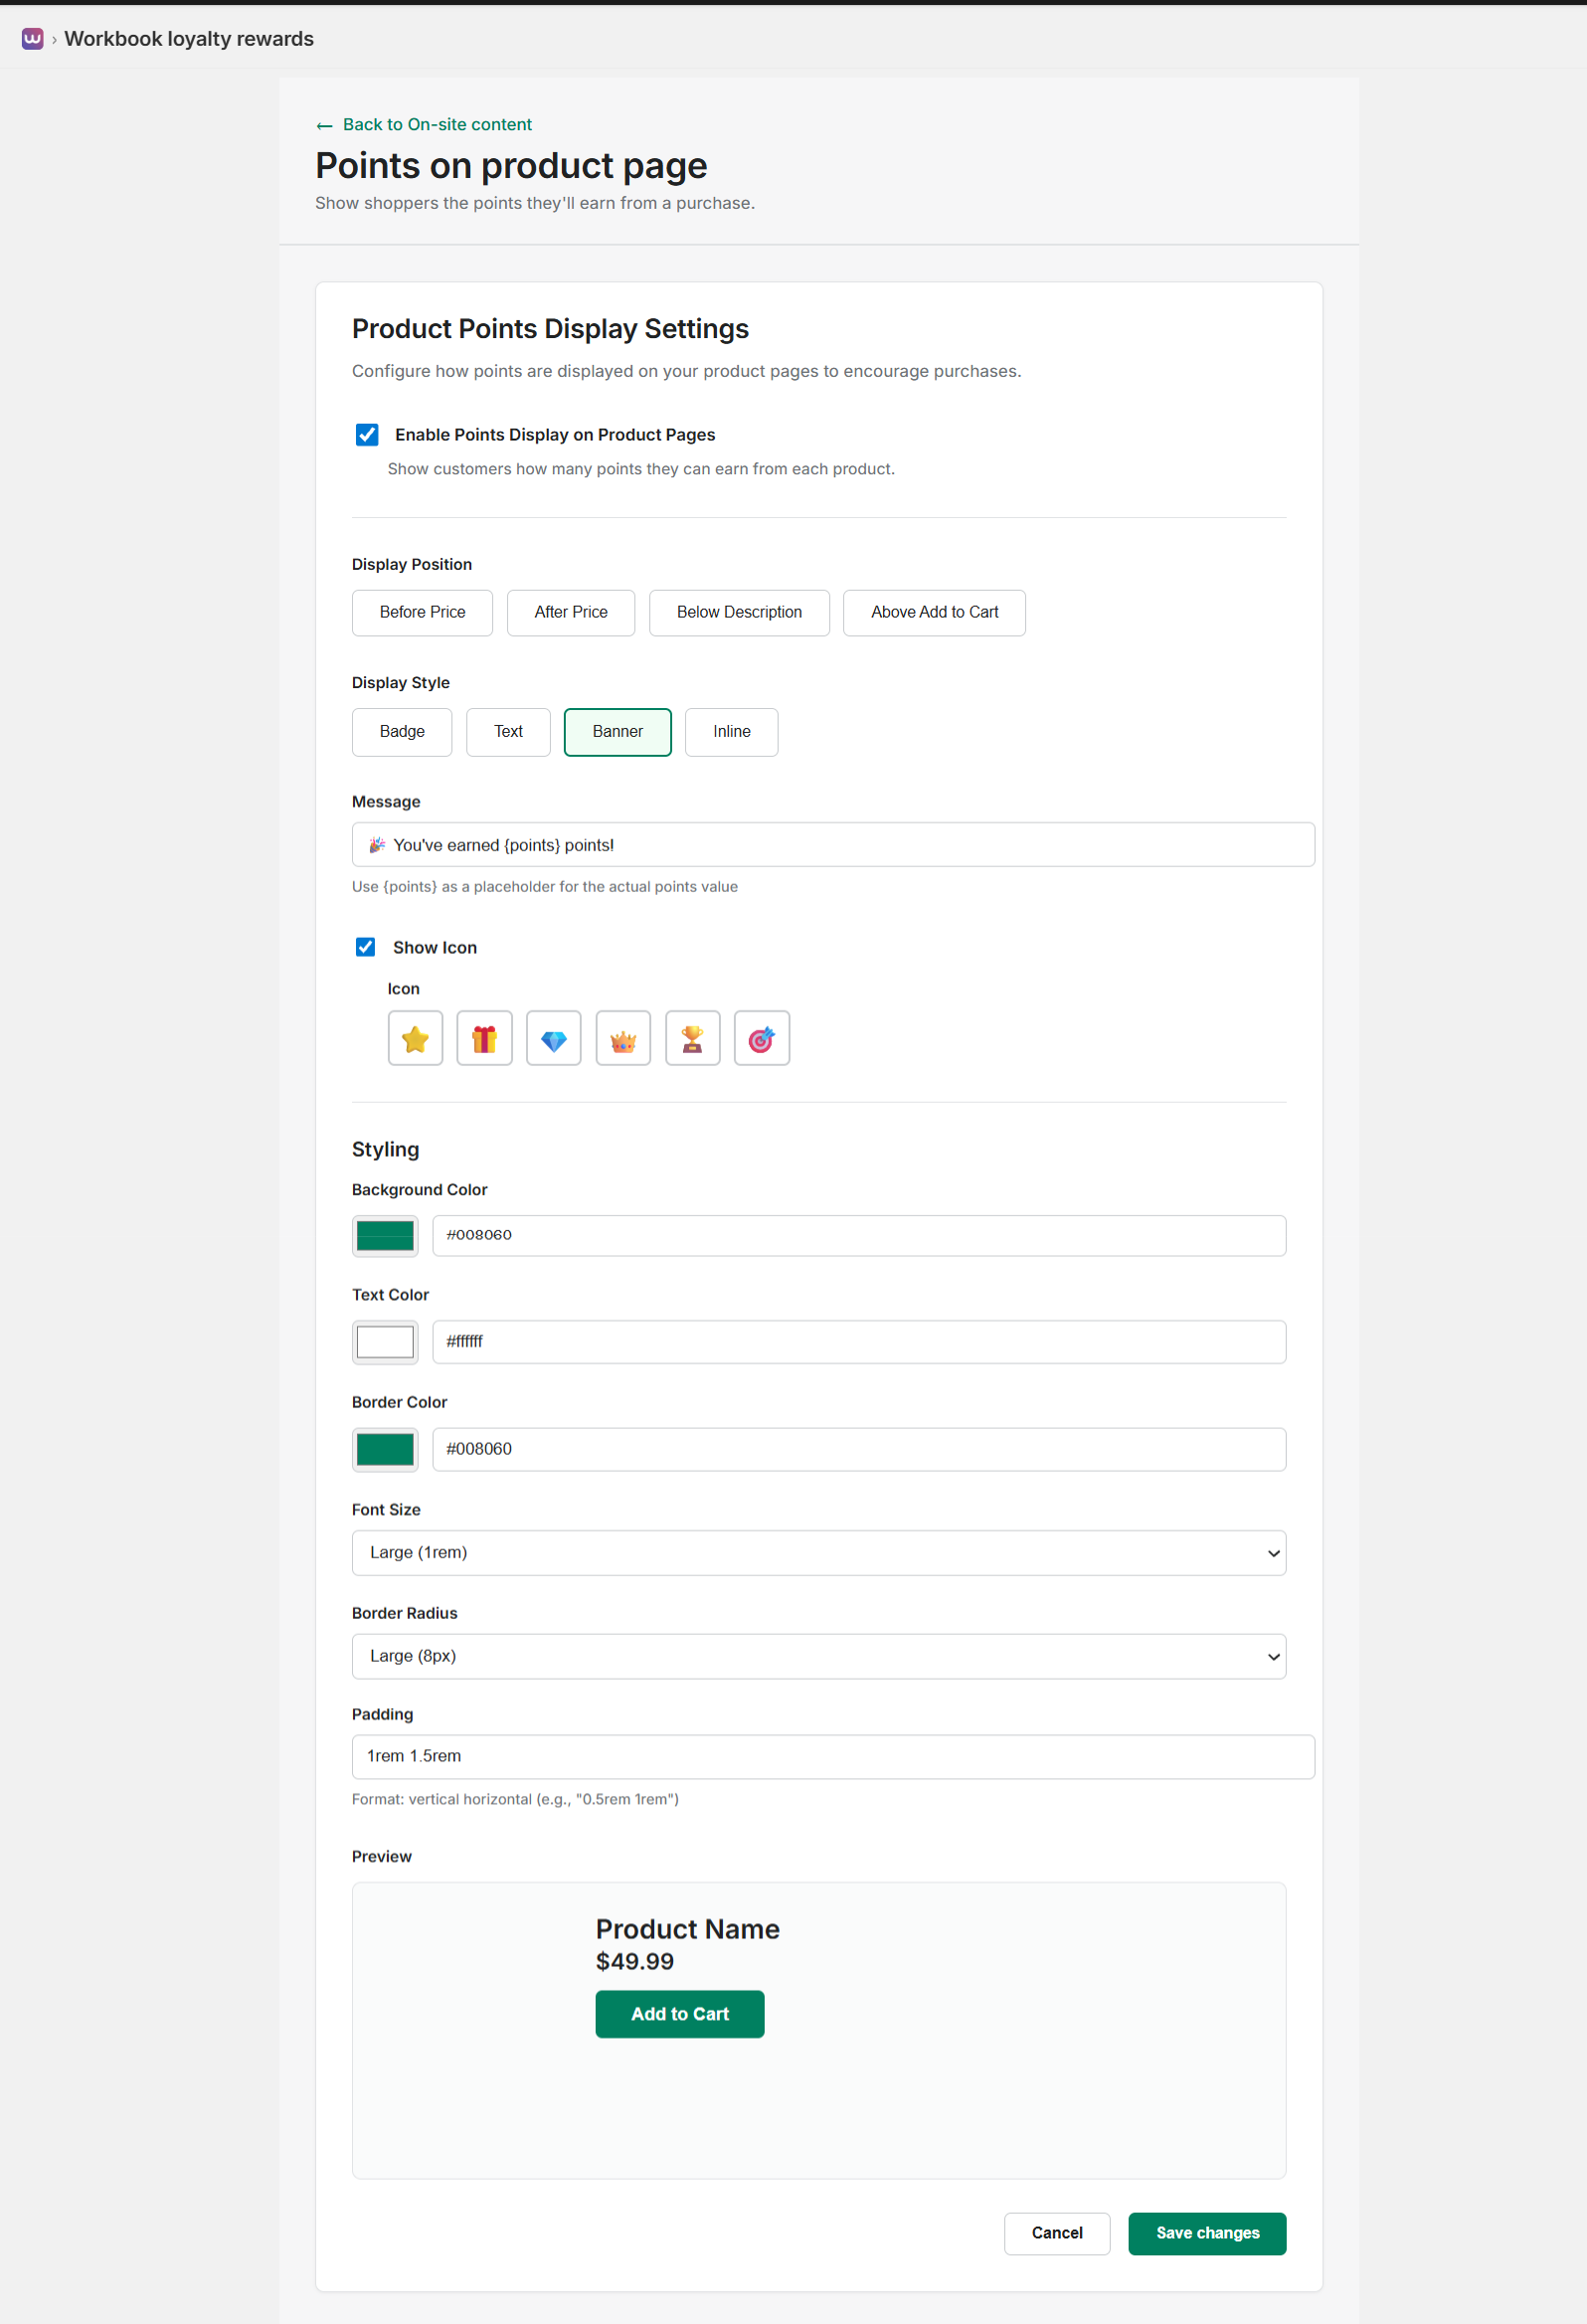
Configure how points are displayed on product pages:
- Enable Points Display: Toggle to show customers how many points they can earn from each product
- Display Position: Choose where the points information appears:
- Before Price
- After Price
- Below Description
- Above Add to Cart
- Display Style: Select the visual presentation:
- Badge: A styled badge with background color
- Text: Simple text display
- Banner: Banner-style display
- Inline: Inline with product information
- Message: Customize the message (e.g., “You’ve earned {points} points!”) – use {points} as a placeholder
- Show Icon: Toggle to display an icon with the points message
- Icon Selection: Choose from star, gift box, diamond, crown, trophy, or target icons
- Styling: Customize:
- Background Color
- Text Color
- Border Color
- Font Size (Small, Medium, Large)
- Border Radius (Small, Medium, Large)
- Padding (format: “vertical horizontal”, e.g., “1rem 1.5rem”)
The preview shows how the points display will appear on a product page with your selected style and position.
Customer Account Points Banner
Show shoppers their points balance on their account page. Display a banner on customer account pages to keep loyalty program visibility high.
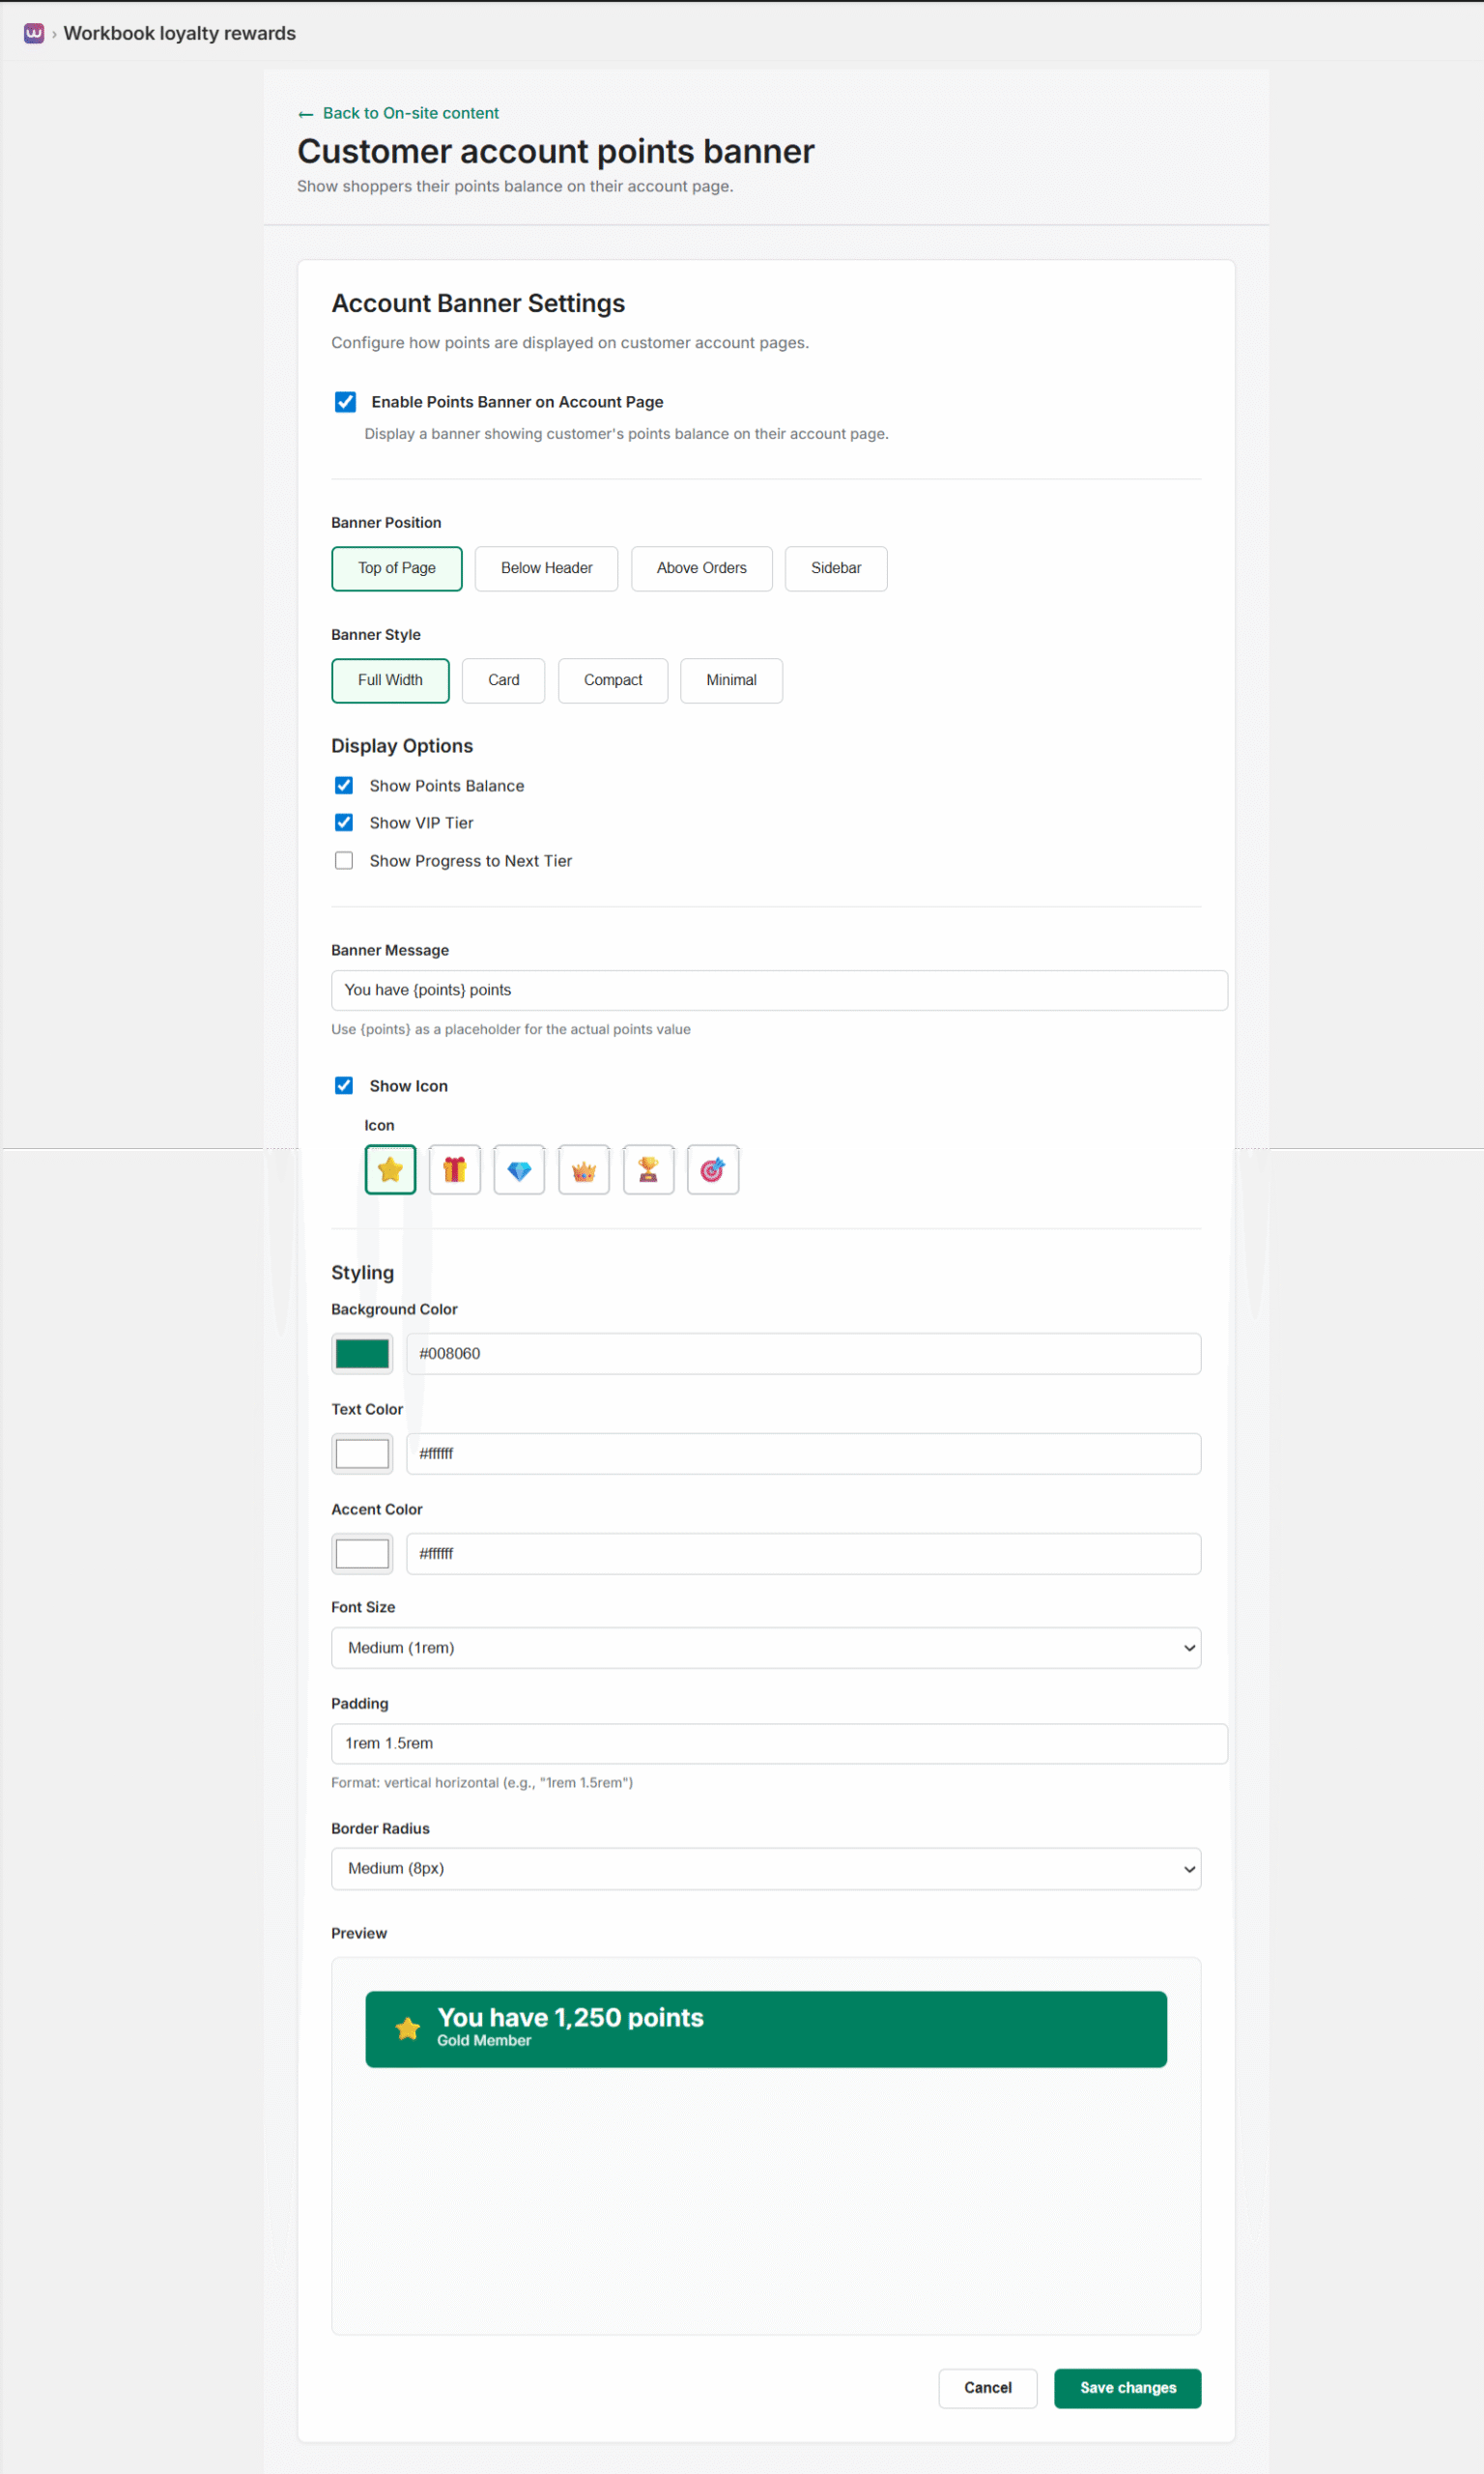
Configure how points are displayed on customer account pages:
- Enable Points Banner: Toggle to display a banner showing customer’s points balance on their account page
- Banner Position: Choose where the banner appears:
- Top of Page
- Below Header
- Above Orders
- Sidebar
- Banner Style: Select the visual style:
- Full Width: Banner spans the full width
- Card: Card-style banner
- Compact: Compact banner
- Minimal: Minimal banner
- Display Options: Choose what to show:
- Show Points Balance
- Show VIP Tier
- Show Progress to Next Tier
- Banner Message: Customize the message (e.g., “You have {points} points.”) – use {points} as a placeholder
- Show Icon: Toggle to display an icon
- Icon Selection: Choose from star, gift box, diamond, crown, trophy, or target icons
- Styling: Customize background color, text color, accent color, font size, padding, and border radius
The preview shows how the banner will appear with your configured settings, displaying points balance and VIP tier information.
Redeem at Checkout
Make it easy for shoppers to redeem rewards at checkout. Allow customers to apply their earned rewards directly during the checkout process.
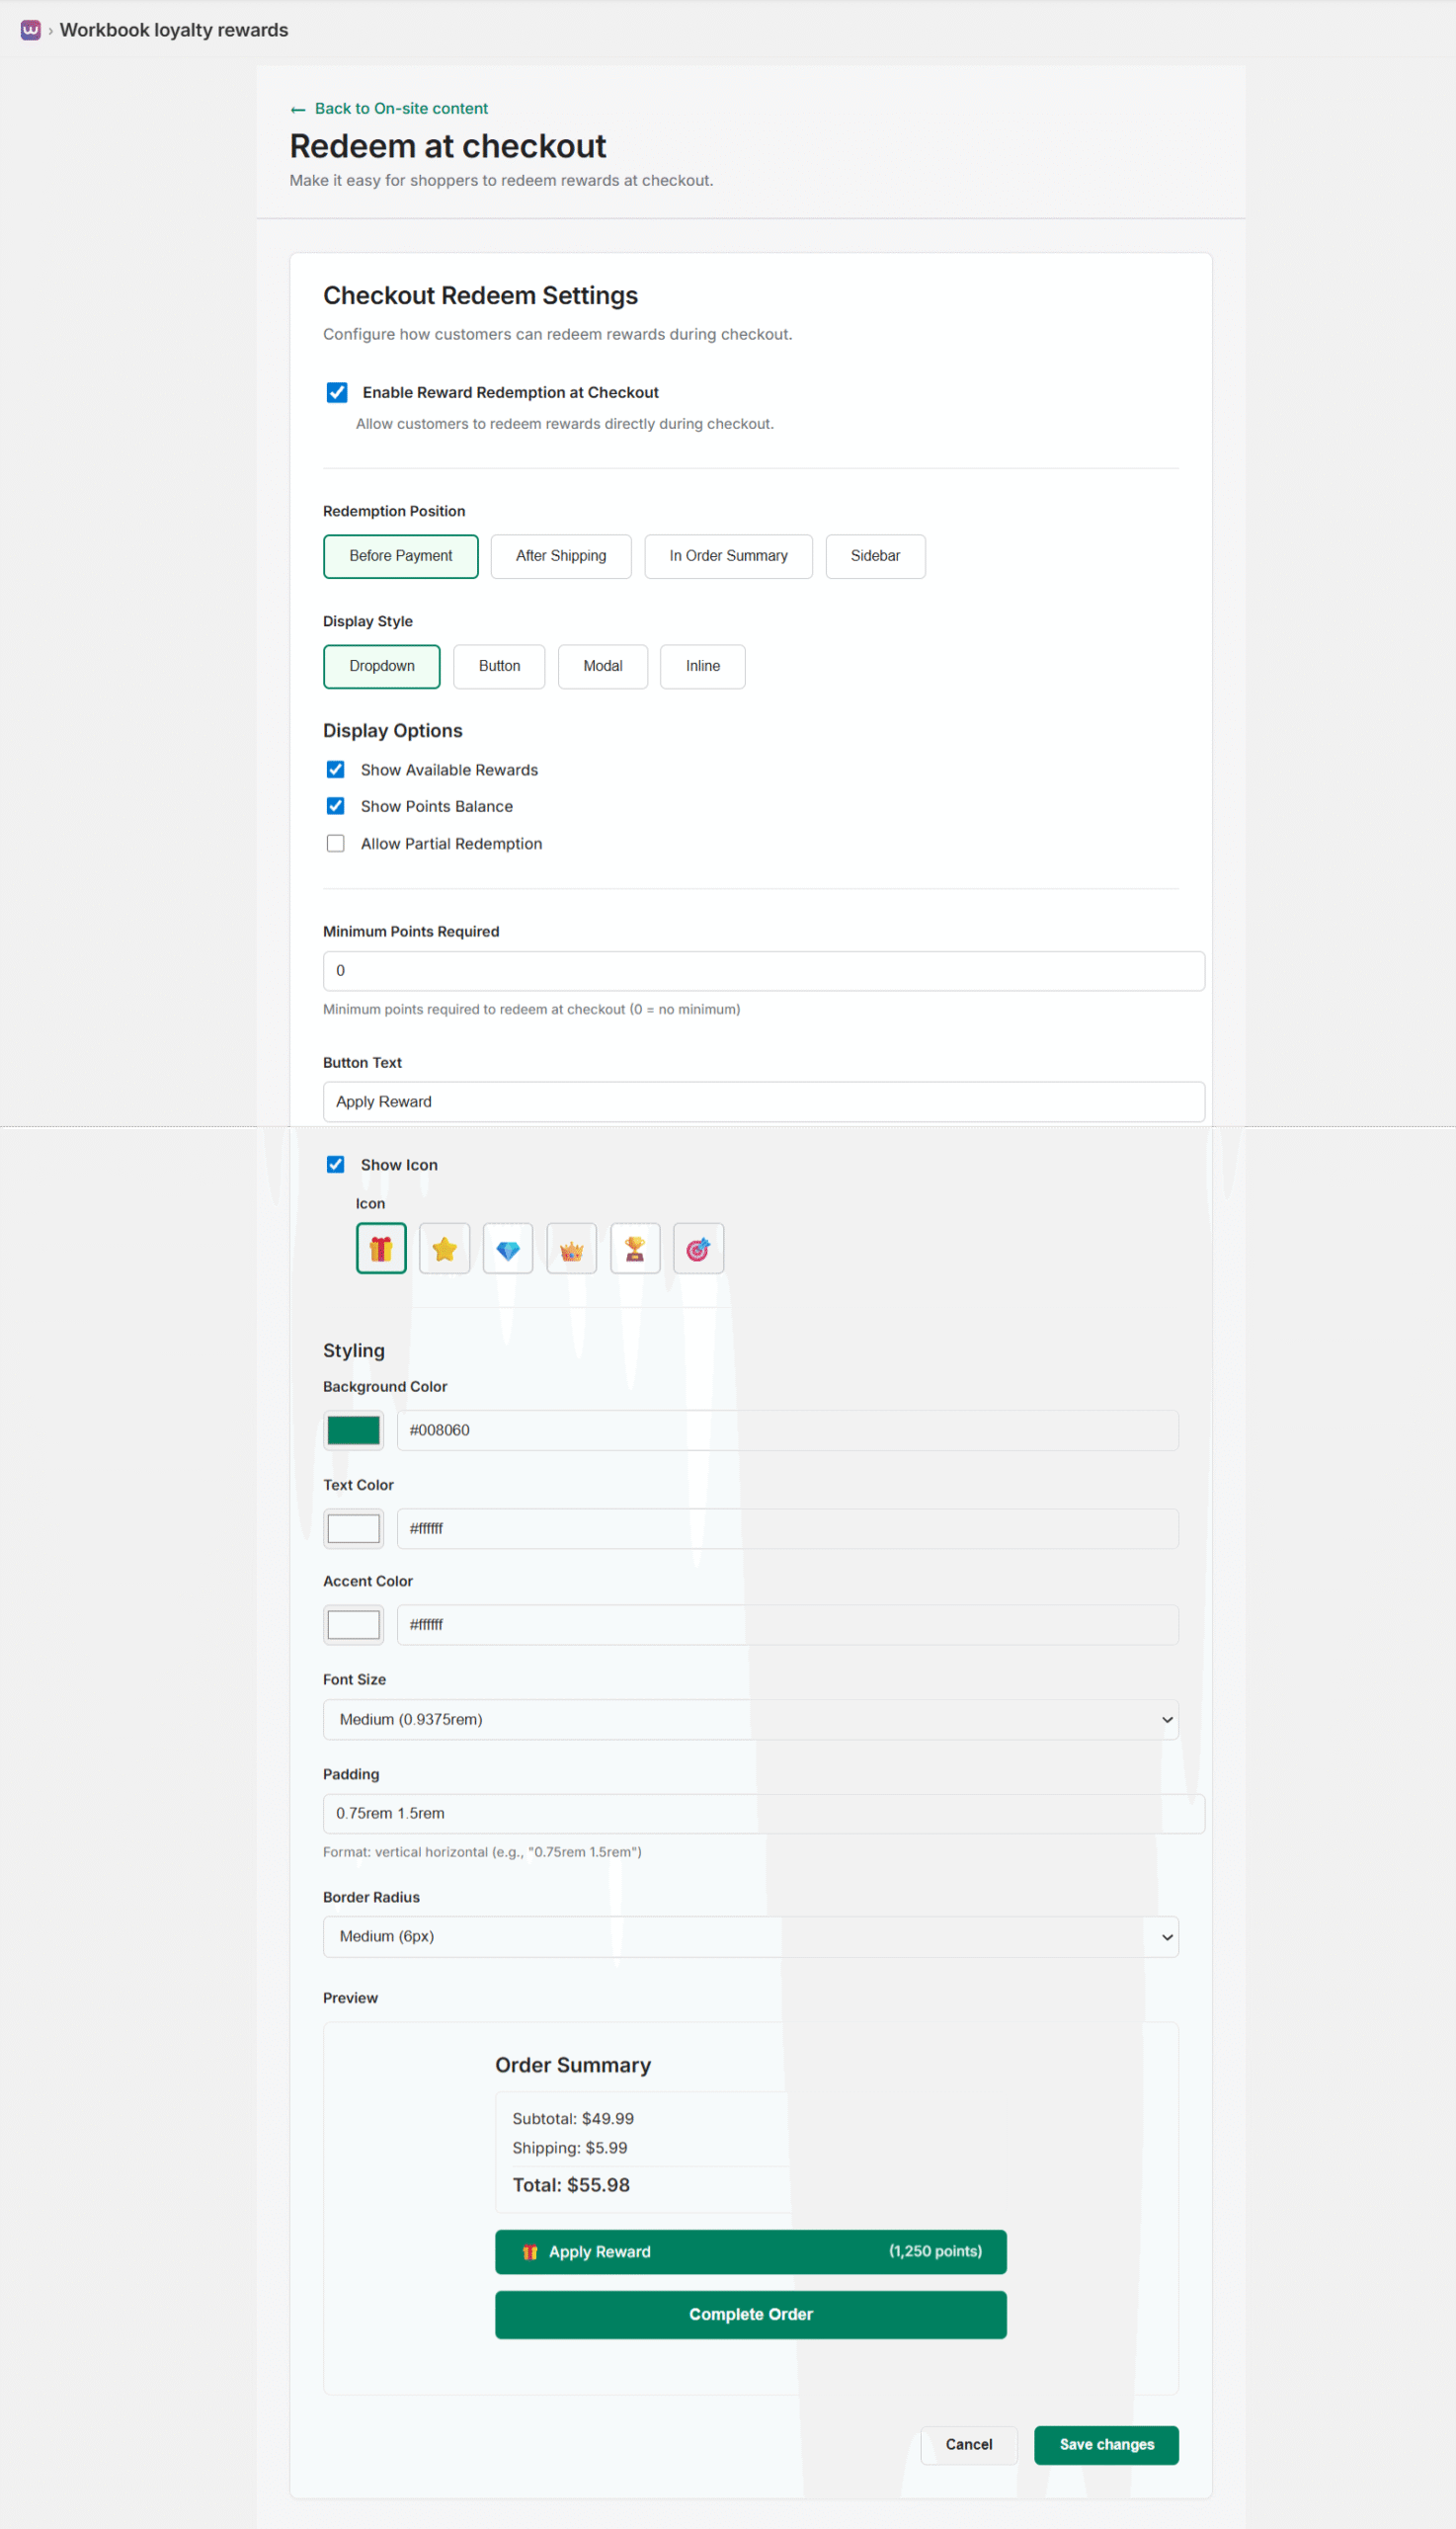
Configure redemption options at checkout:
- Enable Checkout Redemption: Allow customers to redeem rewards during checkout
- Display Options: Show available rewards and redemption options
- Redemption Interface: Customize how rewards are presented at checkout
- Styling: Match checkout redemption styling to your store’s design
This feature makes it convenient for customers to use their points at the moment of purchase.
Show Points at Checkout
Show shoppers the points they’ll earn from a purchase at checkout. Display points earning information during the checkout process to encourage completion.
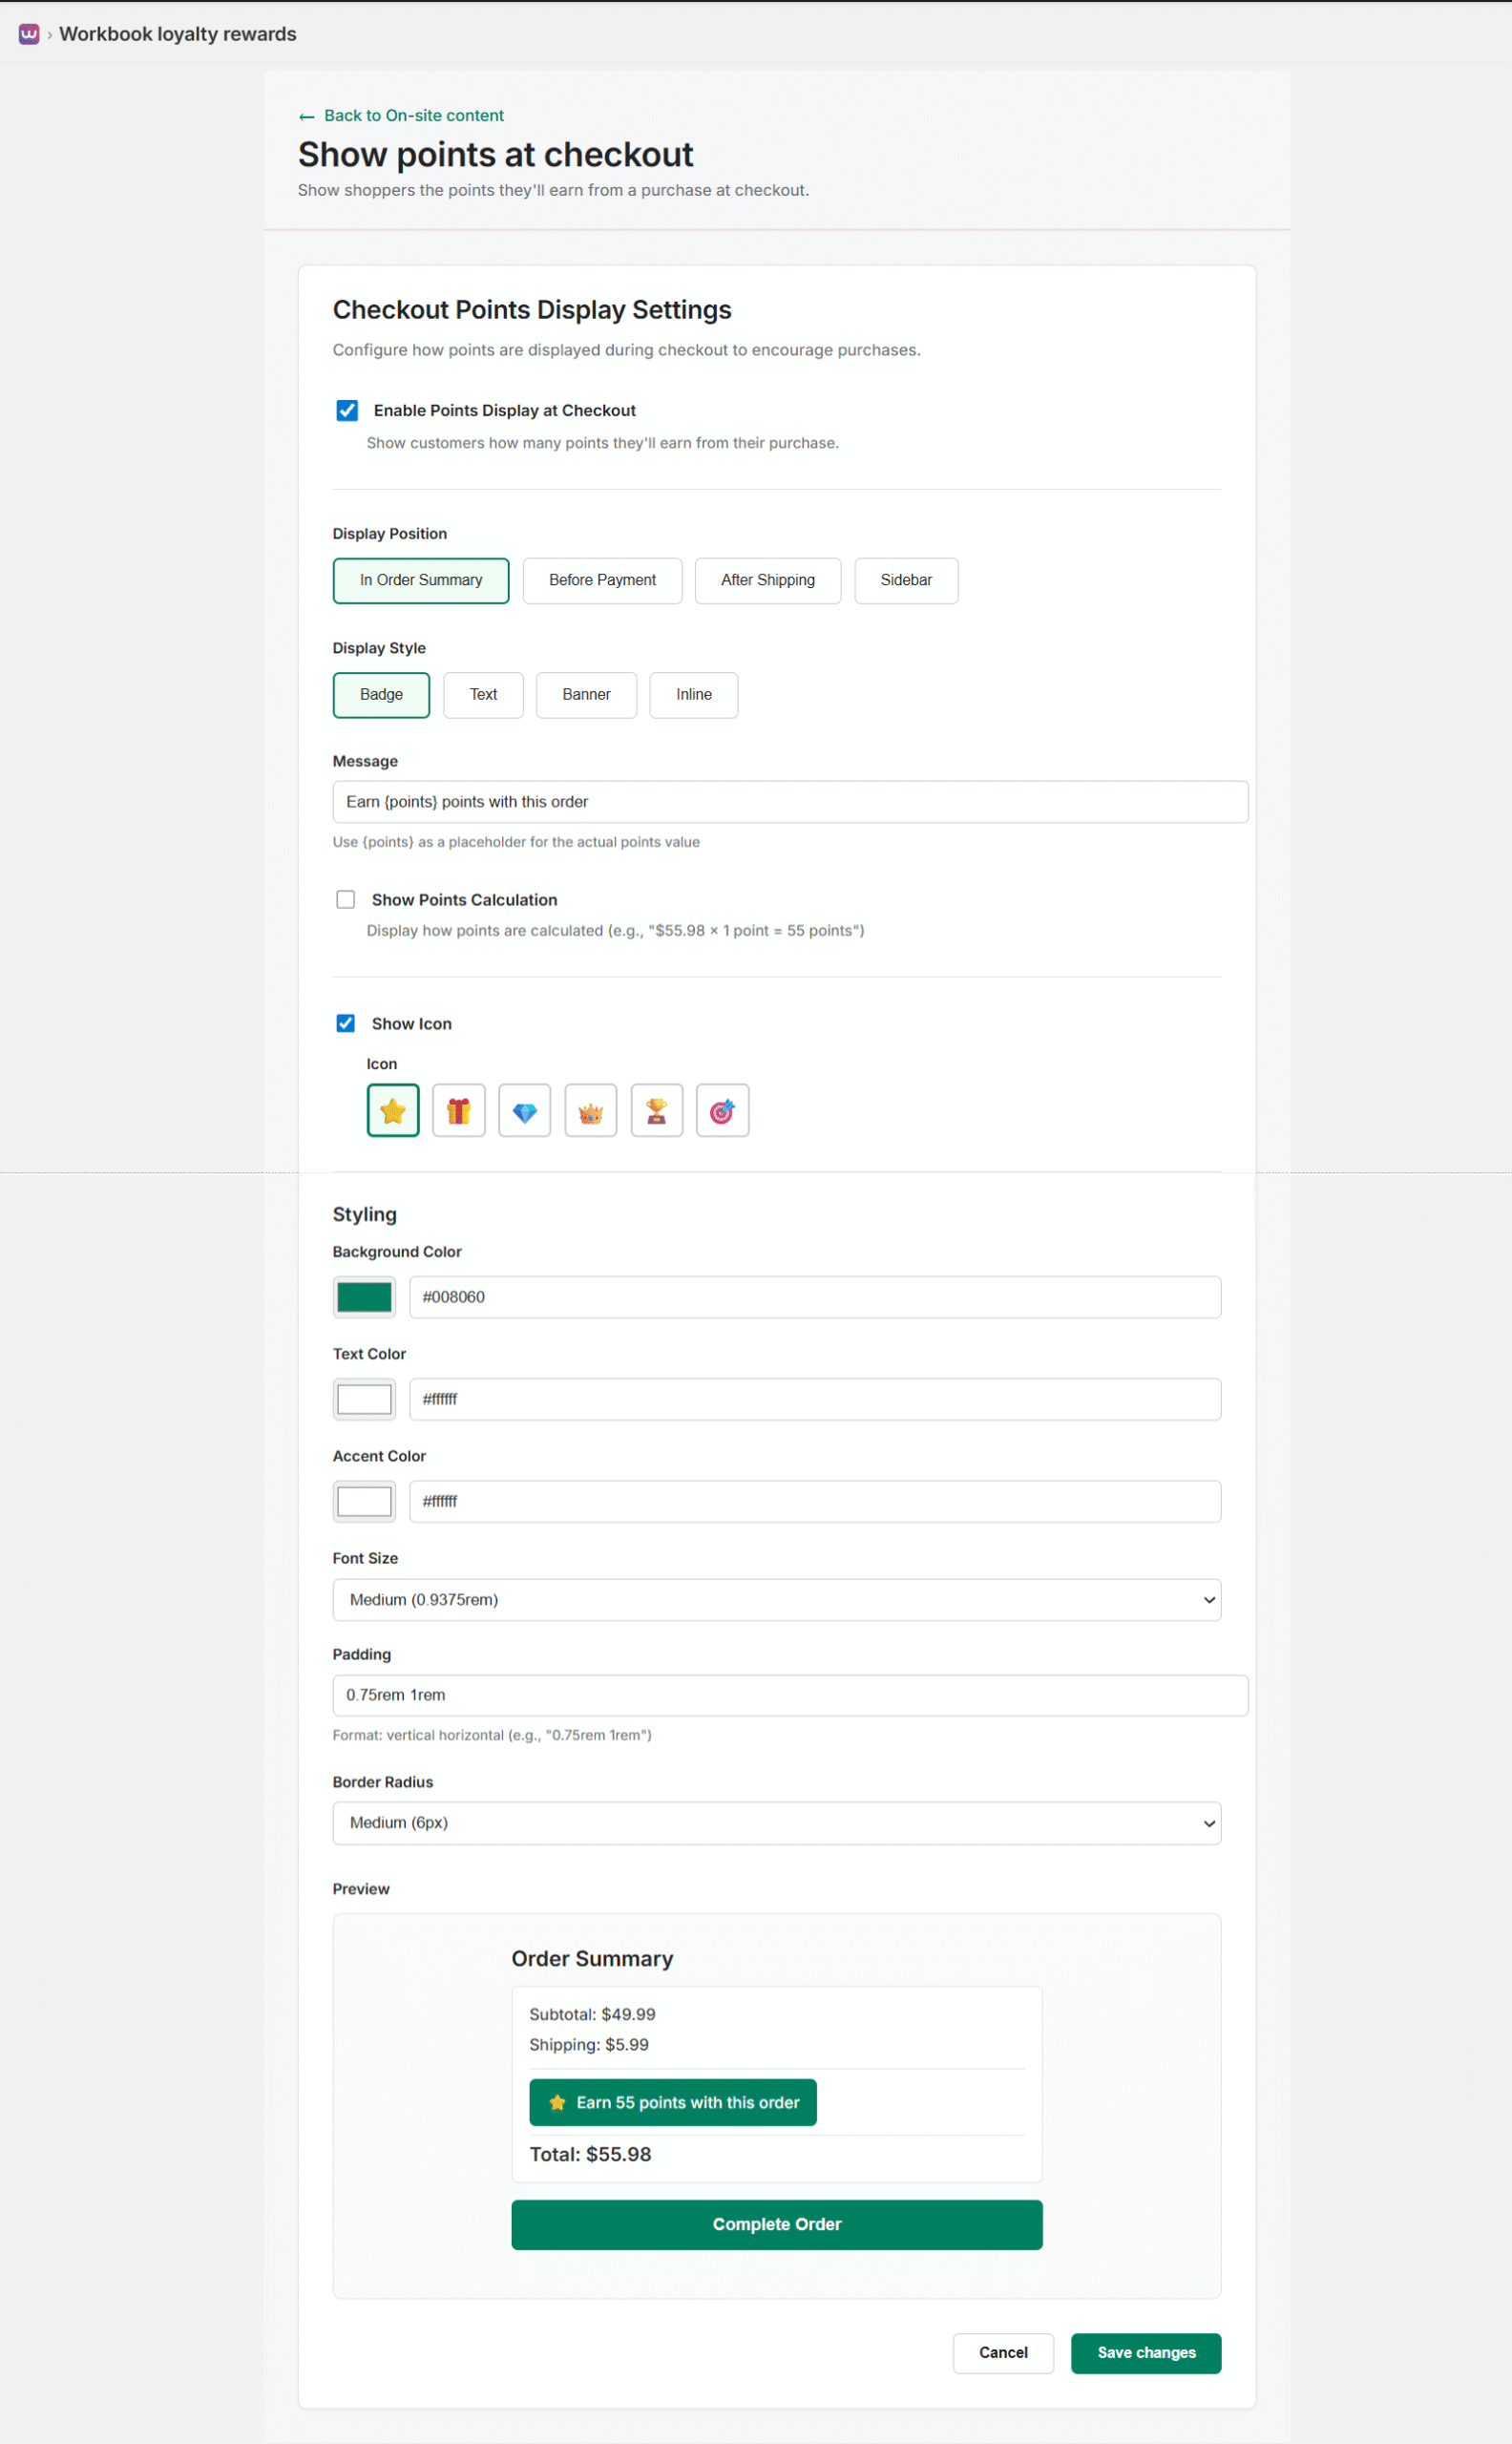
Configure points display at checkout:
- Enable Points Display: Show customers how many points they’ll earn from their purchase
- Display Position: Choose where to show points information in the checkout flow
- Message Customization: Customize the points earning message
- Styling: Match the display to your checkout design
This helps customers understand the value they’ll receive from their purchase.
Points After Purchase
Show shoppers that they’ve earned points after their purchase. Display a confirmation message after order completion to reinforce the loyalty program value.
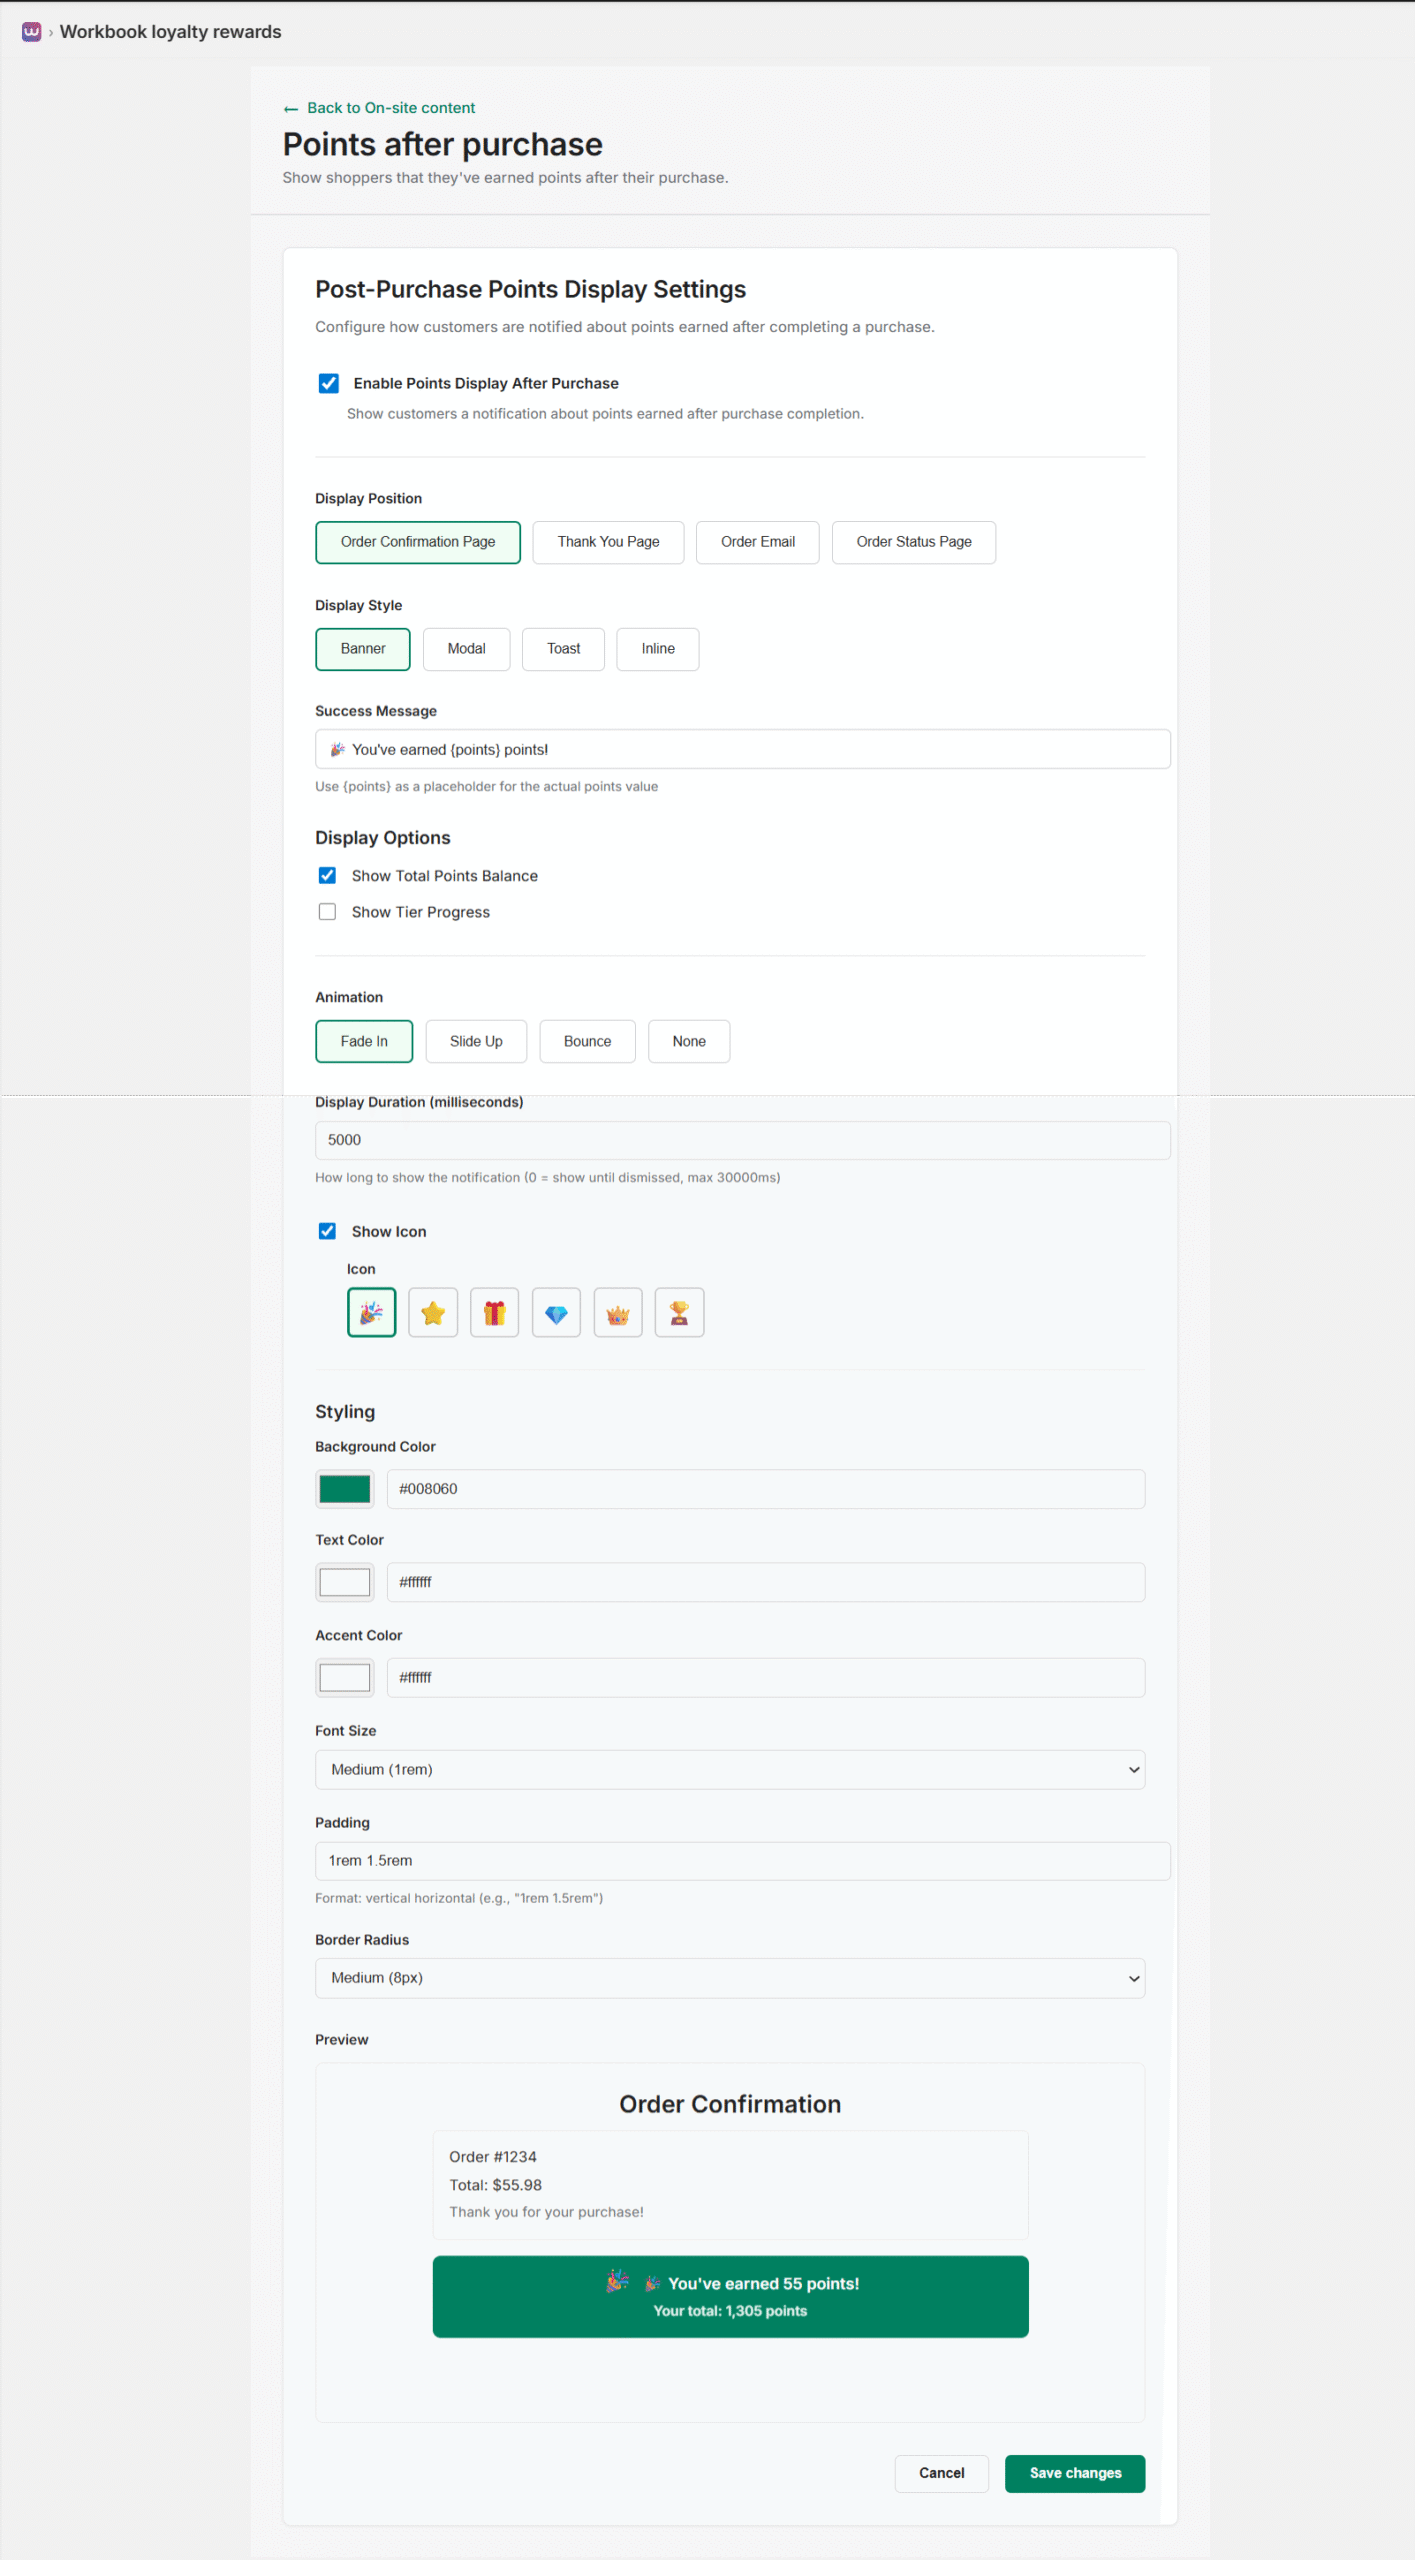
Configure how customers are notified about points earned after completing a purchase:
- Enable Points Display After Purchase: Toggle to show customers a notification about points earned after purchase completion
- Display Position: Choose where the notification appears:
- Order Confirmation Page: Show on the order confirmation page immediately after purchase
- Thank You Page: Display on the thank you page
- Order Email: Include in the order confirmation email
- Order Status Page: Show on the order status/tracking page
- Display Style: Select how the notification appears:
- Banner: A banner-style notification
- Modal: A popup modal dialog
- Toast: A toast notification (small popup)
- Inline: Inline with order confirmation content
- Success Message: Customize the message (e.g., “🎉 You’ve earned {points} points!”) – use {points} as a placeholder for the actual points value
- Display Options: Choose what additional information to show:
- Show Total Points Balance: Display the customer’s total points balance after earning
- Show Tier Progress: Display progress toward the next VIP tier
- Animation: Select animation style for the notification:
- Fade In: Smooth fade-in animation
- Slide Up: Slide up from bottom
- Bounce: Bounce animation effect
- None: No animation
- Display Duration: Set how long to show the notification (in milliseconds):
- 0 = Show until dismissed by the customer
- Maximum: 30000ms (30 seconds)
- Default: 5000ms (5 seconds)
- Show Icon: Toggle to display an icon with the notification
- Icon Selection: Choose from confetti burst, star, gift box, diamond, crown, or trophy icons
- Styling: Customize the appearance:
- Background Color: Set the notification background color (e.g., #008060 for green)
- Text Color: Set text color (e.g., #ffffff for white)
- Accent Color: Set accent color for highlights
- Font Size: Choose Small, Medium, or Large
- Padding: Set padding (format: “vertical horizontal”, e.g., “1rem 1.5rem”)
- Border Radius: Choose Small, Medium, or Large border radius
The preview section shows exactly how the notification will appear on the order confirmation page, including the success message, icon, and total points balance display. This reinforces the value customers receive from participating in your loyalty program and encourages future purchases.
Customization Best Practices
When configuring on-site content, consider:
- Brand Consistency: Use colors and styling that match your store’s brand
- User Experience: Position elements where they’re most visible but don’t interfere with shopping
- Mobile Responsiveness: Ensure all elements work well on mobile devices
- Testing: Preview all changes before publishing to ensure they appear correctly
- Performance: Enable only the features you need to maintain site performance
Note: All customization options can be changed later from Settings > On-site Content. Use the preview features to see exactly how changes will appear before saving.
Getting Started
Follow these steps to set up your loyalty program and start rewarding customers.
Step 1: Install and Activate
After installing the app from the Shopify App Store, navigate to the Dashboard. The app will automatically sync your existing customers and prepare them for the loyalty program.
Step 2: Configure Points Earning Rate
Set up how customers earn points on every order. The setup page displays “Reward every order with points” with a description explaining that every time a customer makes a purchase, they will be rewarded with points that can be used as a discount on their next order.
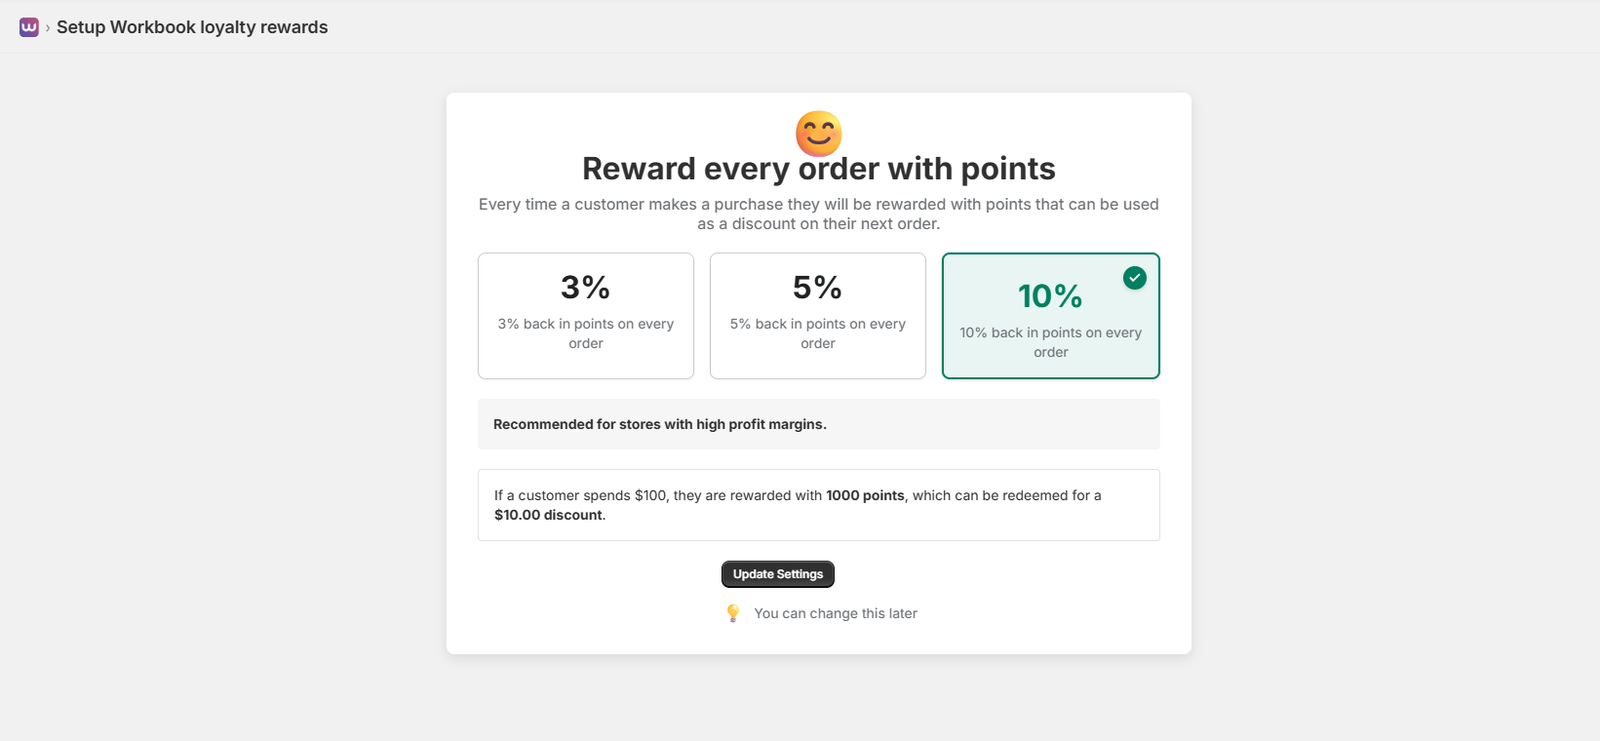
You can choose from three reward percentage options displayed as selectable boxes:
- 3% back in points: Customers earn 3 points for every $1 spent. Displayed as “3% back in points on every order”
- 5% back in points: Customers earn 5 points for every $1 spent. Displayed as “5% back in points on every order”
- 10% back in points: Recommended for stores with high profit margins. Customers earn 10 points for every $1 spent. Displayed as “10% back in points on every order”. This option is typically selected by default and shows a green checkmark when active.
A recommendation banner appears below the options stating “Recommended for stores with high profit margins” when the 10% option is selected.
Redemption Example: The page shows a clear example: “If a customer spends $100, they are rewarded with 1000 points, which can be redeemed for a $10.00 discount.”
After selecting your preferred percentage, click “Update Settings” to save. A note below the button reminds you that “You can change this later” if you need to adjust the rate.
Step 3: Configure Basic Settings
Go to Settings > General to configure:
- Program name and branding
- Points earning rates (points per dollar, per order)
- Signup bonus points
- VIP tier thresholds
Step 4: Set Up Launcher Access
Configure how customers access your loyalty program on your store. The setup page displays “Easy access to your loyalty program” as the main heading.
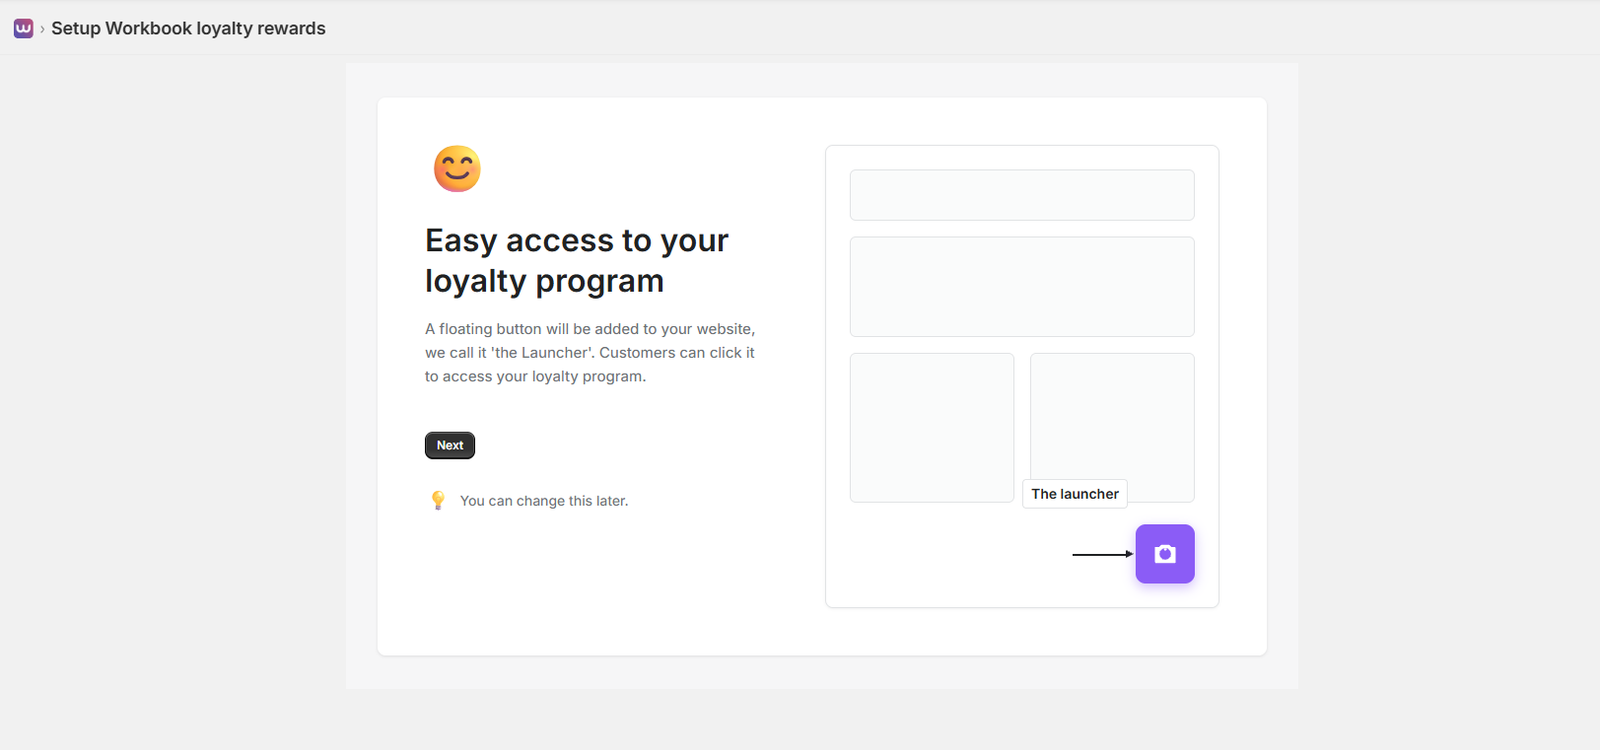
The page explains: “A floating button will be added to your website, we call it ‘the Launcher’. Customers can click it to access your loyalty program.”
A visual mock-up on the right side of the page shows where “The Launcher” button will appear on your website – typically in the bottom right corner as a purple square button with a white camera icon.
Click “Next” to proceed, or use the lightbulb hint that reminds you “You can change this later” if you want to customize the launcher icon, position, and colors in the future.
Step 5: Style Your Program
Customize your loyalty program to match your store’s branding. The setup page displays “Style your program to match your store” with a description: “When customers click on the Launcher a panel opens up with your loyalty program details.”

The styling page includes three main customization options:
- Customize Your Loyalty Program Name: A text input field pre-filled with “Workbook loyalty rewards” (or your store name). You can customize this to make it more memorable and connected to your brand. The page explains: “Your program name has been pre-filled with your store name. You can customize the name to make it more memorable and connected to your brand, or keep it as is.”
- Choose your brand color: A color picker showing a color swatch (e.g., bright green #1CE96A) with a hex code input field. Select a color that matches your brand identity.
- Select a color for your icon and text: Radio button options for “White” or “Black” to ensure optimal contrast and readability. Select the option that works best with your chosen brand color.
A live preview panel on the right shows how your loyalty program will appear to customers, including the green top bar with “Welcome to” and “Workbook loyalty rewards” text, matching your selected brand color and text color.
Click “Next” to proceed, or use the reminder that “You can change this later” if you want to adjust these settings in the future.
Step 6: Review and Launch
Before launching, review your setup. The final setup page displays “You’re ready to start rewarding!” as the main heading.
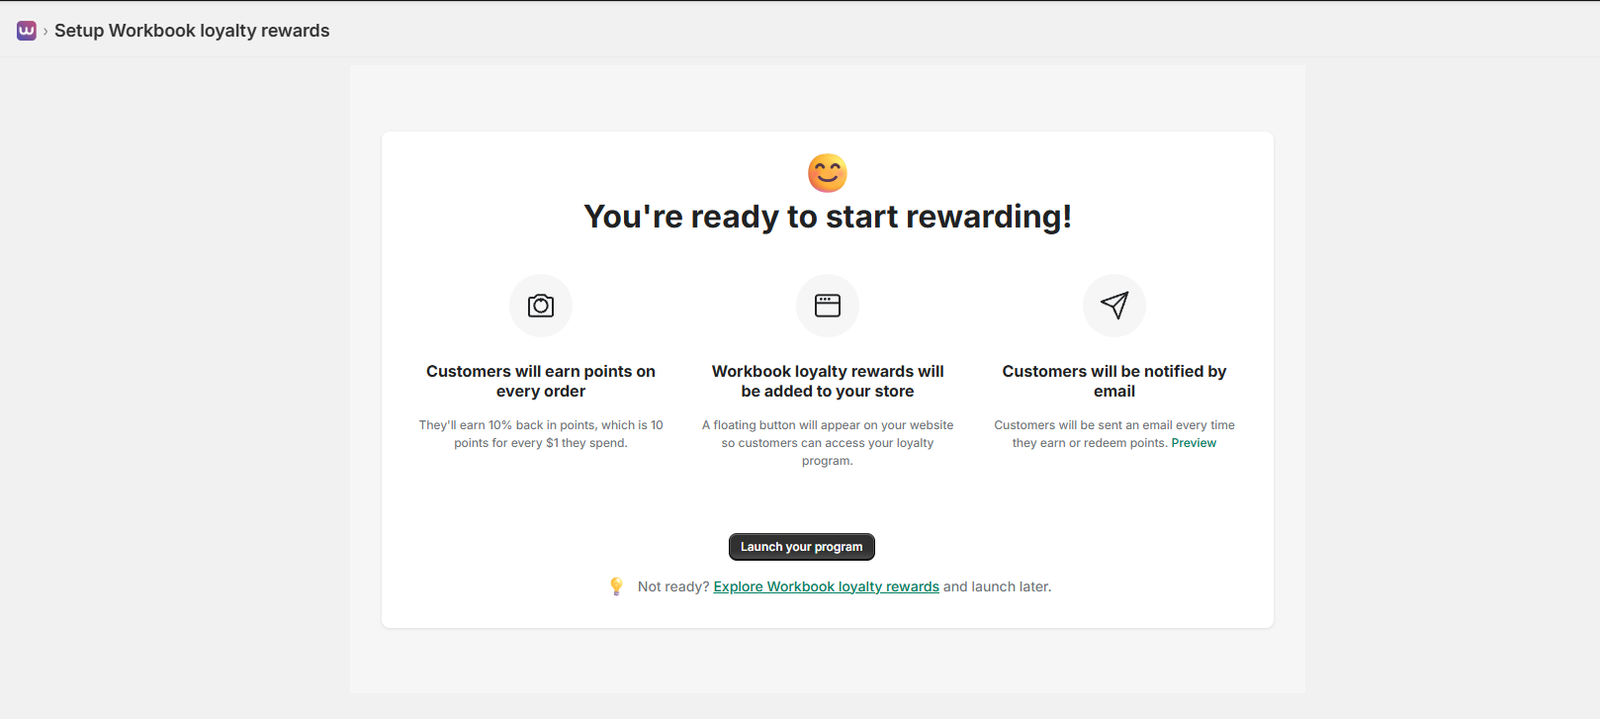
The setup summary displays three key features that will be activated:
- Customers will earn points on every order: Displayed with a camera icon. Shows the configured earning rate, for example: “They’ll earn 10% back in points, which is 10 points for every $1 they spend.”
- Workbook loyalty rewards will be added to your store: Displayed with a tablet/computer screen icon. Explains: “A floating button will appear on your website so customers can access your loyalty program.”
- Customers will be notified by email: Displayed with a paper airplane icon. States: “Customers will be sent an email every time they earn or redeem points.” Includes a “Preview” link to see how the email will look.
A prominent “Launch your program” button is displayed at the bottom. Below it, there’s a smaller text link: “Not ready? Explore Workbook loyalty rewards and launch later” if you want to review more features before going live.
Click “Launch your program” when you’re ready to activate your loyalty program, or explore the app further before launching.
Step 7: Create Your First Reward
Navigate to Rewards and create your first reward:
- Choose a reward type (discount, free shipping, product, or gift card)
- Set the points cost (e.g., 100 points for 10% off)
- Add a compelling title and description
- Upload an attractive image
- Activate the reward
Best Practices
Follow these best practices to maximize the effectiveness of your loyalty program.
Points Earning Strategy
- Start Simple: Begin with 1 point per dollar spent. You can always adjust later.
- Bonus Events: Run special promotions like “Double Points Weekend” to drive engagement.
- Signup Bonus: Offer 50-100 points for new signups to encourage enrollment.
- Order Bonus: Award 10-25 bonus points per order to reward repeat purchases.
Reward Strategy
- Low Entry Point: Create rewards starting at 50-100 points to encourage early redemptions.
- Value Proposition: Ensure rewards provide real value (at least 5-10% discount equivalent).
- Variety: Offer different reward types (discounts, free shipping, products) to appeal to all customers.
- Limited Time Offers: Create time-limited rewards to create urgency and drive redemptions.
VIP Tier Strategy
- Clear Progression: Set tier thresholds that are achievable but meaningful (e.g., 2K, 5K, 10K points).
- Tier Benefits: Consider offering exclusive rewards or higher earning rates for higher tiers.
- Communication: Notify customers when they’re close to the next tier to encourage spending.
Customer Engagement
- Email Campaigns: Send regular updates about points balance and available rewards.
- On-site Visibility: Make the loyalty program visible on product pages and checkout.
- Social Sharing: Encourage customers to share their rewards and referrals on social media.
- Gamification: Use challenges and milestones to keep customers engaged.
Referral Program
The referral program allows customers to earn points by referring friends and family to your store.
Referral Rewards
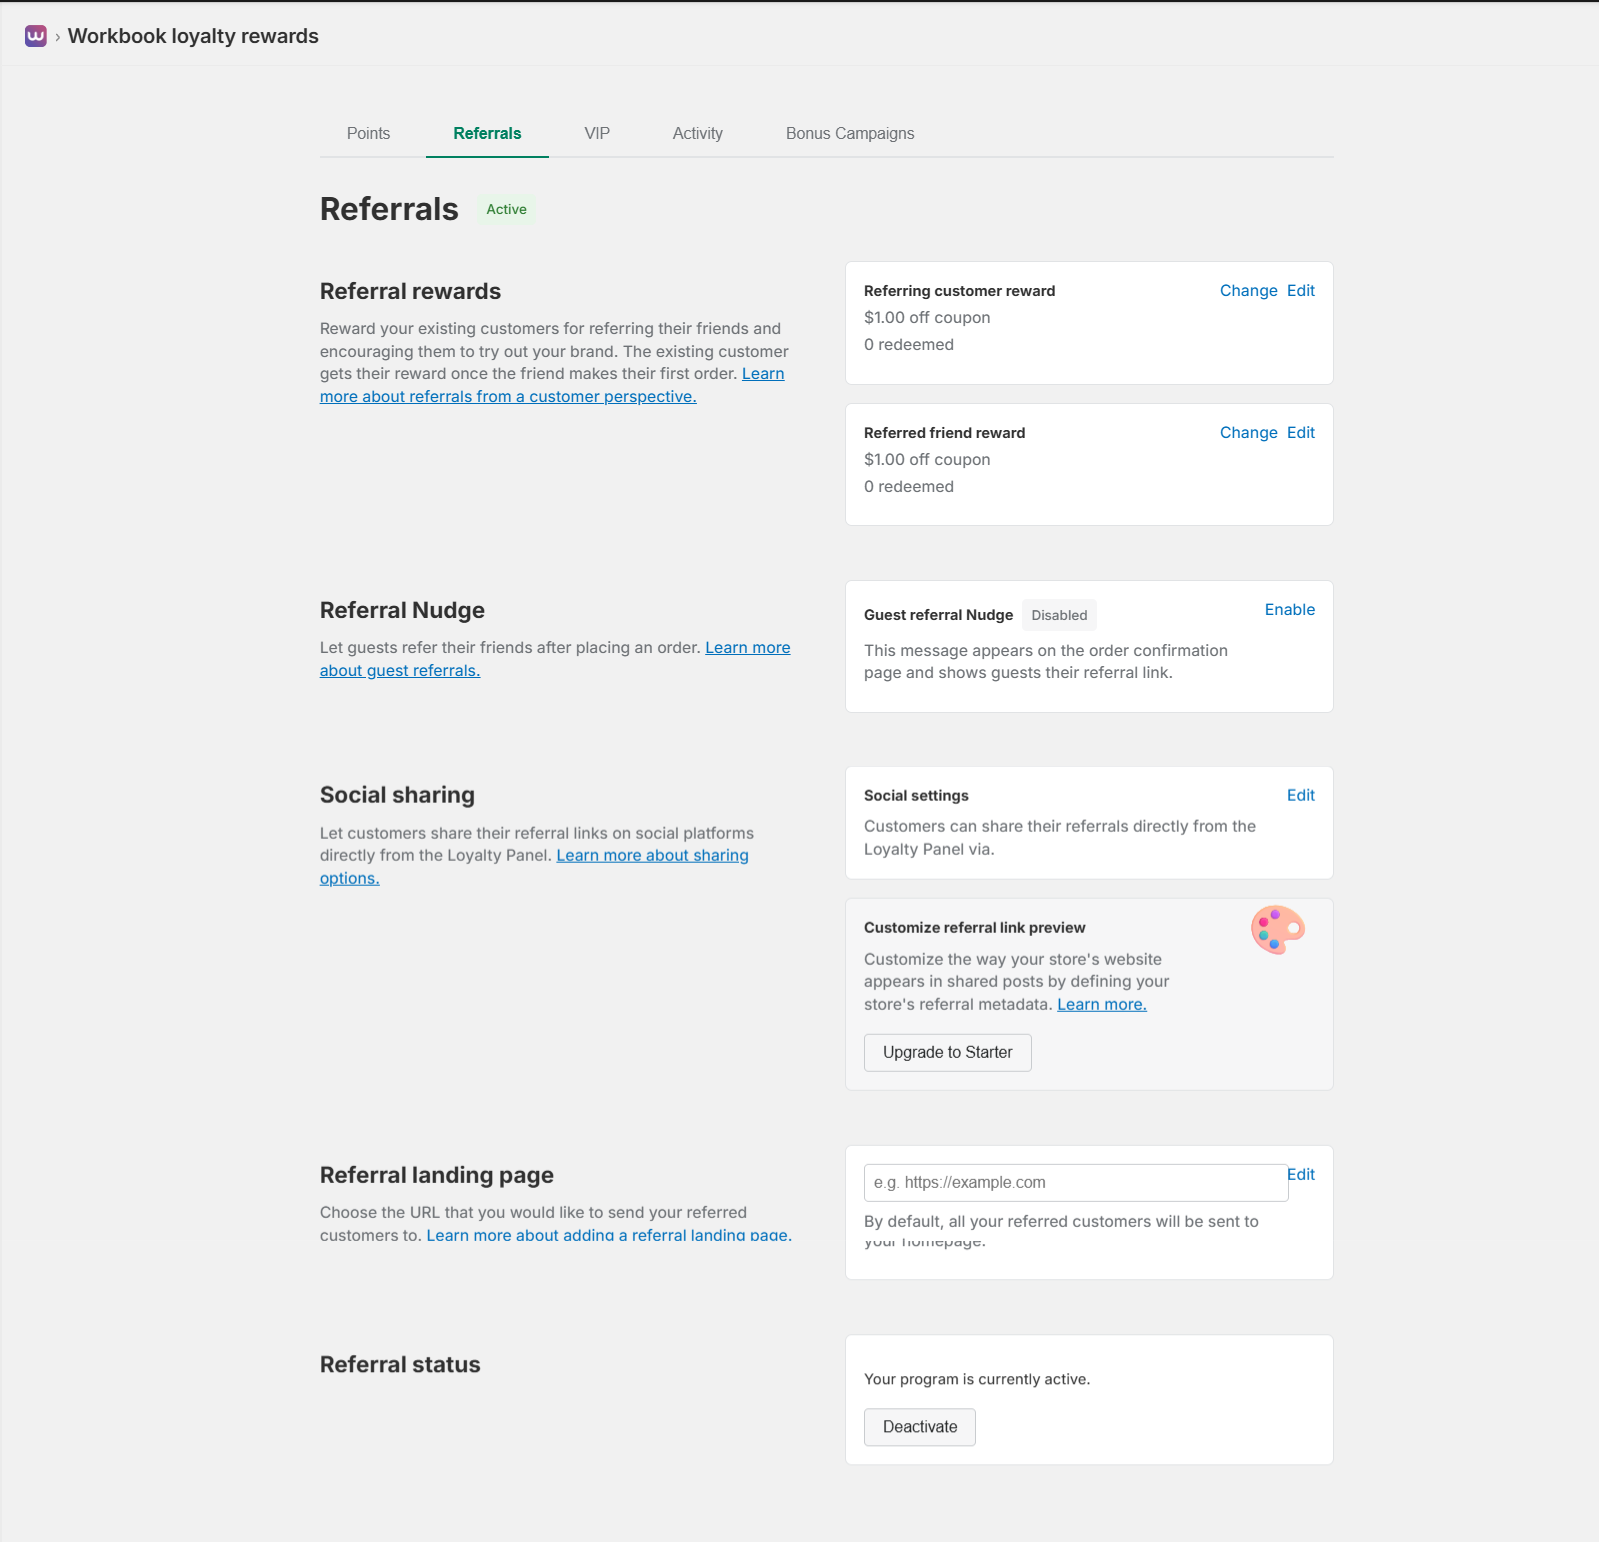
Reward your existing customers for referring their friends and encouraging them to try out your brand. The existing customer gets their reward once the friend makes their first order.
In the Referrals section, you can configure two types of rewards:
- Referring Customer Reward: What the referrer gets (e.g., “$1.00 off coupon”). You can see how many times it’s been redeemed (e.g., “0 redeemed”). Use the “Change” or “Edit” links to modify the reward.
- Referred Friend Reward: What the new customer gets (e.g., “$1.00 off coupon”). Similar to the referring customer reward, you can track redemptions and edit the reward type.
Both rewards are automatically applied when the referred friend completes their first purchase. The system tracks redemption counts for each reward type.
Referral Nudge
Let guests refer their friends after placing an order. The Guest Referral Nudge can be enabled or disabled from the Referrals settings page.
When enabled, this message appears on the order confirmation page and shows guests their referral link, even if they haven’t created an account yet. This feature helps capture referrals from one-time customers who may not return to your store.
You can enable or disable this feature at any time using the “Enable” or “Disable” link in the Referrals section.
Social Sharing
Let customers share their referral links on social platforms directly from the Loyalty Panel. In the Social Settings section, you can configure which platforms customers can use to share their referrals.
Customers can share via:
- Copy link
Use the “Edit” link in the Social Settings section to configure which sharing options are available to your customers.
Customize Referral Link Preview
Customize the way your store’s website appears in shared posts by defining your store’s referral metadata. This feature allows you to control the preview image, title, and description that appears when referral links are shared on social media.
This feature is available on Starter plan and above. Use the “Upgrade to Starter” button if you’re on the Free plan and want to access this customization option.
Referral Landing Page
Choose the URL that you would like to send your referred customers to. In the Referral Landing Page section, you can enter a custom URL (e.g., https://example.com) or leave it empty to use the default homepage.
By default, all referred customers are sent to your homepage, but you can customize this to send them to a specific landing page, product, or collection. Use the “Edit” link to modify the landing page URL.
Referral Status
Monitor and control your referral program status. The Referrals section displays whether your program is currently active. You can deactivate the referral program at any time using the “Deactivate” button, which will pause referrals but preserve all existing referral data.
How It Works
When a customer refers someone:
- The referrer shares their unique referral link or code
- The new customer makes their first purchase using the referral
- Both the referrer and the new customer earn referral rewards
- Rewards are automatically credited to both accounts
Tracking Referrals
View referral performance in:
- Analytics Dashboard: See total referrals and referral conversion rates
- Customer Profiles: View each customer’s referral count and successful referrals
- Referrals Report: Access detailed referral reports in Analytics > Reports
- Activity Section: Monitor referral activity in real-time
Best Practices for Referrals
- Make referral links easy to share (social media, email, SMS)
- Offer attractive rewards for both referrer and referred customer
- Send reminder emails to customers with unused referral codes
- Create referral campaigns during peak shopping seasons
- Enable social sharing to make it easier for customers to share
VIP Program
Reward your best customers with VIP status, exclusive rewards, and special perks that recognize their loyalty.
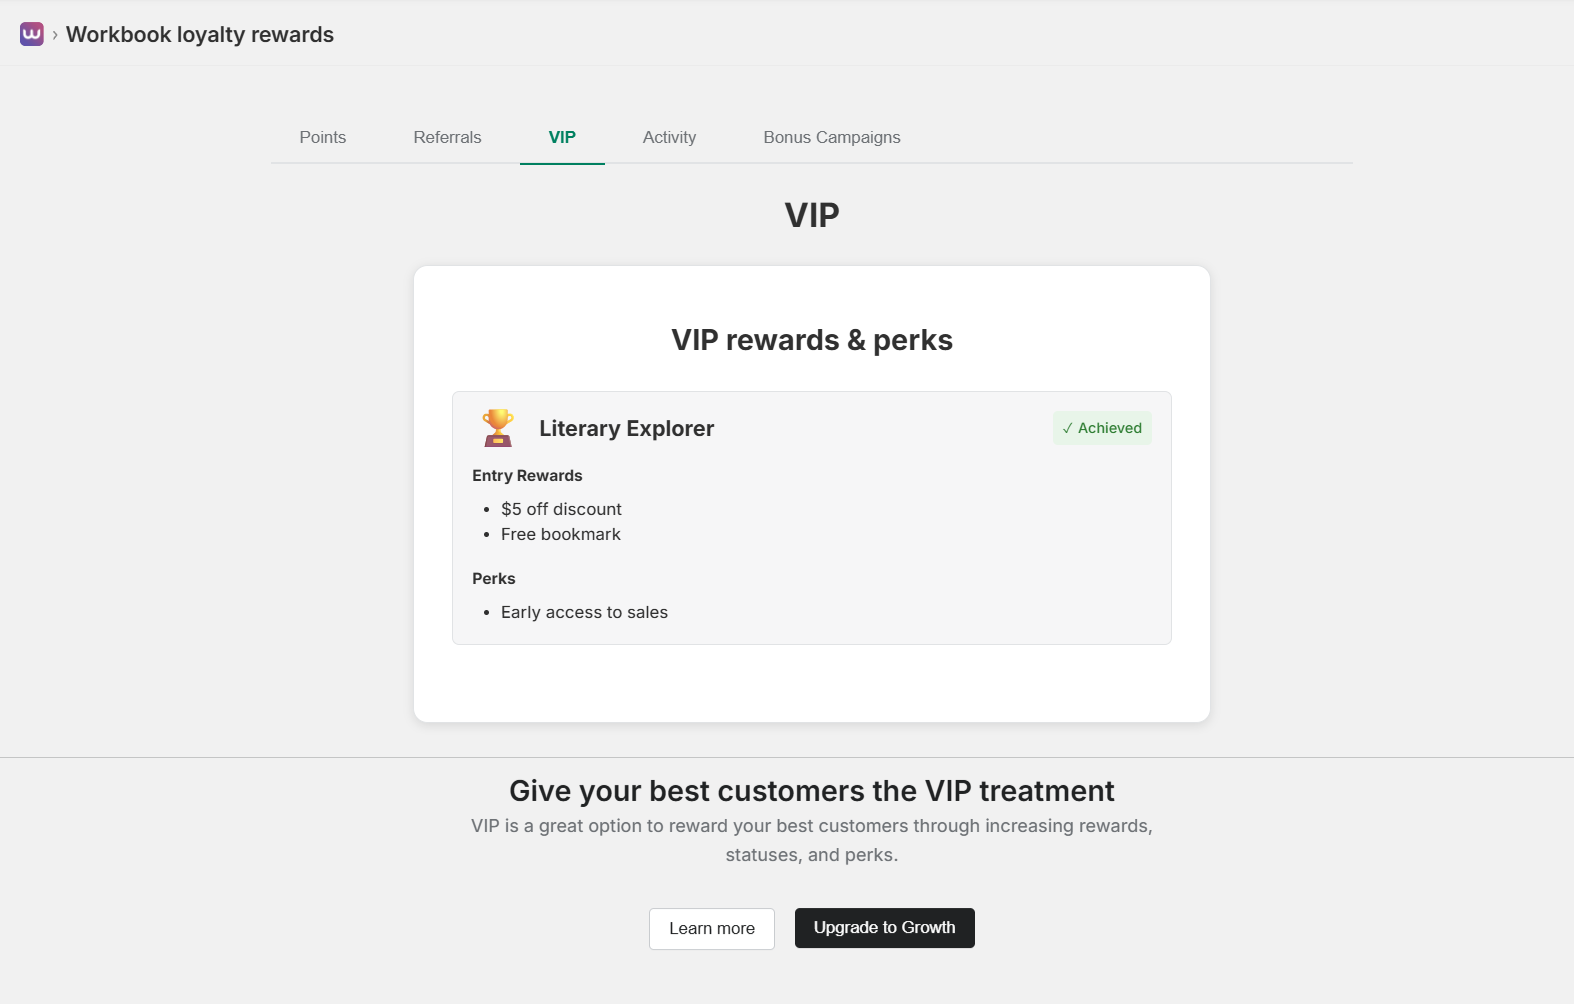
VIP Rewards & Perks
Give your best customers the VIP treatment through increasing rewards, statuses, and perks. VIP tiers create a sense of achievement and exclusivity that encourages customers to shop more to reach higher levels.
VIP Tier Display
In the VIP section, you’ll see a card displaying a specific VIP tier with details:
- Tier Name: Displayed with a golden trophy icon (e.g., “Literary Explorer”)
- Achievement Status: A green checkmark icon followed by “Achieved” text, indicating the customer has reached this tier
- Entry Rewards: Listed with bullet points showing what customers receive when they reach this tier (e.g., “$5 off discount”, “Free bookmark”)
- Perks: Ongoing benefits for this tier (e.g., “Early access to sales”)
This visual representation helps customers understand their VIP status and the benefits they’ve unlocked.
VIP Tier Structure
Configure multiple VIP tiers with different benefits:
- Bronze: Entry level (default tier for all customers)
- Silver: First achievement tier (e.g., 2,000 points)
- Gold: Mid-level tier (e.g., 5,000 points)
- Platinum: Highest tier (e.g., 10,000 points)
You can customize tier names, thresholds, and benefits for each level.
Entry Rewards
When customers reach a new VIP tier, they automatically receive entry rewards. These are one-time rewards given when a customer first achieves a tier level. Examples include:
- Discount coupons (e.g., “$5 off discount”, “10% off”)
- Free products or gifts (e.g., “Free bookmark”)
- Bonus points
- Free shipping vouchers
Entry rewards are displayed in the VIP tier card under the “Entry Rewards” section, making it clear what customers receive when they reach each tier.
VIP Perks
Ongoing benefits for VIP members are displayed in the VIP tier card under the “Perks” section. These include:
- Early Access: First access to sales, new products, and limited editions (e.g., “Early access to sales”)
- Exclusive Discounts: Special discount codes available only to VIP members
- Priority Support: Faster customer service response times
- Higher Earning Rates: Earn more points per dollar spent
- Birthday Rewards: Special birthday bonuses
Below the VIP tier card, you’ll see a promotional section with the heading “Give your best customers the VIP treatment” and a description: “VIP is a great option to reward your best customers through increasing rewards, statuses, and perks.”
Two action buttons are available: “Learn more” (for additional information) and “Upgrade to Growth” (to access VIP features on higher-tier plans).
VIP Status Display
VIP status is automatically displayed in:
- Customer loyalty panel
- Account pages
- Email notifications
- Order confirmations
Customers can see their current tier and progress toward the next tier.
Best Practices
- Set tier thresholds that are achievable but meaningful
- Offer exclusive rewards that aren’t available to lower tiers
- Send tier upgrade notifications to celebrate achievements
- Create urgency by showing progress toward next tier
- Consider offering tier-specific products or experiences
Activity Tracking
Monitor all loyalty program activity in real-time, including points transactions, referrals, and VIP tier changes.
Activity Dashboard Overview
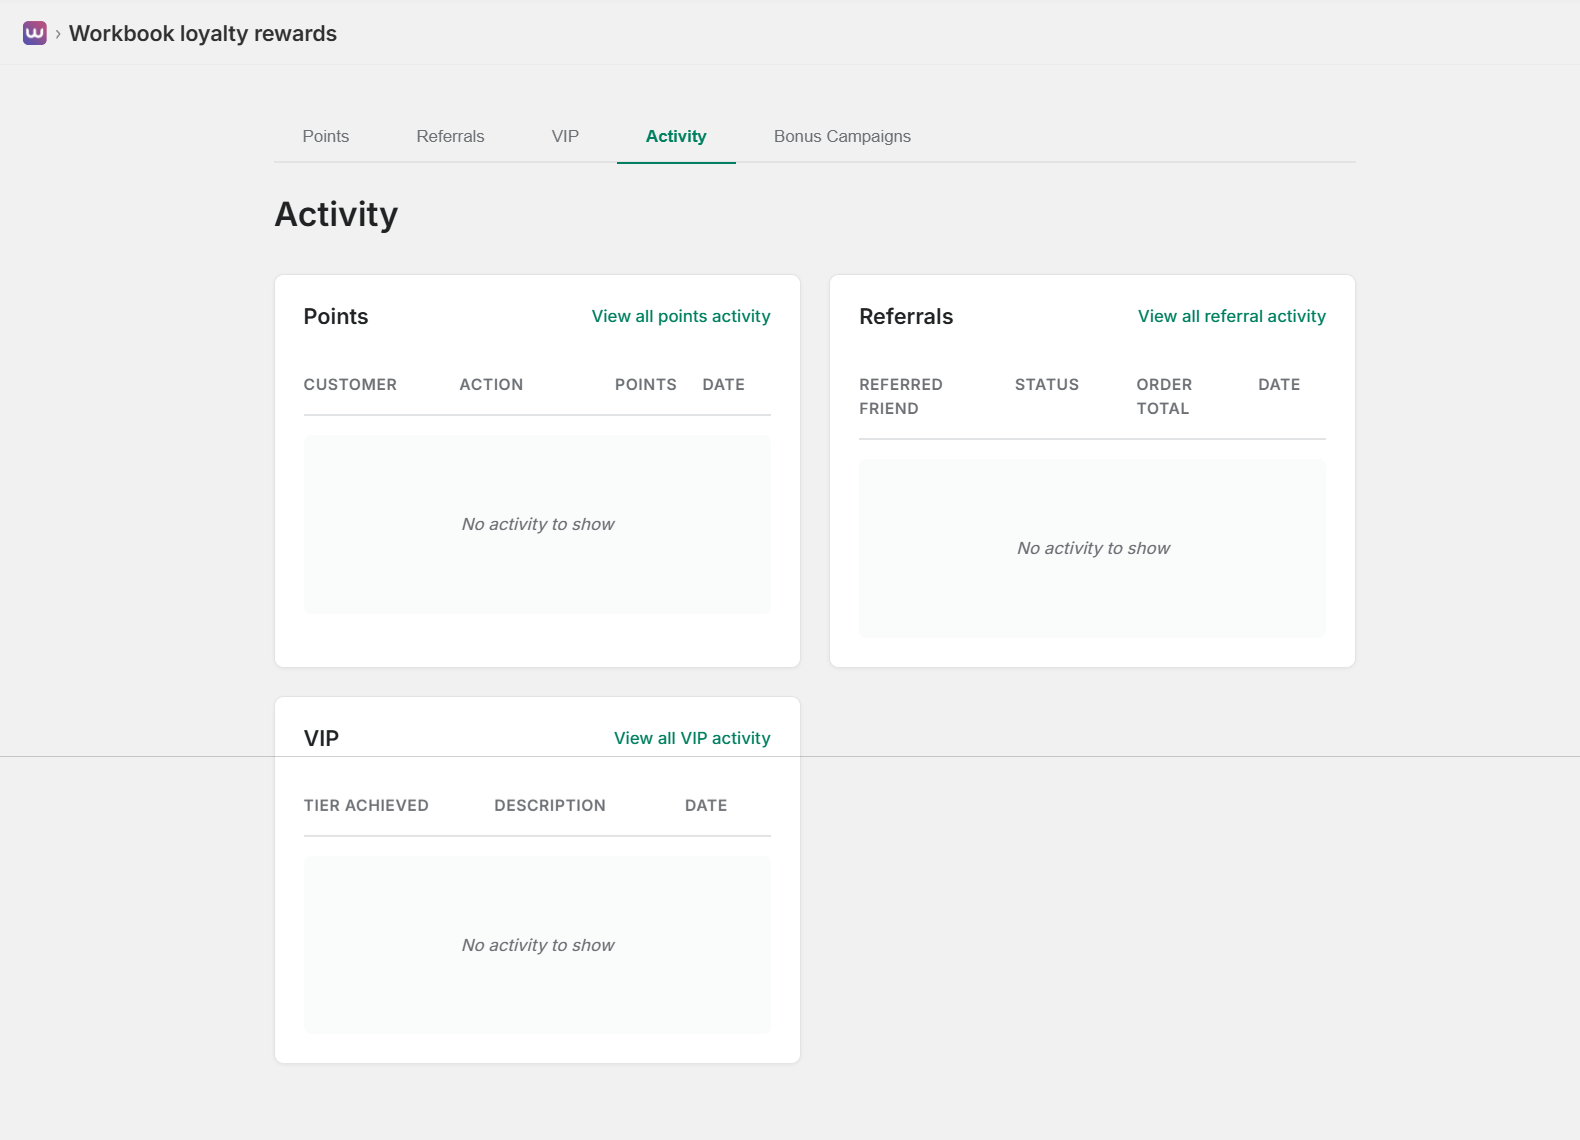
The Activity section provides a comprehensive view of all loyalty program activity, organized into three main categories displayed as separate cards:
Points Activity
Track all points-related transactions in a table format with the following columns:
- CUSTOMER: Name of the customer who earned or redeemed points
- ACTION: Type of action (earned, redeemed, expired, adjusted)
- POINTS: Number of points involved in the transaction
- DATE: When the transaction occurred
Use the “View all points activity” link to see a complete list with filtering and search options. When there’s no activity yet, the table will display “No activity to show”.
Referral Activity
Monitor referral program performance in a dedicated table with columns:
- REFERRED FRIEND: Name of the customer who was referred
- STATUS: Current status of the referral (pending, completed, etc.)
- ORDER TOTAL: Total value of the order placed by the referred friend
- DATE: When the referral was made or completed
Use the “View all referral activity” link to access detailed referral reports. This helps you understand which customers are your best advocates and which referral campaigns are most effective.
VIP Activity
Track VIP tier changes and achievements in a table format with columns:
- TIER ACHIEVED: Which VIP tier the customer reached (e.g., Silver, Gold, Platinum)
- DESCRIPTION: Details about the tier upgrade and benefits unlocked
- DATE: When the tier change occurred
Use the “View all VIP activity” link to see complete tier progression history. This data helps you identify your most valuable customers and understand tier progression patterns.
Activity Reports
Access comprehensive activity reports from the Activity section:
- View all points activity with filtering options
- View all referral activity with status tracking
- View all VIP activity with tier progression history
- Export activity data for analysis
Bonus Campaigns
Drive engagement with targeted bonus points campaigns that help customers earn rewards faster.
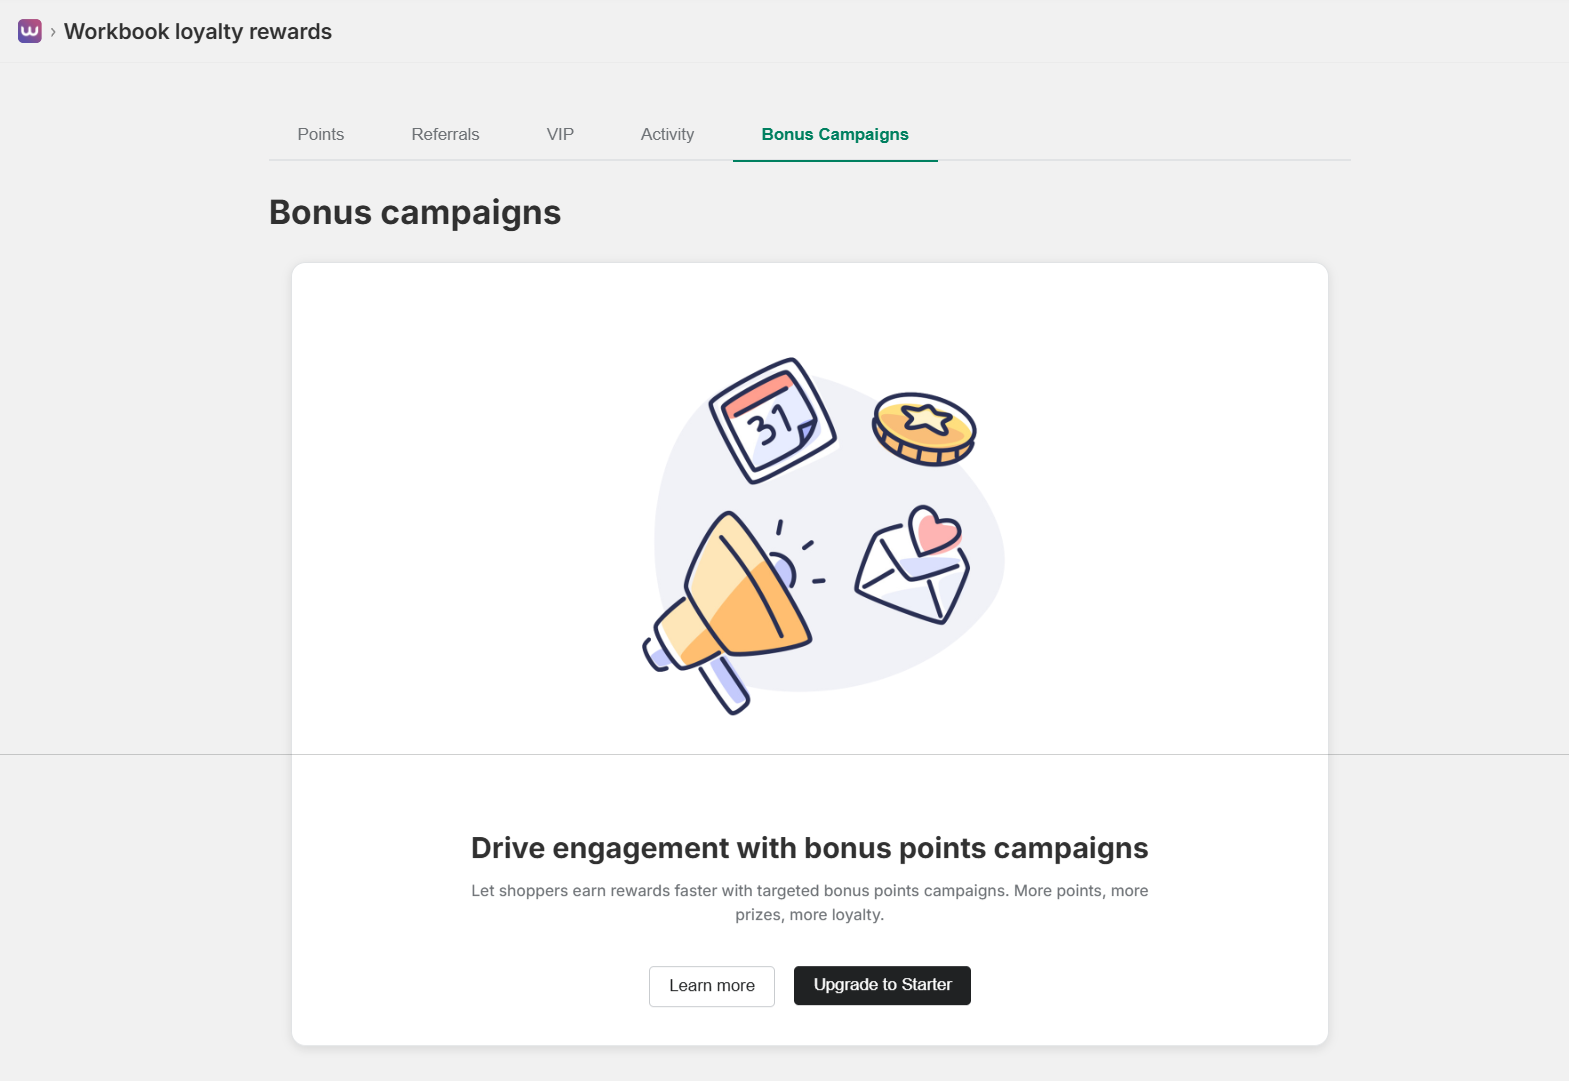
Bonus Campaigns Overview
In the Bonus Campaigns section, you’ll see a prominent card displaying the feature introduction. The section includes:
- Feature Title: “Drive engagement with bonus points campaigns” displayed in bold
- Description: “Let shoppers earn rewards faster with targeted bonus points campaigns. More points, more prizes, more loyalty.”
- Action Buttons:
- “Learn more” button (white background, dark text) for additional information
- “Upgrade to Starter” button (dark background, white text) to access this feature on paid plans
The Bonus Campaigns section is accessible from the main navigation tabs (Points, Referrals, VIP, Activity, Bonus Campaigns) in the Program settings area.
What Are Bonus Campaigns?
Bonus campaigns are time-limited promotions that allow customers to earn extra points for specific actions. Let shoppers earn rewards faster with targeted bonus points campaigns. More points, more prizes, more loyalty.
Campaign Features Represented
The illustration above shows four key elements of bonus campaigns, each represented by a distinct icon:
- Calendar (Top Left – Event Scheduling): A calendar page showing the number “31” represents time-limited campaigns with specific start and end dates. Schedule campaigns around holidays, sales events, or special occasions. The calendar helps you plan and manage campaign timelines effectively.
- Gold Coin with Star (Top Right – Rewards & Points): A stack of golden coins with a five-pointed star embossed on the top coin represents bonus points and rewards that customers can earn during campaigns. The star symbolizes premium or special bonus rewards that motivate customers to participate.
- Megaphone/Loudspeaker (Bottom Left – Announcements): An orange and light blue megaphone with sound waves represents marketing and communication tools to announce campaigns to customers. Use this feature to broadcast your campaigns via email, on-site notifications, or social media to maximize visibility and engagement.
- Envelope with Heart (Bottom Right – Personalized Communication): A white envelope with a red heart emerging from the flap represents targeted email campaigns and personalized messages. Send heartfelt, personalized communications to engage customers with special offers and campaign updates, building stronger relationships.
These four elements work together to create effective bonus campaigns: schedule them on specific dates (calendar), offer attractive rewards (coin with star), announce them widely (megaphone), and communicate personally with customers (envelope with heart).
Campaign Types
You can create various types of bonus campaigns:
- Double Points Weekend: Customers earn 2x points on all purchases
- Birthday Bonuses: Extra points for customers during their birthday month
- Product-Specific: Bonus points for purchasing specific products or collections
- Time-Limited: Bonus points during specific date ranges (e.g., Black Friday, holidays)
- Referral Bonuses: Extra points for successful referrals during campaign period
Creating Bonus Campaigns
To create a bonus campaign (available on Starter plan and above):
- Navigate to the Program section in the main navigation
- Click on the “Bonus Campaigns” tab (the rightmost tab in the navigation)
- Review the feature introduction card that explains bonus campaigns
- If you’re on the Free plan, click “Upgrade to Starter” to access this feature
- Once upgraded, click “Create Campaign” or the campaign creation button
- Set campaign name and description
- Choose campaign type and bonus multiplier (e.g., 2x points, 3x points)
- Set start and end dates using the calendar interface
- Configure targeting options:
- All customers
- Specific customer segments
- VIP tiers only
- New customers only
- Set up campaign announcements (email notifications, on-site banners)
- Activate the campaign
Note: The Bonus Campaigns feature requires a Starter plan or higher. Free plan users will see the “Upgrade to Starter” button to access this functionality.
Campaign Benefits
- Increased Engagement: Bonus campaigns create urgency and encourage immediate purchases
- Customer Retention: Regular campaigns keep customers coming back
- Revenue Boost: Time-limited offers drive sales during campaign periods
- Data Insights: Track campaign performance and customer response
Campaign Management
Once you’ve created bonus campaigns, you can:
- View Active Campaigns: See all currently running campaigns with their performance metrics
- Schedule Future Campaigns: Set up campaigns in advance using the calendar feature
- Monitor Performance: Track engagement, points awarded, and revenue generated from each campaign
- Edit Campaigns: Modify active campaigns (dates, multipliers, targeting) as needed
- Pause or End Campaigns: Stop campaigns early if needed or let them run until the scheduled end date
- Announce Campaigns: Use email and on-site notifications (megaphone feature) to promote campaigns
Best Practices
- Run campaigns during peak shopping seasons (holidays, sales events) using the calendar feature
- Use the megaphone (announcement) feature to promote campaigns through multiple channels
- Send personalized emails (envelope with heart) to targeted customer segments
- Offer meaningful bonus rewards (coin with star) that motivate customers to participate
- Create urgency with limited-time offers
- Target specific customer segments for personalized campaigns
- Promote campaigns through email and on-site notifications
- Analyze campaign performance to optimize future campaigns
Email Customization
Customize email templates to match your brand and communicate effectively with customers.
Available Email Templates
- Points Earned: Sent when customers earn points from purchases
- Reward Redeemed: Confirmation email when customers redeem rewards
- Referral Invitation: Email template for referral program invitations
- Tier Upgrade: Notification when customers reach a new VIP tier
- Points Expiring: Warning email before points expire (if enabled)
Customization Options
For each email template, you can customize:
- Subject Line: Create compelling subject lines to improve open rates
- Header Image: Upload your brand logo or banner
- Body Content: Customize the message text and tone
- Footer: Add your company information and contact details
- Colors: Match email colors to your brand palette
Email Best Practices
- Keep subject lines clear and action-oriented
- Use your brand colors and logo consistently
- Include clear call-to-action buttons
- Make emails mobile-responsive
- Test emails before sending to ensure formatting is correct
Troubleshooting
Common issues and solutions to help you resolve problems quickly.
Points Not Being Awarded
- Check Program Status: Ensure the loyalty program is activated in Settings > General
- Verify Order Status: Points are only awarded for completed orders, not pending or cancelled orders
- Check Customer Enrollment: Verify the customer is enrolled in the loyalty program
- Review Points Settings: Confirm points per dollar and per order settings are configured correctly
Rewards Not Appearing
- Check Reward Status: Ensure the reward is set to “Active”
- Verify Points Cost: Make sure customers have enough points to see the reward
- Check Visibility Settings: Review on-site content settings to ensure rewards are displayed
- Clear Cache: Clear browser cache and refresh the page
Customers Not Syncing
- Manual Sync: Use the “Sync Customers” button in the Customers page
- Check Permissions: Ensure the app has necessary permissions to access customer data
- Verify Shopify Connection: Check that the app is properly connected to your Shopify store
On-site Elements Not Showing
- Check Theme Compatibility: Ensure your theme supports app embeds
- Verify Settings: Confirm on-site elements are enabled in Settings > On-site Content
- Theme Installation: Make sure the loyalty app is added to your theme settings
- Browser Console: Check browser console for JavaScript errors
Payment Issues
- Check Subscription Status: Verify your subscription is active in Settings > Billing
- Order Limit: Ensure you haven’t exceeded your plan’s monthly order limit
- Payment Method: Verify your payment method is up to date
- Contact Support: If issues persist, contact support for assistance
API Access
Access programmatic control over your loyalty program with our API (available on Plus plan).
API Endpoints
The API provides endpoints for:
- Retrieving customer points and tier information
- Manually adjusting customer points
- Creating and managing rewards
- Fetching transaction history
- Accessing analytics data
Authentication
API requests require authentication using API keys. Generate your API keys from Settings > Platform > API Access.
Rate Limits
API requests are rate-limited to ensure system stability:
- 100 requests per minute per API key
- 1,000 requests per hour per API key
- 10,000 requests per day per API key
Webhooks
Receive real-time notifications about loyalty program events via webhooks.
Available Webhooks
- points.earned: Triggered when a customer earns points
- points.redeemed: Triggered when a customer redeems a reward
- tier.upgraded: Triggered when a customer reaches a new VIP tier
- referral.completed: Triggered when a referral is successfully completed
Webhook Configuration
Configure webhooks in Settings > Platform > Webhooks:
- Click “Add Webhook”
- Select the event type
- Enter your webhook URL
- Test the webhook connection
- Save the configuration
Webhook Payload
Each webhook includes relevant data about the event:
Frequently Asked Questions
General Questions
Q: How do customers join the loyalty program?
A: Customers can join automatically when they make a purchase, or they can sign up through the loyalty hub or landing page. You can also configure the program to require account creation.
Q: Can I change points earning rates after launch?
A: Yes, you can adjust points earning rates at any time in Settings > General. Changes will apply to future orders only.
Q: Do points expire?
A: By default, points do not expire. However, you can enable point expiration in Growth and Plus plans, typically set to 12 months.
Q: Can customers use points and discount codes together?
A: This depends on your Shopify discount settings. Generally, customers can use points for rewards, and those rewards can be combined with other discounts if your store settings allow it.
Technical Questions
Q: Will the app slow down my store?
A: No, the app is optimized for performance and runs asynchronously. It won’t impact your store’s loading speed.
Q: Is the app compatible with all Shopify themes?
A: The app works with all modern Shopify themes. Some customization may be needed for older themes.
Q: Can I export customer data?
A: Yes, you can export customer points, transactions, and tier information from the Analytics > Reports section.
Support & Resources
Get help when you need it with our comprehensive support resources.
Support Channels
- Email Support: support@carenetsolutions.co.uk
- Phone Support: +44 7774 687764
- Live Chat: Available in the app dashboard (Starter plan and above)
- Priority Support: Available for Plus plan customers
- Community Forum: Connect with other merchants and share best practices
Documentation Resources
- This comprehensive documentation guide
- Video tutorials for common tasks
- Step-by-step setup guides
- API documentation (Plus plan)
Training & Onboarding
Plus plan customers receive:
- Dedicated onboarding session
- Quarterly program reviews
- Custom strategy recommendations
- White-glove migration assistance
Contact Us
Get in touch with our team for questions, feedback, or assistance with your loyalty program.
Contact Information
- Email: support@carenetsolutions.co.uk
- Phone: +44 7774 687764
- Support Hours: Monday – Friday, 9:00 AM – 6:00 PM EST
- Response Time: Within 24 hours (48 hours for Free plan)
Sales Inquiries
Interested in upgrading your plan or have questions about enterprise features?
- Sales Email: support@carenetsolutions.co.uk
- Sales Phone: +44 7774 687764
- Schedule a Demo: Contact us to schedule a personalized demo of our advanced features
Technical Support
Need help with integration, API access, or technical issues?
- Technical Support: Available through the app dashboard (Starter plan and above)
- API Documentation: Available for Plus plan customers
- Integration Help: Our team can assist with custom integrations
Feedback & Suggestions
We value your feedback! Share your ideas and suggestions to help us improve:
- Feature Requests: Email us with your feature ideas
- Bug Reports: Report any issues you encounter
- User Feedback: Share your experience and suggestions